Hello, and welcome to my personal hell blog!
I will be covering an assortment of topics, tips & tricks, a few gotchas, and downright randomness in this blog. Sit tight, grab a cup of coffee [or tea], and prepare for some of the most disorganized collection of information, hopefully laced with a dash of "a-ha! so that's what that means..." every now and then
I'm X0RW3LL. I'd like to think I have absolutely no idea what I'm doing, but that's okay; no one really does. However, every now and then, every last one of us faces a point when they have to make a choice whether or not they'd like to keep things the way they are. I'm very curious by nature, and that's what I use to fuel this hunger for knowledge
In making this blog, I hope I can inspire anyone reading it to push for more understanding of things. This is not a guide by any means, nor should you treat it as such; it's simply my way of going about problem solving (where research topics are concerned), or simply an attempt at immortalizing a snapshot of this meat suit's stream of thoughts. Who knows; maybe someday, a highly advanced intelligence will come across this and look a little something like this

That being said, let's dive right into it. Check out the topics that might interest you most using the chapter outline in the collapsible left-side table of contents. This website is powered by mdbook, so feel free to use whichever dark/light mode theme you prefer
Changelog
2025-02-21
- Git: added a new entry for Git
2025-02-13
- Python: added a new entry for Python
- Removed {misc,thoughts}
- Unreferenced dead links
- Reordered chapter index
2024-12-26
- apt-patterns: added apt-patterns demo
2024-09-14
- Exhibit D: Look how they massacred my perms: added permissions demo
- Exhibit E: Can't see me: added broken DISPLAY demo
- Exhibit F: Merciless killing: added demo for killing wrong PIDs by mistake
2024-09-13
- Exhibit C: The case against /usr/local: added demo for Python/pip issues
2024-08-05
- Tips, Tricks, and Gotchas - The Root of All Evil: added the long-awaited yelling at root lovers
2024-02-25
- DANGER ZONE: introduced a new chapter; thoughts on things
2024-02-15
- Music: updated highlights
- Series TV: added a new comedy show
- Tips, Tricks, and Gotchas - Bash: added Bash tips
- Tips, Tricks, and Gotchas - Functions & Aliases: added Bash functions and aliases
The Root of All Evil
Prologue
The year is 2024 AD. We have flying cars (sort of), Quantum technology, potential cures for cancer, new and powerful space telescopes, and users still use sudo/root for EVERYTHING. It's as if the entire world moved on, and a significant subset of users decided to stick to the past and horrible opinions/advice some other misinformed users left some 5, 10, or 15 years ago. If you're given this link, you need to read on. Stick around because there are real demos which will deliver the point straight to your proverbial doorstep
What the hell is root, sudo, or any of that witchcraft?
Let's think of your operating system as a car for a moment. For the sake of simplicity, we're doing good ol' pre-2000s tech, so no Engine Start/Stop buttons, nothing fancy; as simple as it is to insert the key and switch. As an "unprivileged user", you're free to turn on the cabin lights, turn the steering wheel to a certain degree, move a few things around here and there, but not much beyond that. What if you need to, say, start moving? Well, you switch the key to ignition, start the car and off you go. That right there is a "privileged" operation, meaning you need to 1) have the key, and 2) actually start the car
Now, imagine how absurd it would be to start the engine just to turn on the cabin lights, only to switch it off after. This is your brain on drugs what you're doing when you do something like sudo ssh user@host, root@kali~:# echo "I am going to do EVERYTHING as root because I can"
Back to starting the engine just to turn on the cabin lights analogy. Let's think about why that's a bad idea:
- Fuel, oil, and coolant are wasted
- Environment's polluted over something that never warranted that action
- Gears, belts, spark plugs, and any/all parts involved in the process are worn out (however insignificant this might be, it ultimately adds up on the long run)
- Battery life's degraded
- ... (you get the idea by now)
Now, let's leave the garage and come back to technicalities. Remember: turning on the cabin lights is any action your unprivileged user can do, and starting the engine and driving is anything your privileged user(s) can perform. In techy-techy terms, privileged actions require privileged access
But what are privileged actions? Here are a few examples:
- Managing system services
- Modifying system files
- Managing packages
- Sending RAW packets
- Modifying files belonging to other users/groups
- Capturing packets
- [Un]loading kernel modules
- Modifying kernel command-line params
- Modifying boot entries
Anything that does not require privileged access SHOULD NOT be given one. Here are some examples:
- Starting the browser to navigate the World Wide Web (if you do this as a privileged user, please throw your laptop out the window until you understand why that's terrible)
- Reading, writing, executing, and/or removing (user|group)-owned files
- SSH, SMB, FTP, TELNET, SMTP, SNMP, HTTP, ... access
- Managing user services
- Running most programs (unless otherwise prompted for privileged access)
- ... (the list goes on)
What's actually so bad if I perform everything I want while privileged?
Where do we even begin? Let's populate a list of things:
- Dear baddies, here's my entire computer at your disposal, with love xoxo (see Exhibit A: Mi Kali, su Kali <3)
- Accidental data loss (
sudo rm -rf /oops/i/didnt/mean/to/remove/the/entire/etc/directory111one1eleven1) (see Exhibit B: O' Filesystem, where art thou?) - Python import path conflicts (see Exhibit C: The case against /usr/local)
- Broken permissions? Who needs 'em anyway, amirite? (see Exhibit D: Look how they massacred my perms)
- Wait, wtf is
DISPLAY :0? And why can't root just "open" it? (see Exhibit E: Can't see me) - Oh, you killed the wrong PID? Sucks to be you (see Exhibit F: Merciless killing)
Let's face it: we ALL make mistakes. Some of these mistakes might be forgivable, and some others...not so much. Deleting a text file that just says "test" is meh, but deleting an entire directory like /usr, /boot, /etc, or whatever else by mistake? That's an unforgivably expensive mistake with no one to blame but yourself. You might think "oh, I definitely know better than all those losers that don't know what they're doing", and you'd still be absolutely wrong. Everyone makes mistakes; you, me, that guy over there, that girl on the other side of the globe, those people studying arctic climate--everyone. You're certainly not better, but if you let your ego take you down that joyride, by all means enjoy it until you don't.
And yes, some programs WILL NOT actually work as sudo/root because of the different shell/environment variables available to your user vs sudo/root. The most critical thing that can happen to you, from a security standpoint, is running unknown binaries/code 1) as root, and 2) without FULLY understanding what they do. Sit tight; this is gonna be demoed next
Ugh, I just hate having to type my password every N minutes
Stop being lazy. I'm not gonna sugarcoat anything here. I'd rather type my complex password 300 times a day than take the risk with any of the aforementioned mishaps/dangers. The "convenience" factor is just not worth it for me. If you absolutely must, maybe extend your token validity (NOT recommended, but up to you), or turn to other means of authentication (again, up to you; we're not covering those here)
Closing thoughts
You're a supposed "security professional". If I were your client, and you told me that running this web application as root is terrible practice whilst having root@kali:~# in your screenshots, I'd never be inclined to do any future business with you. Plain and simple. If you're not practicing what you're preaching, your legitimacy will be questioned. Again, I'm not shying away from calling out bad practices. If you wanna get places in this industry, learn to do things correctly. If not for anything else, at least for yourself and your own systems' sake, and more importantly, for doing things the right way. Additionally, this entire topic was already covered some 5 years ago in this blog post by the Kali dev team. Please make a habit of reading docs and blog posts; they're there to help you
Exhibit A: Mi Kali, su Kali <3
In this quick demo, we will show how an attacker can quickly (and effortlessly) gain a root shell on your system because you decided to clone a questionable Git repository and executed the script(s)/binaries it provided as root
Enter: CNoEvil
CNoEvil is a fictitious repository that provides an "LDAP exploitation and scanning" script. The source code thereof will not be released, but I will walk you through what I did. The instructions shown in the README are as follows:
root@kali:~# git clone git@github.com:X0RW3LL/CNoEvil.git
root@kali:~# cd CNoEvil/
root@kali:~/CNoEvil# pip3 install -r requirements.txt
root@kali:~/CNoEvil# python3 ldapscan.py

LDAP scanner that utilizes state of the art
enumeration technologies and some fancy
military-grade AES-256 encryption that
obfuscates request payloads and hides
your traffic like the world is after you

Usage: ldapscanner.py [options] <IP>

Options:
     -h:     print this help message
     -e:     exploit mode
     -d:     DoS mode
     -l:     LDAP scanner
...
We can tell that the author implied running those steps as root as shown in the PS1 prompt root@kali:~#. Moreover, there's a considerable number of users who login as root by default anyway, and that's the audience I'm addressing. Now, let's have a look at the requirements.txt file:
urllib3==1.26.0
pytest-httpbin==1.0.0
requests>=2.28.2,!=2.26.0,!=2.27.1,!=2.27.0
./dist/requestd-2.28.2-py3-none-any.whl
ldap3>=2.5,!=2.5.2,!=2.5.0,!=2.6,!=2.5.1
pyOpenSSL>=21.0.0
colorama==0.4.6
Notice anything yet? The requirements list a typosquatted Python package requestd that was shipped along with the repo when it was cloned. That typosquatted malicious package does not need anything extra from the user's end; it fires the reverse shell as soon as the package is imported. Best part is: package is imported along with ANY selected argument (with the exception of -h to not raise suspicions). Even better: there's no explicit import statement for requestd--that import statement was rather obfuscated (however rudimentarily for the sake of this demo)
x0rw3ll@1984:~/dev/CNoEvil$ wc -l ldapscan.py
1812 ldapscan.py
x0rw3ll@1984:~/dev/CNoEvil$ grep import ldapscan.py
import os
from time import sleep
from multiprocessing import Process
    import sys
sale, or importing the Program or any portion of it.
make, use, sell, offer for sale, import and otherwise run, modify and
x0rw3ll@1984:~/dev/CNoEvil$ grep requestd ldapscan.py
x0rw3ll@1984:~/dev/CNoEvil$
You'd think an 1812-line script would be something solid, but no. You absolutely must scrutinize it to the core. If you inspect the source code, you'll find the script doesn't really do anything at all. No, really, it doesn't. It adds random sleeps, some bogus shell output, while it calls back to the attacker's machine. Let's look at an example snippet:
def ldap_exploit(ip=''):
    print('[+] Initiating LDAP exploitation...')
    sleep(3)
    print('[+] Exploiting target: {}'.format(ip))
    sleep(1)
    print('[+] LDAP running on port 389')
    sleep(2.6)
    print('[+] Connected to LDAP Server successfully! Exploitation in progress...')
    print('[!] This might take a moment...DO NOT press any key until prompted!')
    sleep(0.5)
    if os.fork() != 0:
        return
    print('''
[+] Shell landed on target! Spawning shell...

Microsoft Windows [Version 10.0.16299.15]
(c) 2017 Microsoft Corporation. All rights reserved.

C:\Windows\System32>''')
    print('[-] Host terminated the connection unexpectedly')
    enc_key = xor(IV)
It really is just a fake shell printer (trololol, amirite?), but you wouldn't know that without reading the script, now would you? Let's move on to the part where you finally get owned. You'd think that running the code in a Python virtual environment would save you, but that couldn't be further from the truth. Venvs serve a specific purpose, and it has absolutely nothing to do with security
Demo time
In this demo, I am using my Kali on metal as the attacker machine (bottom terminal window), and a containerized Kali based on my filesystem (top terminal window). My attacker IP is 172.20.10.1, and the would-be victim IP is 172.20.10.50. Moreover, the victim container is running a Python venv called CNoEvil, following the README instructions and running everything as root. The victim container has a lighter/blue background color for visual distinction
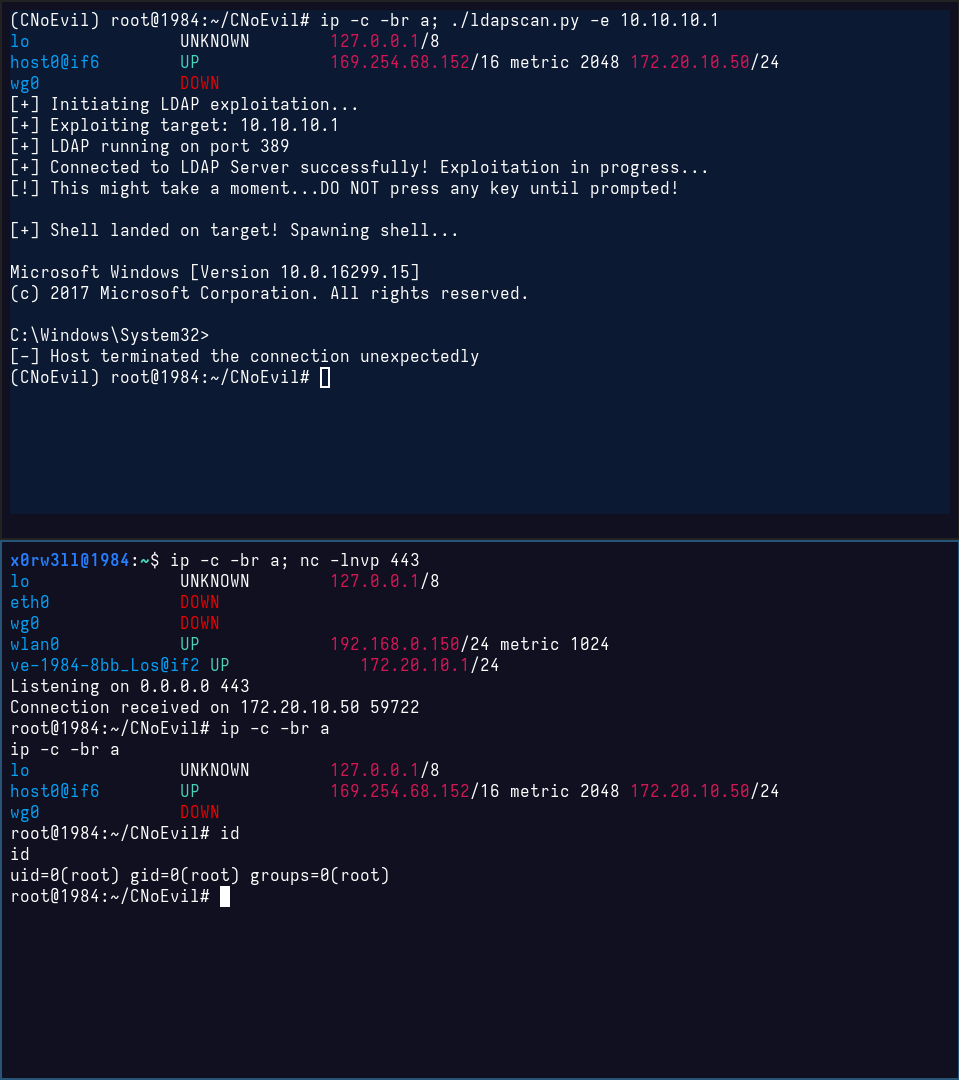
Moving forward
All the above being said and done, please heed this warning as you could very well become the next victim to such attacks
- Do not login as root
- Do not execute scripts you cannot vet (or have them vetted by some reputable, trustworthy entity)
- Do not clone repositories as root/with sudo
Exhibit B: O' Filesystem, where art thou?
Enter: rm -rf / --no-preserve-root
We've all seen it, and we've laughed at all the memes, but we cannot disregard the fact that it is a very real thing that can (and will) happen to everyone. I'm not talking specifically about rm -rf / --no-preserve-root, but the fact that everyone's bound to accidentally delete something. Let's destroy some filesystems, shall we?
I will be demoing removing the entire filesystem inside the ephemeral container, and that's enough to demonstrate the extent of the damage caused. Apply this to any directory that shouldn't have been mistakenly deleted in the first place, and you get the point
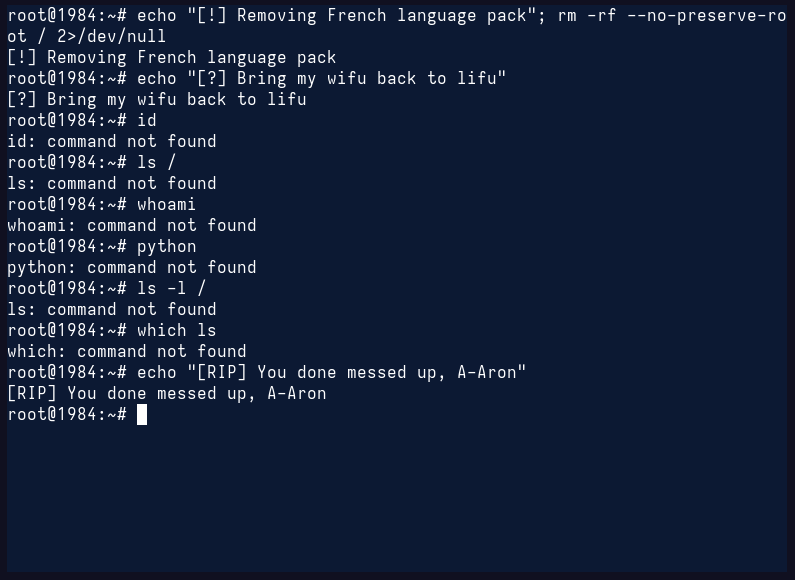
Exhibit C: The case against /usr/local
Prologue
This is a special one. Probably one everyone hates the most. The crown jewel of the most common issues with privileged execution of commands. It's no secret that Python is one of the most infamous languages out there, and it's no secret either that almost everyone knows what pip is; Python's package manager. In the past, pip might not have been such an issue (for the most part). Nowadays, however, pip is synonymous with nothing but "trouble"
Import Paths
Let's talk about your $PATH environment variable for a moment. When you type the name of a program, say, nmap, how does the shell know to autocomplete the binary name, let alone launch it?
Autocompletion technicalities aside, at a very basic level, the shell will start searching the $PATH environment variable for possible locations that hold said binary. This is certainly better than having to type, say, /usr/bin/nmap or /usr/sbin/poweroff. Neat, right?
Now, Python works on the same principle, more or less. When you import a library, Python will look for the default path where packages get installed (i.e. /usr/lib/pythonX/dist-packages/), where X is the version. Let's see that in action with a library everyone knows; requests. python3-requests is installed on Kali by default as it's a dependency for a considerable number of tools, so it's a good candidate for this demo
x0rw3ll@1984:~$ systemd-detect-virt
none
x0rw3ll@1984:~$ pip3 show requests
Name: requests
Version: 2.31.0
Summary: Python HTTP for Humans.
Home-page: https://requests.readthedocs.io
Author: Kenneth Reitz
Author-email: me@kennethreitz.org
License: Apache 2.0
Location: /usr/lib/python3/dist-packages
Requires:
Required-by: censys, crackmapexec, dropbox, faraday-agent-dispatcher, faraday-plugins, faradaysec, netexec, pyExploitDb, pypsrp, python-gitlab, pywinrm, requests-file, requests-toolbelt, theHarvester, tldextract
x0rw3ll@1984:~$ python3 -c 'import requests; print(requests)'
<module 'requests' from '/usr/lib/python3/dist-packages/requests/__init__.py'>
x0rw3ll@1984:~$
As we can see from the above output, this is running on metal, with no externally-managed packages installed via pip. The default path, as previously mentioned, is indeed /usr/lib/python3/dist-packages. We can also confirm this with pip list --path /usr/lib/python3/dist-packages
x0rw3ll@1984:~$ pip list --path /usr/lib/python3/dist-packages/
Package                        Version
------------------------------ -------------------------
aardwolf                       0.2.8
adblockparser                  0.7
aesedb                         0.1.3
aiocmd                         0.1.2
aioconsole                     0.7.0
...
zope.deprecation               5.0
zope.event                     5.0
zope.interface                 6.4
zstandard                      0.23.0.dev0
pip happily lists all the packages installed in that location, which is everything currenlty installed with its package name prefixed with python3-
Enter: Trouble
We'll now switch contexts; we'll spin up an ephemeral container based on the host file system so that we retain the same packages and everything in its place, and not mess up the actual host with potentially breaking changes. Additionally, we'll be running everything as root for maximum effect. I will be using run0 instead of sudo to switch users so systemd can give us the nice, bright red background color. We'll use pip to install requests again with switches instructing it to break system packages, and ignore currently installed packages. This is done for demonstration purposes only, and should not be used for the trouble that ensues. Recall from the output above showing requeststhat the currently installed version is 2.31.0
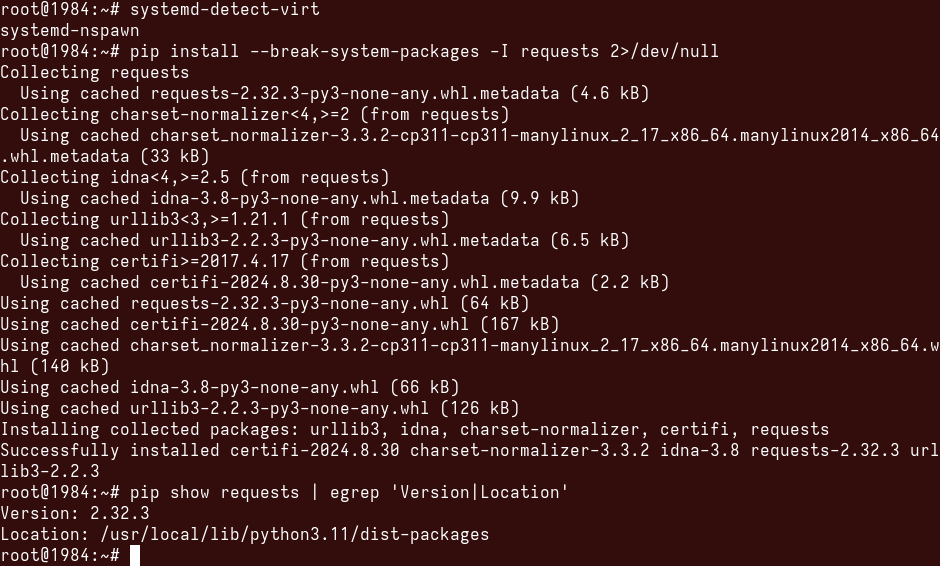
Note how pip now reports the package being installed to /usr/local/lib/python3.11/dist-packages instead of /usr/lib/python3/dist-packages? Let's double-check whether the system-wide installation of python3-requests still exists
root@1984:~# pip list --path /usr/lib/python3/dist-packages | egrep '^requests '
requests           2.31.0
root@1984:~# pip list --path /usr/local/lib/python3.11/dist-packages | grep requests
requests           2.32.3
root@1984:~#
Now we have a real problem: we have two different versions of requests, namely 2.31.0 and 2.32.3 installed in two different locations; /usr/lib/python3/dist-packages and /usr/local/lib/python3.11/dist-packages. What does this mean? Well, different programs/scripts will be extremely unreliable when it comes to importing requests. They might end up importing one version or the other, depending on who's calling, where, under which context, etc. Moreover, some tools will have exactly equal Depends. That means that the tool is designed to work with a specific version of a library. This might be due to deprecated APIs, or other decisions made by the tool developer(s)
Demo
Let's see that in action with a package that will indeed throw some functionality-breaking errors; impacket. Here's what we have so far (before installing the externally-managed impacket package)
root@1984:~# apt policy python3-impacket; apt rdepends python3-impacket; pip show impacket
python3-impacket:
  Installed: 0.11.0+git20240410.ae3b5db-0kali1
  Candidate: 0.11.0+git20240410.ae3b5db-0kali1
  Version table:
 *** 0.11.0+git20240410.ae3b5db-0kali1 500
        500 https://kali.download/kali kali-rolling/main amd64 Packages
        500 https://kali.download/kali kali-rolling/main i386 Packages
        100 /var/lib/dpkg/status
python3-impacket
Reverse Depends:
  Depends: netexec (>= 0.11.0+git20240410)
  Depends: wig-ng
  Depends: spraykatz
  Depends: smbmap
  Depends: set
  Depends: redsnarf
  Depends: python3-pywerview
  Recommends: python3-pcapy
  Depends: python3-masky
  Depends: python3-lsassy
  Depends: python3-dploot
  Depends: polenum
  Depends: patator
  Recommends: openvas-scanner
  Depends: offsec-pwk
  Depends: impacket-scripts (>= 0.11.0)
  Depends: koadic
  Depends: kali-linux-headless
  Depends: autorecon (>= 0.10.0)
  Depends: hekatomb
  Depends: enum4linux-ng
  Depends: crackmapexec
  Depends: coercer
  Depends: certipy-ad
  Depends: bloodhound.py
Name: impacket
Version: 0.12.0.dev1
Summary: Network protocols Constructors and Dissectors
Home-page: https://www.coresecurity.com
Author: SecureAuth Corporation
Author-email:
License: Apache modified
Location: /usr/lib/python3/dist-packages
Requires:
Required-by: crackmapexec, dploot, lsassy, netexec
root@1984:~#
As we can see, python3-impacket has quite a number of reverse dependencies that may very well end up breaking. Let's break some!
After installing the package with pip as root, we get the following information
root@1984:~# pip show impacket
Name: impacket
Version: 0.11.0
Summary: Network protocols Constructors and Dissectors
Home-page: https://www.coresecurity.com
Author: SecureAuth Corporation
Author-email:
License: Apache modified
Location: /usr/local/lib/python3.11/dist-packages
Requires: charset-normalizer, dsinternals, flask, future, ldap3, ldapdomaindump, pyasn1, pycryptodomex, pyOpenSSL, six
Required-by: crackmapexec, dploot, lsassy, netexec
root@1984:~#
Right off the bat, besides the obvious location, we now have a downgraded version of impacket. Why is that? For starters, PyPI might not have been updated with the latest release of the package, while the Debian Python Team has taken the lead on that one, building the 0.12.0.dev1 release, as opposed to 0.11.0. Let's now try running some of our favorite impacket examples and see what happens
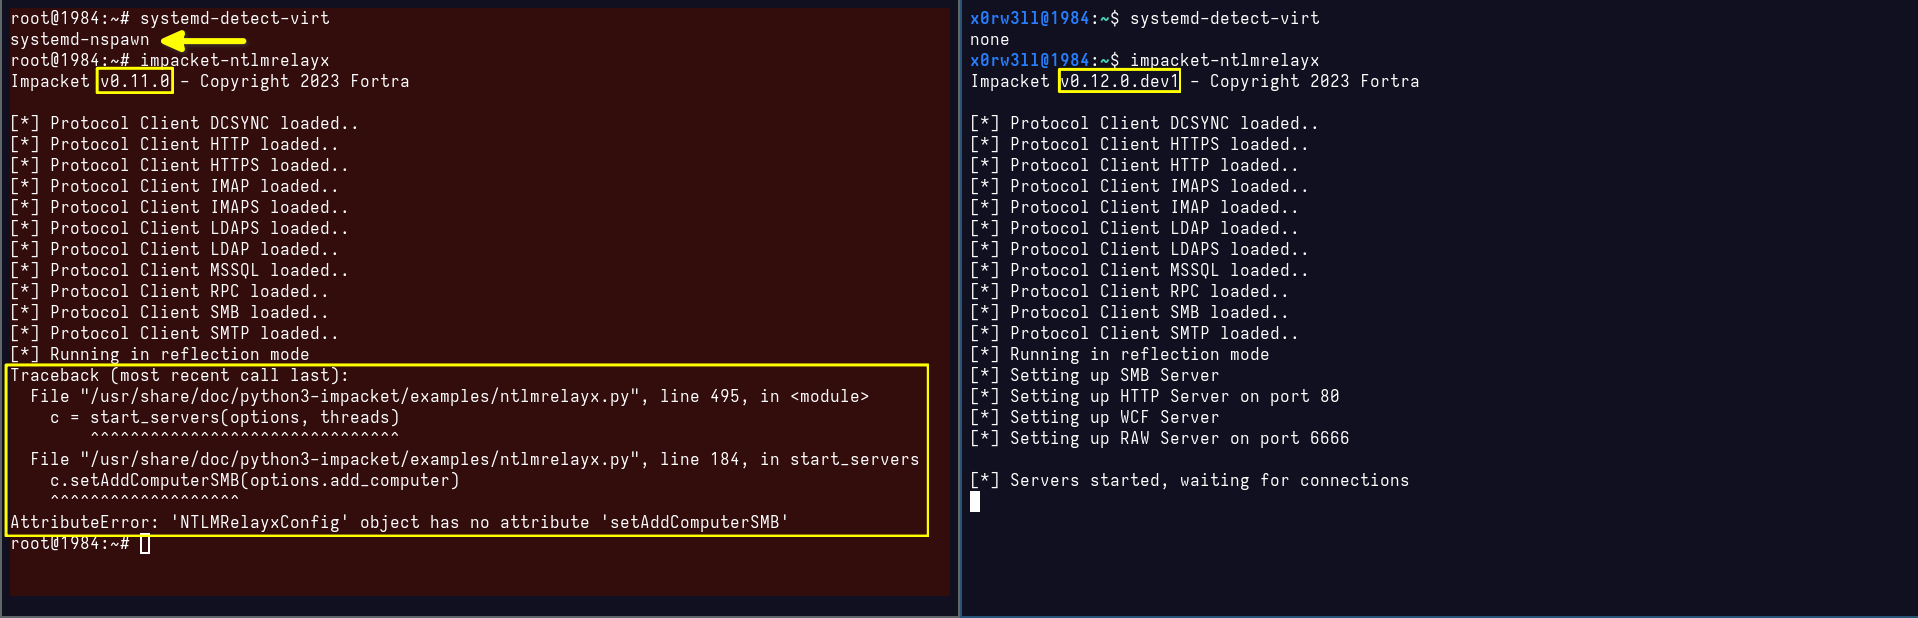
Sure enough, we definitely broke system packages! Even worse, the above error output doesn't even say much about what's actually wrong; it just complained that NTLMRelayxConfig has no attribute setAddComputerSMB. This attribute could have been added in the newer release of the package, or a result of conflicting import paths; one would have to really dig into it, line by line, to figure out where/what the problem is
Fixing the mess
The million-dollar question is: how does one fix this dependency hell? The answer is quite simple, really. All we need to do is filter those packages located at /usr/local/lib/python*/dist-packages, and uninstall them with elevated privileges much like they were originally installed. At this point, saving the package list to a file can be a good idea in case we want to install some of those packages properly later. For the purpose of this demo, I am going to have a bunch of externally-managed packages installed via pip so we can take a look at automating an otherwise tedious process
┌──(test㉿1984)-[~]
└─$ pip list --path /usr/local/lib/python3.11/dist-packages/
Package            Version
------------------ ---------
aesedb             0.1.6
aiosmb             0.4.11
aiowinreg          0.0.12
asn1crypto         1.5.1
asyauth            0.0.21
asysocks           0.2.13
blinker            1.8.2
certifi            2024.8.30
cffi               1.17.1
chardet            5.2.0
charset-normalizer 3.3.2
click              8.1.7
colorama           0.4.6
cryptography       43.0.1
dnspython          2.6.1
dsinternals        1.2.4
Flask              3.0.3
future             1.0.0
h11                0.14.0
idna               3.8
impacket           0.11.0
itsdangerous       2.2.0
Jinja2             3.1.4
ldap3              2.9.1
ldapdomaindump     0.9.4
lsassy             3.1.12
markdown-it-py     3.0.0
MarkupSafe         2.1.5
mdurl              0.1.2
minidump           0.0.24
minikerberos       0.4.4
msldap             0.5.12
netaddr            1.3.0
oscrypto           1.3.0
prompt_toolkit     3.0.47
pyasn1             0.6.1
pycparser          2.22
pycryptodomex      3.20.0
Pygments           2.18.0
pyOpenSSL          24.2.1
pypykatz           0.6.10
requests           2.32.3
rich               13.8.1
six                1.16.0
tabulate           0.9.0
tqdm               4.66.5
unicrypto          0.0.10
urllib3            2.2.3
wcwidth            0.2.13
Werkzeug           3.0.4
winacl             0.1.9
As we can see, there's a considerable number of externally-managed packages that need to be dealt with. Since we're all about automation, let's get creative with a one-liner that does just that
┌──(test㉿1984)-[~]
└─$ pip list --path /usr/local/lib/python3.11/dist-packages/ | cut -d ' ' -f1 | egrep -v '^Package|---*' | tr '\n' ' '
aesedb aiosmb aiowinreg asn1crypto asyauth asysocks blinker certifi cffi chardet charset-normalizer click colorama cryptography dnspython dsinternals Flask future h11 idna impacket itsdangerous Jinja2 ldap3 ldapdomaindump lsassy markdown-it-py MarkupSafe mdurl minidump minikerberos msldap netaddr oscrypto prompt_toolkit pyasn1 pycparser pycryptodomex Pygments pyOpenSSL pypykatz requests rich six tabulate tqdm unicrypto urllib3 wcwidth Werkzeug winacl
We used cut -d ' ' -f1 to simply grab the first thing that's not a space, which happens to be the package names. We then egrep -v '^Package|---*' to filter out irrelevant output that would break the uninstall process since Package and --------- are obviously not valid Python packages. Finally, we used tr '\n' ' ' to translate newlines into spaces instead. Now that we got the desired output, let's incorporate it into the final pip command
┌──(test㉿1984)-[~]
└─$ sudo pip uninstall -y $(pip list --path /usr/local/lib/python3.11/dist-packages/ | cut -d ' ' -f1 | egrep -v '^Package|---*' | tr '\n' ' ')
Found existing installation: aesedb 0.1.6
Uninstalling aesedb-0.1.6:
  Successfully uninstalled aesedb-0.1.6
Found existing installation: aiosmb 0.4.11
Uninstalling aiosmb-0.4.11:
  Successfully uninstalled aiosmb-0.4.11
Found existing installation: aiowinreg 0.0.12
Uninstalling aiowinreg-0.0.12:
  Successfully uninstalled aiowinreg-0.0.12
...
To confirm, we can run the listing again, and sure enough, all those externally-managed packages are now a thing of the past
Closing thoughts
Luckily, pip is now becoming more a thing of the past, and I do hope it gets sunset soon. Switches like --break-system-packages have been added as a deterrent to stop users from, well, breaking system packages. I cannot stress enough how terrible an idea it is to keep running everything as a privileged user all the time. Again, it does way more harm than good, and even if you do know what you're doing, you're still very much prone to making mistakes; we're all human, remember? We do make mistakes. Should you need to install Python packages, search the package repos for them first using apt search. If they exist, they will be prefixed with python3-. If they don't exist, you can always create virtual environments that will take care of path separation for you, and avoid breaking your currently installed packages
Further reading
- https://www.kali.org/blog/kali-linux-2023-1-release/#python-updates--changes
- https://peps.python.org/pep-0668/
- https://docs.python.org/3/library/venv.html
Exhibit D: Look how they massacred my perms
The basics
Let's talk about permission bits for a moment. Assume we have a file with the following permission bets set: -rwxrwxrwx. It should already be obvious there's some sort of a pattern here, but in case that wasn't clear enough, let's dissect it
We notice there are 4 main segments to these bits
# See chmod(1) for more information

r: read
w: write
x: execute (or search for directories)
X: execute/search only if the file is a directory or already has execute permission for some user
s: set user or group ID on execution
t: restricted deletion flag or sticky bit

- [rwx] [rwx] [rwx]
The first field can either be a - or a d for file, or directory, respectively
The first segment of [rwx] is owner permissions. Second is group, and third is "others". The account that first created the file would be its owner, and if the account belongs to a certain group, the file might also belong to that same group; meaning other members of the same group might be able to read the file as well, given correct permission bits are set. The final segment refers to others, meaning anyone else who's not 1) the owner, and 2) part of the group that owns the file
If you've ever looked up file permissions, you must have come across something like chmod 0777 <file>. What do these numbers mean? This would be what's known as numeric mode. Permission bits can be represented by octal digits, ranging from 0-7, derived by adding up the bits with the values 4, 2, and 1. First digit (0 in this case) selects the set user ID, set group ID, and restricted deletion/sticky attributes. Second digit selects the permissions for the user who owns the file (read (4), write (2), and execute (1)). Third selects permissions for other users in the same group, and fourth selects permissions for other users not in the file's group
In the case of -rwxrwxrwx, we agreed that we have 3 segments; rwx for each. Let's add them up; r = 4, w = 2, x = 1
4+2+1=7, therefore the first digit becomes 7. Same for the second and third, ergo 777. First digit, when omitted, is assumed to be a leading zero
Now, what if the file permissions are as follows: -rw-------. The segments are: rw-, ---, and ---. Add them up: 4+2+0=6. Omitted digits are zeros, remember? Therefore, octal permissions are 0600 in this case, meaning only the file owner has read and write permissions to the file, and everyone else cannot read, write, or execute/search for the file. Now you know why OpenSSH private keys are set with these permission bits by default; no one else should ever be able to read them but their respective owner alone. We've got the basics covered, yes? Let's move on
Why permissions are important
Your file system is not up for public demonstration, hey. Every user or group on the system should be able to enjoy the right to privacy to their files and how they want to control them. For example, I think we can all agree that the shadow file /etc/shadow should never, ever, be publicly readable by anyone waltzing in on the system without proper access rights, yes? It's the database that holds the hashed passwords of every user on the system after all. Imagine how easy it would have been if everyone could read that database, let alone modify it. From a security standpoint, permission bits can be considered the bare minimum anyone can adopt to place any sort of restrictive access controls to files and directories in the file system
Demo I: Fictitious perms for demonstration purposes
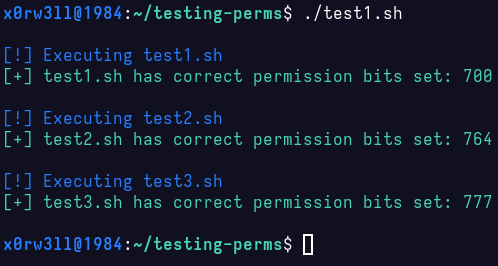
For this demo, I've set up 3 scripts with different permission bits set. Each script checks its own permissions, and if they match, it calls the next script which does the same. This specific demo will highlight one thing many like to do, with little-to-zero idea what it does or why: sudo chmod -R 777 /path/to/some/directory
Before we go ahead, this is something you should never do unless you absolutely know what you're doing and why you're doing it. Do not follow random "advice" you find on forums, even if some of the answers swear it worked for them. Just because something works, it doesn't mean it was done correctly
Let's have a look at what the scripts do, and what their permissions are
x0rw3ll@1984:~/testing-perms$ ll
total 12
-rwx------ 1 x0rw3ll x0rw3ll 393 Sep 14 14:44 test1.sh
-rwxrw-r-- 1 x0rw3ll x0rw3ll 393 Sep 14 14:44 test2.sh
-rwx--x--x 1 x0rw3ll x0rw3ll 385 Sep 14 14:44 test3.sh
x0rw3ll@1984:~/testing-perms$ for i in `ls`; do echo $i; cat $i; echo; done
test1.sh
#!/usr/bin/bash

r="\e[31m"
g="\e[32m"
b="\e[34m"
e="\e[0m"
perms=`stat -c %a $0`
filename=`echo $0 | cut -d '/' -f2`

printf "\n%b[!] Executing $filename%b\n" $b $e

if [ $perms == 700 ]
then
  printf "%b[+] $filename has correct permission bits set: $perms%b\n" $g $e
  ./test2.sh
else
  printf "%b[-] $filename has incorrect permission bits set: $perms -- Expected: 700%b\n" $r $e
  exit 1
fi

test2.sh
#!/usr/bin/bash

r="\e[31m"
g="\e[32m"
b="\e[34m"
e="\e[0m"
perms=`stat -c %a $0`
filename=`echo $0 | cut -d '/' -f2`

printf "\n%b[!] Executing $filename%b\n" $b $e

if [ $perms == 764 ]
then
  printf "%b[+] $filename has correct permission bits set: $perms%b\n" $g $e
  ./test3.sh
else
  printf "%b[-] $filename has incorrect permission bits set: $perms -- Expected: 764%b\n" $r $e
  exit 1
fi

test3.sh
#!/usr/bin/bash

r="\e[31m"
g="\e[32m"
b="\e[34m"
e="\e[0m"
perms=`stat -c %a $0`
filename=`echo $0 | cut -d '/' -f2`

printf "\n%b[!] Executing $filename%b\n" $b $e

if [ $perms == 777 ]
then
  printf "%b[+] $filename has correct permission bits set: $perms%b\n\n" $g $e
else
  printf "%b[-] $filename has incorrect permission bits set: $perms -- Expected: 777%b\n\n" $r $e
  exit 1
fi

x0rw3ll@1984:~/testing-perms$
Fairly straight forward. Let's see what happens when we execute
Now, let's do the stupid thing; chmod 777 * inside the testing-perms directory, and see how that plays out
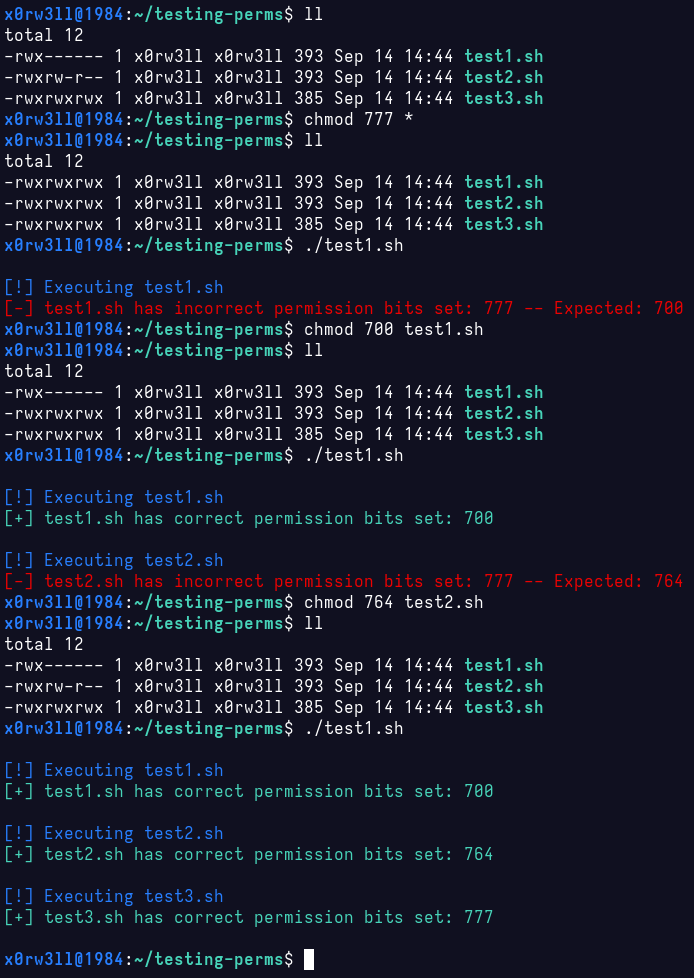
Bear in mind you'll likely never run into a situation where you'll be given some handy guide with all the correct file permissions outlined therein. Often times, permissions will be provided as-is, and should not be modified unless, again, you know what you're doing and why. Imagine you did something incredibly stupid like sudo chmod -R 0777 /; this is 100% guaranteed to break your system beyond actual repair. There's just no way to keep track of which file(s) had which permissions, not to mention that it would take literal ages to go through every single file that was affected. It gets worse; at least sudo prompts you for a password (given the token's expired). Imagine running that as root, without paying attention to what file/directory you're modifying. Good luck with that!
Demo II: OpenSSH keys
This one is more functional, and is often a point of headaches. The principal is the same, really, but I'm inviting you to think about what happens when you, say, sudo wget http://target/main.php?include=/path/to/id_rsa. Or when you download an OpenSSH private key file without remembering to set the proper permissions to it. If you've ever connected to, say, an AWS EC2 instance, you might remember it instructing you to set the key perms to 0400 before connecting. 0400 is more restrictive than 0600 since only the read bit is set, but no write is allowed

Closing thoughts
Hopefully those demos give you better insights into avoiding bad habits. Permissions are no joke, and can be a massive security risk if set incorrectly. Moreoever, you should always read error output; error messages are there to help you diagnose issues and troubleshoot them
Exhibit E: Can't see me
About DISPLAY
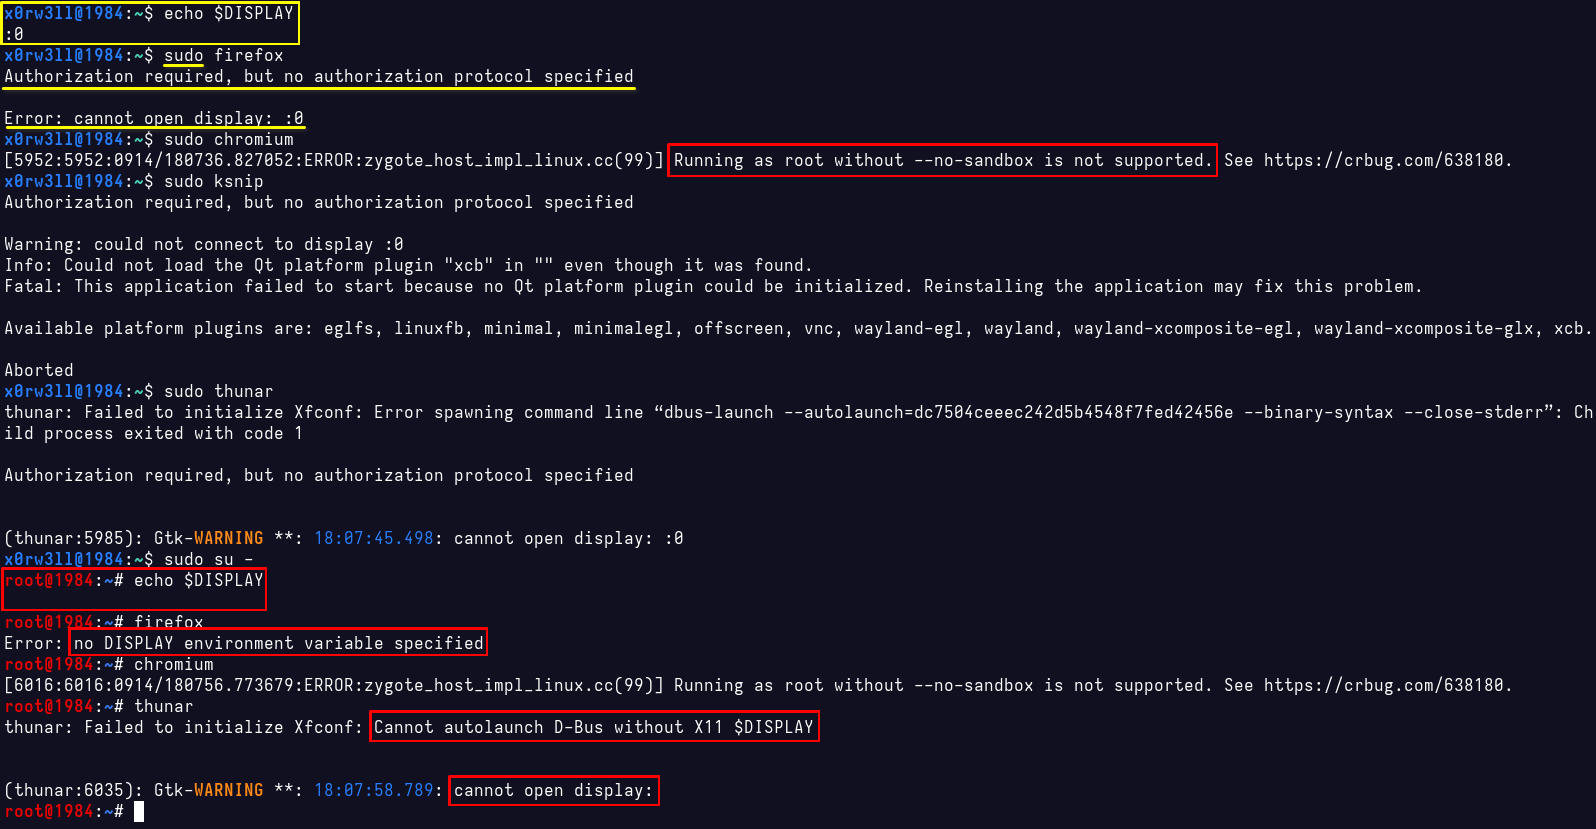
Let's talk about environment variables once more, specifically the DISPLAY variable this time. This variable, when set, tells programs what the current display is so they can draw their graphics on that display. Easy, right? Usually, it's set to :0, but it can also be something like :0.0. You can also have multiple displays, and instruct each program to draw its graphics by setting the DISPLAY variable beforehand. So who has the authority to those displays? The user running them!
After booting up the system, you're greetd (SWIDT?) with the login manager where you're prompted for your username and password. Once you're logged in, and you can already see the desktop environment, your username with which you logged in now controls that display that's set. It would be such a shame if someone else were to login, remotely, to your system as another user and be able to just see what you're looking at, right? Not only is it a massive security breach, obviously, but it also doesn't make sense. Well, what if you, being physically on the computer, switch users to root, and try running graphical applications? It's still the same. From your system's perspective, those are still very much two completely different users
This one is going to be very short and straight forward: a few examples of programs that can and will break when trying to run everything as sudo/root
IMPORTANT: Browser security
I believe I'd already alluded to that bit earlier, but I'm going to go ahead and emphasize it once more: browsers should never be run as root. Your browser is your gateway to the World Wide Wild Web. You'll see this in action as we try to run Chromium as a privileged user shortly
General word of caution
Whenever possible, and unless otherwise explicitly stated, do not try running graphical programs as a privileged user. One more thing to keep in mind is that not all environment variables are propagated to/shared with other users. This latter point explains why you can't just open or see graphical programs run as root/sudo since their DISPLAY environment variable is not set to your logged in user's
Exhibit F: Merciless killing
Dive right in
Last, but not least: making typos while killing processes. Imagine you want to kill PID 2944, but ended up killing PID 294 instead? The following happens
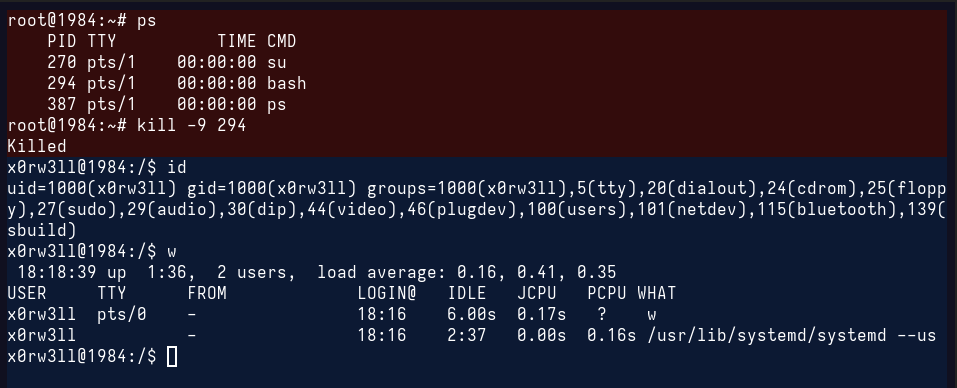
Notice how the colors changed? That signifies the login shell, i.e. Bash, was killed and thereby kicking the root user out of its session. Imagine you did this in the middle of something very important, like halfway through upgrading the system, flashing hardware, or what have you; it can be catastrophic, especially when there isn't really anything to ask whether you really meant to kill a specific process
Bash
Disclaimer: this entry is Bash-specific; some of the tips outlined below might or might not intersect with other shells
NB: Ctrl+ shall be annotated C-. Alt+ shall be annotated M- (as in Meta)
Using an $EDITOR for editing [long] commands
POV you're typing up a long command, and the terminal starts playing tricks on you. Tricks like the cursor moving all the way back to the beginning of the line, [visually] destroying your PS1, and part or all of the command being input. This is often a byproduct of terminal resizing. Let's say you started a maximized terminal window, say 50 rows 190 columns, then you decided to split the terminal vertically. The terminal size is now, say, 50 by 94. Dynamic sizing may not always be 100% reliable in some cases, so what's the best options here?
We can edit the commands using an editor, as opposed to using the shell prompt. I personally prefer using VIM for many reasons, with keybinds and convenience specifically taking the cake. Your preferred editor might be something else, so we're gonna wanna make sure we set the default editor first before proceeding
$ sudo update-alternatives --config editor
There are 4 choices for the alternative editor (providing /usr/bin/editor).

  Selection    Path                Priority   Status
------------------------------------------------------------
  0            /bin/nano            40        auto mode
  1            /bin/nano            40        manual mode
  2            /usr/bin/nvim        30        manual mode
* 3            /usr/bin/vim.basic   30        manual mode
  4            /usr/bin/vim.tiny    15        manual mode

Press <enter> to keep the current choice[*], or type selection number:
It's simple, really; all you have to do is input the Selection index that corresponds to the editor you want to set as a default. I already had vim.basic selected by previously inputting 3. Yours may very well start at 0 (/bin/nano), so you can hit Enter to leave the selected option as-is, or input another index
Next, we'll use Bash's handy edit-and-execute-command by invoking the shortcut combination (Ctrl+x Ctrl+e), or (C-x C-e) as Bash prefers to annotate it in the man-pages. The concept is simple: enter (or edit) whatever command you have, save the buffer and quit to execute said command, or quit without saving to abort it. What happens when you edit a command using an editor is that this command is saved in a temporary file in /tmp/bash-fc.{random-identifier}, then either the command(s) stored in that file are executed (upon saving the buffer and quitting), or the file gets deleted (upon quitting without saving)
Character repitition
This is for all the buffer overflow lovers out there. Have you ever caught yourself doing something silly like python -c 'print("A"*200)'? Let's look at the numbers, Jim; that's about 31 keystrokes, right?
Let's bring those down to 6. Alt+{count}, followed by the character we want repeated, "A" in this case, does just that. Try Alt+200 A; you hold down the Alt key while inputting 2,0,0, release the Alt key, then Shift+a (A)
What about all them hash-passers? I'm talking specifically about the LM portion of NTLM hashes where you want to pass 32 zeros. As you might have already realized, you cannot pass digits as literals for readline. So, how exactly do you do M-32 0 if it's gonna end up thinking you want to repeat 320 characters, whereas you really want 32 zeroes? Well, C-v!
The combo goes as follows: M-32 C-v 0. That is: count 32 (M-32), add the next character (0) typed to the line verbatim (C-v)
Movement
You've entered a somewhat long command, and then you realized you messed up a certain word at the beginning of it, middle, or wherever. Do you keep furiously pressing the arrow keys on your keyboard to move the cursor around? No...No, you do not, my friend. You learn how to do things faster and more efficiently, so let's cover some basics
C-a: move the cursor to the start of the current lineC-e: move the cursor to the end of the current lineC-f: move the cursor one character forwardC-b: move the cursor one character backwardM-f: move the cursor one word forwardM-b: move the cursor one word backward
We can also combine the beauty of readline's convenience with some of the above movements. If you know your way around VIM movements, this part is gonna be breezy for you. Let's have a look at the following example
$ echo The quick brown fox jumps iver the lazy dog|| # where || indicates the cursor position
Let's say we want to jump back to the word "iver" to fix the typo. We can do so by issuing the following combo: M-4-b. That is, move the cursor 4 words back, where "dog" is the first word, "lazy" second, "the" third, and finally "iver" fourth
File/directory name typos
Let's admit it, we've all been there. ls /user/bin, or ls /usr/lin, followed by the inevitable "ugh". No one likes that. Did you know that Bash supports spelling correction? There are some caveats, but I'll leave those for you to figure out. Hint: chained commands, cursor position, starting versus ending characters
Let's have a look at the following example where we messed up not one, but three words. Normally, we'd either rewrite the entire thing, or go back one character/word at a time, which is not cool
$ ls -l /user/bim/vash
So how do we fix this quickly? C-x s. That is Ctrl+x then s. It really is that simple. We go from /user/bim/vash to /usr/bin/bash. Pretty cool, eh?
Text manipulation
C-d: delete the character under the cursor (forward deletion)M-d: delete the word under the cursor (forward deletion)C-w: delete one word behind the cursorC-u: delete everything behind the cursorM-r: revert changes made to current lineM-#: comment out the current line (useful if you wanna hold onto a command for later reference)M-t: transpose words behind the cursor (useful for flipping argument ordering, for example)C-t: transpose characters behind the cursor (useful for fixing typos likeclaer=>clear)M-l: lowercase word under the cursorM-u: uppercase word under the cursorM-c: capitalize word under the cursor
Macros
Let's say there's a handful of repeating commands/functions that you'd like to issue, but you couldn't be bothered to write a script/alias/function for it, or you simply only need them for that one shell session. This is where keyboard macros shine. The process is as follows: start recording the macro, type out (and/or execute) whatever commands to be recorded, end the macro recording, and finally execute the macro at any point later in the same shell. Here's an example
# Ctrl+x (
$ echo hello world # this is where you start typing
hello world
# Ctrl+x )
# Notice we ended the recording _after_ executing the command
# meaning invoking the macro will _also_ execute the command
# Ctrl+x e
$ echo hello world
hello world
Functions & Aliases
Hot tip: don't flood your ~/.bashrc with function/alias declarations. You can offload those to ~/.bash_aliases instead if your distro sources it by default
This is going to include some of the aliases I personally like to use, so here goes nothing
Aliases
alias update='sudo apt update' # update the repo index
alias uplist='apt list --upgradable' # show packages pending upgrade
alias upgrade='sudo apt full-upgrade -y' # full-upgrade, yes
alias _cleanup='sudo apt autoclean && sudo apt autoremove'
alias _wg='sudo wg-quick up wg0'
alias _diswg='sudo wg-quick down wg0'
alias ipa='ip -br a'
alias ipr='ip r'
alias _jctl='sudo journalctl --vacuum-time=1d' # clean up the journal
alias xc="xsel -b -i < $1" # Depends: xsel - copy the contents of file ($1) into clipboard: xc /path/to/file
alias cnf="command-not-found --ignore-installed $1" # for when you want a quick way to figure out which packages provides a certain command
alias kb='curl -L https://www.kernel.org/finger_banner' # get the latest kernel release versions
alias cpowersave='sudo cpupower frequency-set -rg powersave' # Depends: linux-cpupower
alias cschedutil='sudo cpupower frequency-set -rg schedutil'
alias cperformance='sudo cpupower frequency-set -rg performance'
alias bw='bitwise' # Depends: bitwise
Functions
# For when you're using a VPN, but would like to execute some command
# using your non-VPN connection
utnl () {
	# short for un-tunnel (Home network _only_)
	if [[ $# -eq 0 ]]
	then
		echo "[!] Usage: $FUNCNAME <IFACE>"
	else
		GW=$(ip r | awk '/default/ { print $3 }')
		SUB=${GW%.*}
		sudo ip netns add home
		sudo ip netns exec home ip link set lo up
		sudo ip link add link $1 name home0 type macvlan
		sudo ip link set home0 netns home
		sudo ip -n home a add $SUB.250/24 metric 1024 brd + dev home0
		sudo ip netns exec home sysctl -q net.ipv6.conf.home0.disable_ipv6=1
		sudo ip netns exec home sysctl -qp 2>/dev/null
		sudo ip -n home link set home0 up
		sudo ip -n home r add default via $GW
	fi
}

# To be used after utnl eth0/wlan0 has already been started
nex () {
	# short for netns-exec
	y="\e[33m"
	r="\e[31m"
	m="\e[35m"
	g="\e[32m"
	e="\e[0m"
	cmd=$( printf '%q ' "${@:1}" )
	if [[ $# -eq 0 ]]
	then
		echo "[!] Usage: $FUNCNAME <command> [args]"
	elif [ $1 = "destroy" ]
	then
		if sudo ip netns delete home 2>/dev/null
		then
			printf "%b[+] home network namespace destroyed%b\n" "$g" "$e"
		else
			printf "%b[-] home network namespace not found. Skipping...%b\n" "$r" "$e"
		fi
	elif echo $1 | grep -q firefox
	then
		if ps aux | grep firefox | grep -v grep 1>/dev/null
		then
			printf "%b[-] Close already running instance(s) of Firefox and try again%b\n" "$r" "$e"
		else
			printf "[+] Executing %b|  %s |%b on %bhome%b as %b%s%b\n\n" "$y" "$cmd --display=:1" "$e" "$m" "$e" "$g" "$USER" "$e"
			sudo ip netns exec home runuser - $USER home -c "$cmd --display=:1"
		fi
	else
		printf "[+] Executing %b|  %s |%b on %bhome%b as %b%s%b\n\n" "$y" "$cmd" "$e" "$m" "$e" "$g" "$USER" "$e"
		sudo ip netns exec home runuser - $USER home -c "$cmd"
	fi
}

# Compare SHA256 checksums (useful for downloaded ISOs/packages)
_checksum () {
	g="\e[32m"
	r="\e[31m"
	e="\e[0m"
	if [[ $# -lt 2 ]]
	then
		echo "[!] Usage: $FUNCNAME <file> <SHA256>"
	else
		[ "$(sha256sum $1 | cut -d ' ' -f1)" == "$2" ] && printf "%b\n[+] SHA256 checksum OK\n\n%b" "$g" "$e" || printf "%b\n[-] SHA256 checksum mismatch\n\n%b" "$r" "$e"
	fi
}

# dmesg logs, separating message levels to different output files
dlogs () {
	dmesg -t > dmesg_current
	dmesg -t -k > dmesg_kernel
	dmesg -t -l emerg > dmesg_current_emerg
	dmesg -t -l alert > dmesg_current_alert
	dmesg -t -l crit > dmesg_current_crit
	dmesg -t -l err > dmesg_current_err
	dmesg -t -l warn > dmesg_current_warn
	dmesg -t -l info > dmesg_current_info
}
VIM
Visuals
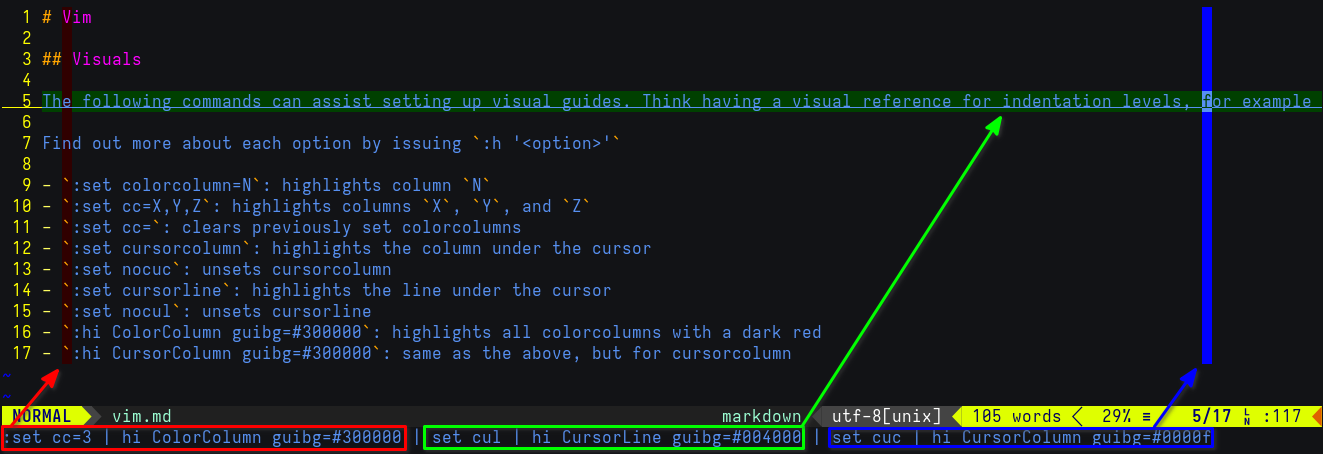
The following commands can assist setting up visual guides. Think having a visual reference for indentation levels, for example
Find out more about each option by issuing :h '<option>'
- (Ex-mode)
:set colorcolumn=N: highlights columnN - (Ex-mode)
:set cc=X,Y,Z: highlights columnsX,Y, andZ - (Ex-mode)
:set cc=: clears previously set colorcolumns - (Ex-mode)
:set cursorcolumn: highlights the column under the cursor - (Ex-mode)
:set nocuc: unsets cursorcolumn - (Ex-mode)
:set cursorline: highlights the line under the cursor - (Ex-mode)
:set nocul: unsets cursorline - (Ex-mode)
:hi ColorColumn guibg=#300000: highlights all colorcolumns with a dark red - (Ex-mode)
:hi CursorColumn guibg=#300000: same as the above, but for cursorcolumn
Movement
- (NORMAL)
3w: jump 3 words forward (cursor is placed at the beginning of the Nth word) - (NORMAL)
5b: jump 5 words backward - (NORMAL)
gg: jump to top (file) - (NORMAL)
G: jump to bottom (file) - (NORMAL)
zz: position line under the cursor at the middle of the screen - (Ex-mode)
:N: jump to line #N $ vim <file> +N: open<file>placing the cursor at lineN
Splitting
- (Ex-mode)
:sp <file>: open<file>in a horizontally-split window - (Ex-mode)
:term: open a terminal in a horizontally-split window - (Ex-mode)
:vsp <file>: open<file>in a vertically-split window - (Ex-mode)
:vert term: open a terminal in a vertically-split window - (NORMAL)
Ctrl+ww: cycle between splits (replace secondwwithh|j|k|lto move in a specific direction between splits)
Text manipulation
- (Ex-mode)
:4,12s/replace_me/replaced/g: replace all (/g) instances ofreplace_mein lines 4 through 12 withreplaced - (Ex-mode)
:50,100d: delete lines 50 through 100 - (NORMAL)
dd: delete entire line under cursor - (NORMAL)
yy: yank (copy) entire line under cursor
Misc
$ vim -x <file>: create a blowfish2-encrypted<file>- (Ex-mode)
:tabnew <file>: open<file>in a new tab - (NORMAL)
Shift+K: view API reference for the function under the cursor (if supported/found) - (NORMAL)
gt: go to next tab - (NORMAL)
m<char>: set a mark usingchar. Example:masets a mark for the lettera - (NORMAL)
'<char>: jump to markchar. Example:'ajump to marka - (NORMAL)
ZZ: quit, saving changes - (NORMAL)
ZQ: quit without saving
apt-patterns
Let's talk about advanced package management. In this section, we'll visit one of apt's lesser known features—apt-patterns. If you've ever found yourself jumping hoops trying to manage multiple packages, doing stuff like apt purge $(dpkg -l | grep whatever | cut -d ' ' -f3 | tr '\n' ' '), you're gonna find this entry useful. Let's see how it works
What's a PATTERN?
First things first: semantics. An apt PATTERN is different than a RegEx pattern, and we need to be very mindful of that distinction because it can get confusing when first reading the man-pages. An apt PATTERN is syntax used with apt, and is usually prefixed with special characters, namely a question mark ? for long-form syntax, and a tilde ~ for short-form syntax. An example would be ?installed, versus ~i. With that in mind, ~i and the likes, be it long or short form, is the PATTERN to which we refer in this section. Again, not to be confused with REGEX, which APT-PATTERNS(7) will highlight as such. Now that we got the semantics out of the way, let's put that into practice
Querying packages
Assume you're shopping for packages from the repository. Quickest thing you can do is apt search <package>, and that's great and all, but sometimes we need more than just a quick fuzzy search. That is, we might be looking for specific package archs, versions, exact names, or even sections. The great thing about apt-patterns is the fact that we can specify whether we want to look exclusively for installed packages, and really just have more fine-grained control over the search. Let's say we want to search for installed packages that include json in the name
$ apt list '~i ~njson'
libcjson1/kali-rolling,now 1.7.18-3+b1 amd64 [installed,automatic]
libcpanel-json-xs-perl/kali-rolling,now 4.38-1+b1 amd64 [installed,automatic]
libjson-c-dev/kali-rolling,now 0.18+ds-1 amd64 [installed]
libjson-c5/kali-rolling,now 0.18+ds-1 amd64 [installed]
...
~n stands for name. We could also use the long-form syntax as follows:
$ apt list '~i ?name(json)'
libcjson1/kali-rolling,now 1.7.18-3+b1 amd64 [installed,automatic]
libcpanel-json-xs-perl/kali-rolling,now 4.38-1+b1 amd64 [installed,automatic]
libjson-c-dev/kali-rolling,now 0.18+ds-1 amd64 [installed]
libjson-c5/kali-rolling,now 0.18+ds-1 amd64 [installed]
...
Now, let's try to find packages that are not installed with json in the name. The logical negation operator works as well as you'd expect; simply prefix the pattern with it
$ apt list '!~i ?name(json)'
dwarf2json/kali-rolling 0.6.0~git20200714-0kali1 amd64
dwarf2json/kali-rolling 0.6.0~git20200714-0kali1 i386
ffjson/kali-rolling 0.0~git20181028.e517b90-1.1 amd64
ffjson/kali-rolling 0.0~git20181028.e517b90-1.1 i386
gir1.2-json-1.0/kali-rolling 1.10.6+ds-1 amd64
gir1.2-json-1.0/kali-rolling 1.10.6+ds-1 i386
gir1.2-jsonrpc-1.0/kali-rolling 3.44.1-1 amd64
gir1.2-jsonrpc-1.0/kali-rolling 3.44.1-1 i386
...
As we can see, the results include i386 packages since I have a multi-arch setup. Let's include only amd64 packages
$ apt list '!~i ?name(json) ~ramd64'
dwarf2json/kali-rolling 0.6.0~git20200714-0kali1 amd64
ffjson/kali-rolling 0.0~git20181028.e517b90-1.1 amd64
gir1.2-json-1.0/kali-rolling 1.10.6+ds-1 amd64
gir1.2-jsonrpc-1.0/kali-rolling 3.44.1-1 amd64
gjh-asl-json/kali-rolling 0.0+git20210628.867c5da-1 amd64
golang-easyjson/kali-rolling 0.7.7-1+b8 amd64
...
Now, let's assume you're just window-shopping, metaphorically, for packages under certain sections. Say you want to figure out what games are available in the repos, specifically those with the amd64 arch
$ apt list '~sgames ~ramd64'
0ad-data-common/kali-rolling,kali-rolling 0.0.26-1 all
0ad-data/kali-rolling,kali-rolling 0.0.26-1 all
0ad/kali-rolling 0.0.26-8 amd64
1oom/kali-rolling 1.11-1 amd64
2048-qt/kali-rolling 0.1.6-2+b3 amd64
2048/kali-rolling 1.0.0-1 amd64
3dchess/kali-rolling 0.8.1-22 amd64
...
Querying dependencies
If you're coming from aptitude where it's easy to just aptitude why <package> and it tells you why a package is installed, i.e. what packages DEPEND on said <package>, this is gonna be helpful. Granted it's not going to be exactly the same as aptitude does it, but it's close enough with a vanilla pattern; reason being that aptitude will also list Suggests and Provides, not strictly Depends. I will leave those as an exercise to the reader, but it shouldn't be too difficult to figure out how to combine multiple patterns in one go. Not to mention man apt-patterns will be your trusty resource, as always
Let's try to figure out the reverse dependencies of, say, libx86-1. There are 3 ways to do it; aptitude why libx86-1 (if aptitude is installed), apt rdepends libx86-1 (which can get pretty crowded and is not friendly with package management without Bash-Fu), and apt list '~i ~D(?exact-name(libx86-1))'
aptitude is great because it will trace the reverse dependencies all the way to the top. This will make more sense when seen in output, so let's compare how each command does it
$ aptitude why libx86-1
i   kali-linux-default  Depends    kali-linux-headless
i A kali-linux-headless Depends    i2c-tools
i A i2c-tools           Recommends read-edid
i A read-edid           Depends    libx86-1 (>= 1.1+ds1)

$ apt rdepends libx86-1
libx86-1
Reverse Depends:
  Depends: read-edid (>= 1.1+ds1)

$ apt list '~i ~D(?exact-name(libx86-1))'
read-edid/now 3.0.2-1.1 amd64 [installed,local]
Notice how aptitude traced rdeps all the way to the top? i.e. kali-linux-default depends on kali-linux-headless, which in turn depends on i2c-tools, which recommends read-edid, which is what depends directly on libx86-1. In the other examples using apt, you don't get that nice relational table highlighting the dependency list, but you do get the actual reverse depency nonetheless. The difference between apt rdepends and apt list then becomes a matter of cooperability with managing packages. apt rdepends can be used in cases where you quickly want to check the reverse dependencies of certain packages, whereas apt list ... is used when you want to do something with those queried reverse dependencies. We'll look at a similar scenario in this following section
Package management
Here comes the risky part; actually managing packages. Please pay close attention because you can easily mess this one up when first trying it out. In this section, we'll figure out how to handle multiple packages based on specific criteria as specified by PATTERNs. I build custom kernels very frequently, and I tend to keep previous releases in case things go wrong so I'm not stuck with an unbootable kernel. Once I'm certain the new kernel release works as expected, I purge the previous one(s). I could type up apt purge --auto-remove linux-image-* linux-headers-*, but that's just too much unnecessary typing. Let's do this efficiently with apt-patterns. For starters, it's always a good idea to just list packages first to make sure we have the intended ones in place before passing destructive verbs like remove or purge. At the time of writing this entry, I'm on the 6.13.0-rc4 kernel, and I still have previous release candidates 1, 2, and 3. I also have the debug symbols installed, so I'll want those purged as well. Let's list those installed packages, specifying the name RegEx
$ apt list '~i ~n"^linux-(image|headers)-6.13.0-rc[1-3]"'
linux-headers-6.13.0-rc1/now 6.13.0-rc1-00695-gf941996d0cb8-5 amd64 [installed,local]
linux-headers-6.13.0-rc2/now 6.13.0-rc2-00401-g48c84277de4c-2 amd64 [installed,local]
linux-headers-6.13.0-rc3/now 6.13.0-rc3-00674-gffe093fb67f8-3 amd64 [installed,local]
linux-image-6.13.0-rc1-dbg/now 6.13.0-rc1-00695-gf941996d0cb8-5 amd64 [installed,local]
linux-image-6.13.0-rc1/now 6.13.0-rc1-00695-gf941996d0cb8-5 amd64 [installed,local]
linux-image-6.13.0-rc2-dbg/now 6.13.0-rc2-00401-g48c84277de4c-2 amd64 [installed,local]
linux-image-6.13.0-rc2/now 6.13.0-rc2-00401-g48c84277de4c-2 amd64 [installed,local]
linux-image-6.13.0-rc3-dbg/now 6.13.0-rc3-00674-gffe093fb67f8-3 amd64 [installed,local]
linux-image-6.13.0-rc3/now 6.13.0-rc3-00674-gffe093fb67f8-3 amd64 [installed,local]
Note that when we want extended RegEx in the query, we'll ideally want to wrap it in quotation marks. In the above example, we're looking for packages beginning (^) with linux-, followed by either image or headers, 6.13.0-rc, followed by any one digit between 1 and 3 (inclusive). Sure enough, we have all the packages we need, and because the output is a listing, it's extremely easy to handle those packages with apt as-is. For extra caution, however, dear reader, I recommend you simulate the action before going live with it; meaning apt -s <VERB> <packages>. I've already done that in the past, so I know what the syntax is and what packages have those names. Here's how I'll purge those in one go
$ sudo apt purge --auto-remove '~i ~n"^linux-(image|headers)-6.13.0-rc[1-3]"'
[sudo] password for x0rw3ll:
REMOVING:
  linux-headers-6.13.0-rc1*  linux-headers-6.13.0-rc3*  linux-image-6.13.0-rc1-dbg*  linux-image-6.13.0-rc2-dbg*  linux-image-6.13.0-rc3-dbg*
  linux-headers-6.13.0-rc2*  linux-image-6.13.0-rc1*    linux-image-6.13.0-rc2*      linux-image-6.13.0-rc3*

Summary:
  Upgrading: 0, Installing: 0, Removing: 9, Not Upgrading: 0
  Freed space: 7,121 MB

Continue? [Y/n]
(Reading database ... 788000 files and directories currently installed.)
Removing linux-headers-6.13.0-rc1 (6.13.0-rc1-00695-gf941996d0cb8-5) ...
Removing linux-headers-6.13.0-rc2 (6.13.0-rc2-00401-g48c84277de4c-2) ...
Removing linux-headers-6.13.0-rc3 (6.13.0-rc3-00674-gffe093fb67f8-3) ...
Removing linux-image-6.13.0-rc1 (6.13.0-rc1-00695-gf941996d0cb8-5) ...
update-initramfs: Deleting /boot/initrd.img-6.13.0-rc1
Removing kernel version 6.13.0-rc1 from systemd-boot...
Generating grub configuration file ...
Found background image: /usr/share/images/desktop-base/desktop-grub.png
Found linux image: /boot/vmlinuz-6.13.0-rc4
Found initrd image: /boot/initrd.img-6.13.0-rc4
Found linux image: /boot/vmlinuz-6.13.0-rc3
Found initrd image: /boot/initrd.img-6.13.0-rc3
Found linux image: /boot/vmlinuz-6.13.0-rc2
Found initrd image: /boot/initrd.img-6.13.0-rc2
Found linux image: /boot/vmlinuz-6.12.0
Found initrd image: /boot/initrd.img-6.12.0
Found linux image: /boot/vmlinuz-6.11.2-amd64
Found initrd image: /boot/initrd.img-6.11.2-amd64
Warning: os-prober will be executed to detect other bootable partitions.
Its output will be used to detect bootable binaries on them and create new boot entries.
Adding boot menu entry for UEFI Firmware Settings ...
done
Removing linux-image-6.13.0-rc1-dbg (6.13.0-rc1-00695-gf941996d0cb8-5) ...
...
Removing linux-image-6.13.0-rc3-dbg (6.13.0-rc3-00674-gffe093fb67f8-3) ...
(Reading database ... 758746 files and directories currently installed.)
Purging configuration files for linux-image-6.13.0-rc2 (6.13.0-rc2-00401-g48c84277de4c-2) ...
Removing kernel version 6.13.0-rc2 from systemd-boot...
Purging configuration files for linux-image-6.13.0-rc3 (6.13.0-rc3-00674-gffe093fb67f8-3) ...
Removing kernel version 6.13.0-rc3 from systemd-boot...
Purging configuration files for linux-image-6.13.0-rc1 (6.13.0-rc1-00695-gf941996d0cb8-5) ...
Removing kernel version 6.13.0-rc1 from systemd-boot...
Couldn't have been easier, don't you think? It might take you a little while just to get used to it, but once you do, it's literally all you'll ever need for the most part. It gets things going quickly, and the fact that you can work with the output straight from apt without any one-liners makes it a very attractive choice for system administration. Do note that this section is really only a very basic, rough guide to using apt-patterns correctly. There is so much more for you to discover in the man-pages, which I cannot recommend enough!
Python
Introduction
Love it or hate it, Python can be very powerful for a wide variety of tasks. From simple scripting to full-blown complex programming, Python's got you covered.
While I started off with Python as a first language, I wouldn't recommend it as a first for anyone else. There are key concepts that Python gets to...masquerade from you. However, we're not here to trash-talk Python's shortcomings; that's left as an exercise for the reader at their own discretion and preference. We are here to cover some ground to make Python even more friendlier to the absolute beginner
Assumptions
- This entry assumes some working knowledge with Python. You're not expected to know how to program an entire server application to be able to follow along, but rather be familiar with the basics; variables, functions, and so on
- Python version: 3.12.9 (at the time of writing)
What you need
- A computer, obv; this isn't the 1800s, hey
- Python interpreter
- Text editor
What we'll cover
- The infamous Traceback (most recent call last)
- Getting help()
- Finding and installing Python packages correctly
- Handling externally-managed Python packages with virtual environments
The infamous Traceback (most recent call last)
We've all seen it at some point or another. When first starting out, it can be daunting, and that's understandable; there's some output you might have never learned even existed, and whatever course or tutorial you followed might have thought it would be a great idea to pretend all programs are error-free (spoiler alert: they're not)
Troubleshooting is an essential skill to have, which is why we're starting off strong with this section. We'll begin by learning how to read the traceback output. First things first: the hint is in the output; (most recent call last). What it means is the most recent call is at the bottom of the output, and so we'll be reading it from the bottom upwards. Let's have a look at a nonsensical example with the following code:
#!/usr/bin/env python3

# Filename: tberr.py

from lxml import html
import requests
from requests.exceptions import ConnectionError

def do_request():
    try:
        resp = requests.get('http://127.1').text
    except ConnectionError:
        resp = None
    return resp

try:
    tree = html.fromstring(do_request())
except:
    print(type(tree))
Assuming there's no HTTP server running on localhost (yes; loopback address can go by localhost, 127.0.0.1, or 127.1), one can safely assume the requests.get() method is bound to fail, raising a ConnectionError exception. That call was made as part of another function call do_request(). As we can see inside the function body, there's some sort of exception handling, but it doesn't actually handle anything correctly. Neither do the statements that follow the function in the script, but we're doing this for dramatic effect illustration purposes
Next, there's a try/except block that tries to assign the supposedly parsed HTML element (returned from the call to do_request(), which should have returned valid a HTML string, but ended up returning None instead. One can make a very educated guess that html.fromstring() expects a string as an argument, so surely providing None is bound to raise an exception. Here comes the fun part: the except portion of the block should handle such exception, right? Not in this example, I'll tell you what there!
Since html.fromstring() will never come to pass (it received None, remember?), tree will never have been declared in the first place, taking us to the second exception where we try to print the type of tree; a nonexistent Name (i.e. variable in this context). Let's see that in action:
$ chmod +x tberr.py; ./tberr.py
Traceback (most recent call last):
  File "/home/$USER/./test.py", line 16, in <module>
    tree = html.fromstring(do_request())
           ^^^^^^^^^^^^^^^^^^^^^^^^^^^^^
  File "/usr/lib/python3/dist-packages/lxml/html/__init__.py", line 849, in fromstring
    is_full_html = _looks_like_full_html_unicode(html)
                   ^^^^^^^^^^^^^^^^^^^^^^^^^^^^^^^^^^^
TypeError: expected string or bytes-like object, got 'NoneType'

During handling of the above exception, another exception occurred:

Traceback (most recent call last):
  File "/home/$USER/./test.py", line 18, in <module>
    print(type(tree))
               ^^^^
NameError: name 'tree' is not defined. Did you mean: 'True'?
One might think that the very bottom of that output is the actual issue, but as you've read, it's only one part of an otherwise dependency of issues. Let's start reading from the bottom upwards:
Traceback (most recent call last):
  File "/home/$USER/./test.py", line 18, in <module>
    print(type(tree))
               ^^^^
NameError: name 'tree' is not defined. Did you mean: 'True'?
File "/home/$USER/./test.py", line 18: line 18 in/home/$USER/test.pyis where the exact issue took placeNameError: name 'tree' is not defined. Did you mean: 'True'?:NameErroris the exception, stating that the nametreeis not defined. Python can be helpful sometimes in providing suggestions, but that may not always be as helpful as what meets the eye
Next, we'll move up to the previous/older call:
Traceback (most recent call last):
  File "/home/$USER/./test.py", line 16, in <module>
    tree = html.fromstring(do_request())
           ^^^^^^^^^^^^^^^^^^^^^^^^^^^^^
  File "/usr/lib/python3/dist-packages/lxml/html/__init__.py", line 849, in fromstring
    is_full_html = _looks_like_full_html_unicode(html)
                   ^^^^^^^^^^^^^^^^^^^^^^^^^^^^^^^^^^^
TypeError: expected string or bytes-like object, got 'NoneType'
Here, we have to understand how the calls were invoked. File "/home/$USER/./test.py", line 16 calls html.fromstring() on a NoneType. Internally, html.fromstring() makes another call as follows:
  File "/usr/lib/python3/dist-packages/lxml/html/__init__.py", line 849, in fromstring
    is_full_html = _looks_like_full_html_unicode(html)
                   ^^^^^^^^^^^^^^^^^^^^^^^^^^^^^^^^^^^
TypeError: expected string or bytes-like object, got 'NoneType'
As we can see, html.fromstring() expected a string (supposedly HTML), but got NoneType instead
Let's recap, annotating the code block this time:
#!/usr/bin/env python3

# Filename: tberr.py

# The following 3 lines import the required libraries
from lxml import html
import requests
from requests.exceptions import ConnectionError

# Nothing happens here upon executing the script _until_
# there's a call to do_request()
def do_request():
    try:
        resp = requests.get('http://127.1').text
    except ConnectionError:
        resp = None
    return resp

try:
    # Try to assign an HTML element from the string returned by
    # do_request(). This will fail because do_request() returns
    # NoneType on ConnectionError
    tree = html.fromstring(do_request()) # this is where execution jumps up to do_request()
except:
    # If the above statement fails, execute the following line(s)
    # This will also fail since tree will have never been assigned
    print(type(tree))
So, logically, our execution flow is as follows:
tree = html.fromstring()=>do_request()do_request()=>requests.get()=> returnsNoneTypeas per handlingConnectionError, rendering step 1 mootprint(type(tree))=> raisesNameErrorsince step 1 never took place (i.e. the assignment of an HTML element to the variabletree)
While this example makes no sense in terms of logic, or common sense for that matter, it should give you an idea on how to read traceback output
Remember:
- Walk your way up the traceback, going from the most recent call to the oldest
- Pay close attention to file names; know what's relevant in your script, verses what's happening internally inside functions provided by libraries
- Pay close attention to line numbers so you can quickly navigate to the offending lines
- Print-debugging is great and all, but debugging with actual debugging tools/libs is paramount and will help you a great deal
- Don't just skim through traceback output, however long it might be. You need to understand what's happening, what's relevant, and why it happened in the first place. In time, your eyes will be trained to tune out the involved libraries, and you'll be mindful of the data types being passed around
- Last, but not least: READ THE DOCS. Familiarize yourself with exceptions so you know what
TypeError,ValueError,NameError, and what the entire assortment of exception classes is
Getting help()
Now that we've covered reading traceback output, we'll move on to another important skill; getting help
You might have learned the bare minimum, just enough to get you through basic scripting/programming tasks, and that's great, but what do you do when you're looking for help?
Ask {insert forum here}? Spam the same question on however many Discord servers you might be on? (seriously, don't do that; it's royally annoying, and wastes everyone's time)
The answer is simple: refer to the API docs. See, the very developers who make this language possible are the only ones who are capable of providing the most accurate technical documentation thereof. That is the first and foremost source everyone learning whatever {insert language/library/framework/API here} should check
With the rise of LLMs AI, things are unfortunately taking a sad turn, in my humble opinion. Everyone touts AI as some silver bullet to all life's problems and burning questions. It is not, however, any of that; it's something that fakes it just enough to sound like it's an SME. We can argue about how "you don't understand how it works" et al., but really, let's not kid ourselves. When there's a tiny little disclaimer that says any variation of the sentence "information may not be accurate", you know this is your first clue to not trust a word that's being generated out of this tin can's /dev/null (yes, that is exactly what you're thinking about right now)
I digress at this point, and we're not here to debate AI; I might write up an entry on everything I think is wrong with how we're dealing with it, but that's for another time. Let's get back to getting help quickly and effectively
Ways to get help
There are at least 4 different ways to get help:
- Straight from the comfort of your terminal:
- Using
pydoc <keyword> - Inside your interpreter shell:
>>> help(<keyword>) - Inside Vim using
Shift+Kto bring uppydoc <keyword>(i.e. Python-specific documentation)
- Using
- Online: https://docs.python.org/3/
As a last resort, you can always look up keywords like "python multiprocessing docs" (or a variation thereof) using your favorite search engine. In that search, you might stumble upon some reply on some forum which cites the official documentation, or provide a decent technical writeup on how 'keyword' works, or explain its concept. Key is to know how to identify good answers and resources from bad ones, and you can only do that when you've read through enough online resources to tell the difference
Finally, let's say you wanted lookup documentation for a function/method that belongs to an imported library, like requests, for example, but you couldn't be bothered to check the Requests library API online. You can opt to do that interactively inside the interpreter shell as follows:
Python 3.12.9 (main, Feb  5 2025, 01:31:18) [GCC 14.2.0] on linux
Type "help", "copyright", "credits" or "license" for more information.
>>> import requests
>>> help(requests.Session) # help(requests.Session()) also works, but no need for extra chars
At this point, your default $PAGER (ideally LESS) is forked with the documentation pertinent to whichever object you passed to help() as follows: (output is truncated for brevity)
Help on Session in module requests.sessions object:

class Session(SessionRedirectMixin)
 |  A Requests session.
 |
 |  Provides cookie persistence, connection-pooling, and configuration.
 |
 |  Basic Usage::
 |
 |    >>> import requests
 |    >>> s = requests.Session()
 |    >>> s.get('https://httpbin.org/get')
 |    <Response [200]>
 |
 |  Or as a context manager::
 |
 |    >>> with requests.Session() as s:
 |    ...     s.get('https://httpbin.org/get')
 |    <Response [200]>
 |
 |  Method resolution order:
 |      Session
 |      SessionRedirectMixin
 |      builtins.object
 |
 |  Methods defined here:
 |
 |  __enter__(self)
 |
 |  __exit__(self, *args)
 |
 |  __getstate__(self)
 |      Helper for pickle.
 |
 |  __init__(self)
 |      Initialize self.  See help(type(self)) for accurate signature.
 | ...
Closing thoughs
Don't be afraid to ask for help, or feel discouraged when you first don't understand something. No one starts off an expert, and no one knows all the ins and outs of a language save for those who invented it to begin with, and possibly a very small subset of people. The more you reference official API documentation, the easier and faster it gets for you, and you'll be positive that you're getting the most recent documentation on the topic at hand from the most verifiable source that can provide it
Finding and installing Python packages correctly
This is an important, and a rather quick one, so pay close attention
For the longest time ever, the de-facto go-to method to install Python packages, as suggested on many an online forum, is pip install <package>. This is no longer the case, however, since PEP-668 (See also: Pip install and Python's externally managed)
PEP-668 TL;DR
Assume the following scenario: your system has the python3-requests package installed system-wide. You then decide to also execute pip install requests, or worse, sudo pip install requests (don't do that or recommend anyone do it; it's why we now have PEP-668 because of how terrible that is. See Exhibit C: The case against /usr/local)
Your system now has two packages with the same name, found in different paths. This is where conflicts exist, especially when you have different versions of the same package installed in different directories. PEP-668 finally puts an end to that, preventing misinformed users from inadvertently damaging their environment. I've already covered that in detail in the linked article above, so we're not going to reinvent the wheel here
How to actually find and install packages correctly
The recommendation is to use your system's package manager. Python packages have the python3- prefix, and so this is with which you should be leading your search
If you know the package name, like requests for example, you can query the package index using apt policy python3-requests to verify that the package indeed exists (i.e. is packaged by your distro), and find out what the candidate version is
If you don't know the package name, however, you can apt search <package name> | grep -E '^python3-'. Following apt-patterns, however, you can do something like apt list '~n^python3-' | grep <package name>.
If you're just catalogue-shopping packages for inspiration, you can do apt list '~spython ~n<package name>'. This will page through packages that are available. If you wanna take it a step further, you can use the same syntax with the operation show instead of list. This is a whole lot quicker than searching for the package, copying its name, then performing apt show <package name> (or going berzerk with Bash-fu loops; it's awfully slow, trust me)
Here's what that looks like in action: (output is truncated for brevity)
$ apt list '~spython ~nrequests'
python3-aws-requests-auth/kali-rolling,kali-rolling 0.4.3-4 all
python3-grequests/kali-rolling,kali-rolling 0.7.0-3 all
python3-requests-cache/kali-rolling,kali-rolling 1.2.1-1 all
python3-requests-file/kali-rolling,kali-rolling,now 2.1.0-1 all [installed,automatic]
python3-requests-futures/kali-rolling,kali-rolling,now 1.0.2-1 all [installed,automatic]
python3-requests-kerberos/kali-rolling,kali-rolling 0.14.0-4 all
python3-requests-mock/kali-rolling,kali-rolling 1.12.1-3 all
python3-requests-ntlm/kali-rolling,kali-rolling,now 1.1.0-3 all [installed,automatic]
python3-requests-oauthlib/kali-rolling,kali-rolling 1.3.1-1 all
python3-requests-toolbelt/kali-rolling,kali-rolling,now 1.0.0-4 all [installed,automatic]
python3-requests-unixsocket/kali-rolling,kali-rolling 0.3.0-6 all
python3-requests/kali-rolling,kali-rolling,now 2.32.3+dfsg-1 all [installed,automatic]
python3-requestsexceptions/kali-rolling,kali-rolling 1.4.0-5 all
python3-txrequests/kali-rolling,kali-rolling 0.9.6-2 all

$ apt show '~spython ~nrequests'
Package: python3-requests
Version: 2.32.3+dfsg-1
Priority: optional
Section: python
Source: requests
Maintainer: Debian Python Team <team+python@tracker.debian.org>
Installed-Size: 247 kB
Depends: python3-certifi, python3-charset-normalizer, python3-idna, python3-urllib3 (>= 1.21.1), python3:any, ca-certificates, python3-chardet (>= 3.0.2)
Suggests: python3-cryptography, python3-idna (>= 2.5), python3-openssl, python3-socks, python-requests-doc
Breaks: awscli (<< 1.11.139)
Homepage: https://requests.readthedocs.io/
Download-Size: 71.9 kB
APT-Manual-Installed: no
APT-Sources: https://kali.download/kali kali-rolling/main amd64 Packages
Description: elegant and simple HTTP library for Python3, built for human beings
 Requests allow you to send HTTP/1.1 requests. You can add headers, form data,
 multipart files, and parameters with simple Python dictionaries, and access
 the response data in the same way.
 ...
 This package contains the Python 3 version of the library.

Package: python3-requests-oauthlib
Version: 1.3.1-1
Priority: optional
Section: python
Source: python-requests-oauthlib
Maintainer: Debian Python Team <team+python@tracker.debian.org>
Installed-Size: 94.2 kB
Depends: python3-oauthlib, python3-requests, python3:any
Homepage: https://github.com/requests/requests-oauthlib
Download-Size: 21.1 kB
APT-Sources: https://kali.download/kali kali-rolling/main amd64 Packages
Description: module providing OAuthlib auth support for requests (Python 3)
...
Handling externally-managed Python packages with virtual environments
Following up on the previous entry, let's talk about the situation when you need a package for a single use, but don't want do deal with it sitting on your drive doing absolutely nothing but wasting storage and bandwidth (however little). Alternatively, a situation when the package you need is not packaged by your distro. Or really, installing older/newer versions of packages. This is where virtual environments (venv) come in handy
We'll cover this very quickly because, really, there isn't all too much to it to get the point
Creating a virtual environment
~$ python3 -c 'import requests; print(requests)'
<module 'requests' from '/usr/lib/python3/dist-packages/requests/__init__.py'>

~$ pip3 show requests # Version and Location are highlighted for relevance
Name: requests
===============
Version: 2.32.3
===============
Summary: Python HTTP for Humans.
Home-page: https://requests.readthedocs.io
Author: Kenneth Reitz
Author-email: me@kennethreitz.org
License: Apache-2.0
========================================
Location: /usr/lib/python3/dist-packages
========================================
Requires: certifi, charset-normalizer, idna, urllib3
Required-by: apache-libcloud, autorecon, b4, censys, crackmapexec, dropbox, faraday-agent-dispatcher, faraday-plugins, faradaysec, netexec, pooch, pwntools, pyExploitDb, pypsrp, python-gitlab, pywinrm, requests-file, requests-futures, requests-toolbelt, sherlock-project, Sphinx, theHarvester, tldextract, wafw00f, websockify

~$ python3 -m venv requests_external # choice of venv name is up to you, but try to keep it descriptive nonetheless

~$ cd requests_external
~/requests_external$ source bin/activate
(requests_external) ~/requests_external$ pip3 show requests
WARNING: Package(s) not found: requests # we are now inside the venv as denoted by the venv name inside the parenthesis, so requests is not installed

(requests_external) ~/requests_external$ pip3 install requests
Collecting requests
  Using cached requests-2.32.3-py3-none-any.whl.metadata (4.6 kB)
Collecting charset-normalizer<4,>=2 (from requests)
  Downloading charset_normalizer-3.4.1-cp312-cp312-manylinux_2_17_x86_64.manylinux2014_x86_64.whl.metadata (35 kB)
Collecting idna<4,>=2.5 (from requests)
  Using cached idna-3.10-py3-none-any.whl.metadata (10 kB)
Collecting urllib3<3,>=1.21.1 (from requests)
  Downloading urllib3-2.3.0-py3-none-any.whl.metadata (6.5 kB)
Collecting certifi>=2017.4.17 (from requests)
  Downloading certifi-2025.1.31-py3-none-any.whl.metadata (2.5 kB)
Using cached requests-2.32.3-py3-none-any.whl (64 kB)
Downloading certifi-2025.1.31-py3-none-any.whl (166 kB)
Downloading charset_normalizer-3.4.1-cp312-cp312-manylinux_2_17_x86_64.manylinux2014_x86_64.whl (145 kB)
Using cached idna-3.10-py3-none-any.whl (70 kB)
Downloading urllib3-2.3.0-py3-none-any.whl (128 kB)
Installing collected packages: urllib3, idna, charset-normalizer, certifi, requests
Successfully installed certifi-2025.1.31 charset-normalizer-3.4.1 idna-3.10 requests-2.32.3 urllib3-2.3.0

(requests_external) ~/requests_external$ pip3 show requests
Name: requests
===============
Version: 2.32.3
===============
Summary: Python HTTP for Humans.
Home-page: https://requests.readthedocs.io
Author: Kenneth Reitz
Author-email: me@kennethreitz.org
License: Apache-2.0
======================================================================
Location: /home/x0rw3ll/requests_external/lib/python3.12/site-packages
======================================================================
Requires: certifi, charset-normalizer, idna, urllib3
Required-by:

(requests_external) ~/requests_external$ deactivate

~/requests_external$ # back to system-wide python/pip environment
Notice how we now have two packages with the same name and version, but not the location? That's because we're inside the virtual environment. The venv is only concerned with the packages installed in its location, not system-wide packages. The key is to remember to activate the venv beforehand so the correct PATH environment is set accordingly. As long as you can see (<venv name>) prefixing your PS1 prompt, you can use python/pip installed in that venv anywhere in your file system. Once you're done, simply execute deactivate to get out of that virtual environment
Removing virtual environments
Once you no longer need the venv, you can simply rm -r /path/to/venv. You don't need to uninstall packages from the venv or anything like that to remove it; literally just remove the directory and you're good to go
That's all, folks!
Git
Foreword
As a developer, Git is probably the most indispensable tool at your disposal. There are only so many iterations of main_finalfinalfinal.c you can go through before you end up flirting with the edge of madness. Learning Git is an absolute MUST, and so if you haven't already, I cannot recommend it enough. As always, we'll only be covering some quick tips in this entry. The rest is left as an exercise for the reader. Let's get straight to business
Writing good commit messages
We've all seen the hideous "Files added via upload". Trust me, no one wants to see that, and if they do, they're very likely not to take your work seriously. This just screams "I don't know Git, but I wrote everything in one go and uploaded the entire shebang wholesale to {insert version control platform domain dot com here}"
When writing commit messages, you're not only highlighting the changes to code for yourself to follow where you left off at any point later, but also to your "users"; i.e. other users (developers or not) using and/or contributing to your project
Commit messages should be descriptive of the changes you introduced. Let's assume the following changes:
diff --git a/logger.c b/logger.c
index a25714af415b..90025508aadc 100644
--- a/logger.c
+++ b/logger.c
@@ -2,6 +2,7 @@
 #include <sys/stat.h>
 #include <fcntl.h>
 #include <unistd.h>
+#include <errno.h>

 int
 main (void)
@@ -9,8 +10,8 @@ main (void)
        int fd;

        if ((fd = open("/nonexistent", O_RDWR)) == -1) {
-               printf("[-] Operation failed. File either does not exist, "
-                       "or there is an issue with access permissions. "
-                       "Try again later\n");
-               return 1;
+               perror("[-] Could not open file.");
+               return errno;
        }

        /*
The above example is really just for demonstration purposes, but let's see two possible ways we can go about communicating those changes to users. One could very well commit something like YOLO, or lol, but this is not going to help later on. It gets even worse if your project will be open to contributions, or if you have to table it for a good few months only to get back with an "I have no memory of this place" look on your face
Ideally, as previously mentioned, commit messages should be descriptive, but also straight to the point. That is, you do not need to write down the declaration of independence; only what is absolutely necessary to communicate. A better commit message would be somewhat as follows:
Clarify error message on failure to open file

* Use `perror` to output the error message to STDERR
  instead of `printf` to STDOUT
* Return error message resulting from the failed call to open
For something as simple as the above change, we can definitely do away with the meticulous explanation since anyone familiar with the language can easily tell. However, there is some value to leaving some sort of explanation especially when first starting out, or if the goal is to also educate beginners looking at your code. We could simply leave it at:
Clarify error message on failure to open file and return errno
For inspiration on how to write proper commit messages, pull the Linux kernel and start reading through the commit log. Do note, however, that kernel developers, maintainers, reviewers, and contributors have to abide by a very strict set of rules that apply to just about every step of the process. You don't have to follow their exact footsteps, for non kernel-related work, as that might not necessarily be applicable to every other project, but it gives you a great reason to start doing things correctly
Oh, no, I made a typo in my commit message
First off, there are multiple scenarios that can be the case here:
- Scenario A: you've added files for tracking, i.e.
git add <file(s)>, followed bygit commit -m <message>, but you didn'tgit push - Scenario B: you've made multiple commits before pushing, but it's not the most recent one that has the typo
- Scenario C: you've already pushed to a remote branch
Scenario A
This one is quite straight forward; git commit --amend lets you reword the latest commit before pushing
Scenario B
Unfortunately, git commit --amend won't work for this scenario since the commit in question is not the most recent one. Fret not, however, for Git has got you covered. Let's consider the following example:
$ git log --oneline
767edc6fa82e (HEAD -> main) Add test case 3
a46c703c7dd5 Add tst case 23
3479fad7f476 Add test case 1
193eb530337c Initial commit
As we can see, we messed up commit a46c703c7dd5, and now we need to fix it. Let's start by rebasing that one commit a46c703c7dd5 as follows:
# HEAD is where we're currently at
# We need the two commits including
# HEAD, so we'll pass HEAD~2
#
$ git rebase -i HEAD~2
At this point, your $EDITOR will be forked, with the default action to pick (or use) the commit(s). We need to reword the commit in question, so we'll change pick to reword (or simply r). For other commits, we can either pick or drop them; this is how you can quickly manage your commits in one go. Let's get on with the rewording:
r a46c703c7dd5 Add tst case 23
pick 767edc6fa82e Add test case 3

# Rebase 3479fad7f476..767edc6fa82e onto 3479fad7f476 (2 commands)
#
# Commands:
# p, pick <commit> = use commit
# r, reword <commit> = use commit, but edit the commit message
# e, edit <commit> = use commit, but stop for amending
# s, squash <commit> = use commit, but meld into previous commit
# f, fixup [-C | -c] <commit> = like "squash" but keep only the previous
#                    commit's log message, unless -C is used, in which case
#                    keep only this commit's message; -c is same as -C but
#                    opens the editor
# x, exec <command> = run command (the rest of the line) using shell
# b, break = stop here (continue rebase later with 'git rebase --continue')
# d, drop <commit> = remove commit
# l, label <label> = label current HEAD with a name
# t, reset <label> = reset HEAD to a label
# m, merge [-C <commit> | -c <commit>] <label> [# <oneline>]
#         create a merge commit using the original merge commit's
#         message (or the oneline, if no original merge commit was
#         specified); use -c <commit> to reword the commit message
# u, update-ref <ref> = track a placeholder for the <ref> to be updated
#                       to this position in the new commits. The <ref> is
#                       updated at the end of the rebase
#
# These lines can be re-ordered; they are executed from top to bottom.
#
# If you remove a line here THAT COMMIT WILL BE LOST.
#
# However, if you remove everything, the rebase will be aborted.
#
You should see the above displayed in your $EDITOR. Only difference is I've already changed pick to r (i.e. reword). Once you write the file and quit, you'll be forked off to the $EDITOR once more so you can reword the commit(s) in question. Let's fix the embarrassing typos:
Add test case 2

# Please enter the commit message for your changes. Lines starting
# with '#' will be ignored, and an empty message aborts the commit.
#
# Date:      Wed Feb 19 18:41:55 2025 +0200
#
# interactive rebase in progress; onto 3479fad7f476
# Last command done (1 command done):
#    reword a46c703c7dd5 Add tst case 23
# Next command to do (1 remaining command):
#    pick 767edc6fa82e Add test case 3
# You are currently editing a commit while rebasing branch 'main' on '3479fad7f476'.
#
# Changes to be committed:
#       new file:   test2
#
A little time-travel doesn't hurt, now does it? If you peek through the output, you'll notice new file: test2. It's as if we've just added that file, but we get a second chance to reword its commit message, without interfering with the later commit(s). Write, quit, and check the log. Et voila:
$ git log --oneline
f1641c86eaf9 (HEAD -> main) Add test case 3
27f4c7ea2cff Add test case 2
3479fad7f476 Add test case 1
193eb530337c Initial commit
Do note that we now have updated refs for the selected commits, as shown by the change in their SHA-1 IDs. We also saved ourselves the embarrassment of publishing that character soup of a commit message. Nice!
One more thing, you absolutely MUST read the comments you get whilst interactively rebasing; they teach about about the different commands you can use, how to abort the ongoing rebase, and what happens when you delete lines. Seriously, read it!
Scenario C
You done messed up, A-A-ron! Let's fix it
This involves force-pushing to remote repositories, which means potentially destructive changes if due caution is not exercised
$ git log --oneline -1
fa93c7289e84 (HEAD -> main, origin/main) lol
$ git rebase -i HEAD~1
$EDITOR forks
r fa93c7289e84 lol

# Rebase 22241e9fde5b..fa93c7289e84 onto 22241e9fde5b (1 command)
# ...
$EDITOR, again, for rewording
Add test file

# Please enter the commit message for your changes. Lines starting
# with '#' will be ignored, and an empty message aborts the commit.
#
# Date:      Fri Feb 21 02:27:45 2025 +0200
#
# interactive rebase in progress; onto 22241e9fde5b
# Last command done (1 command done):
#    reword fa93c7289e84 lol
# No commands remaining.
# You are currently editing a commit while rebasing branch 'main' on '22241e9fde5b'.
#
# Changes to be committed:
#       new file:   test
#
$ git log --oneline -1
1076b7c647aa (HEAD -> main) Add test file
$ git push --force -u origin main
...
$ git log --oneline -1
1076b7c647aa (HEAD -> main, origin/main) Add test file
Navigating to the remote repository, we'll find that we've reworded the commit in-place, as opposed to creating a new commit on top of the mistaken one
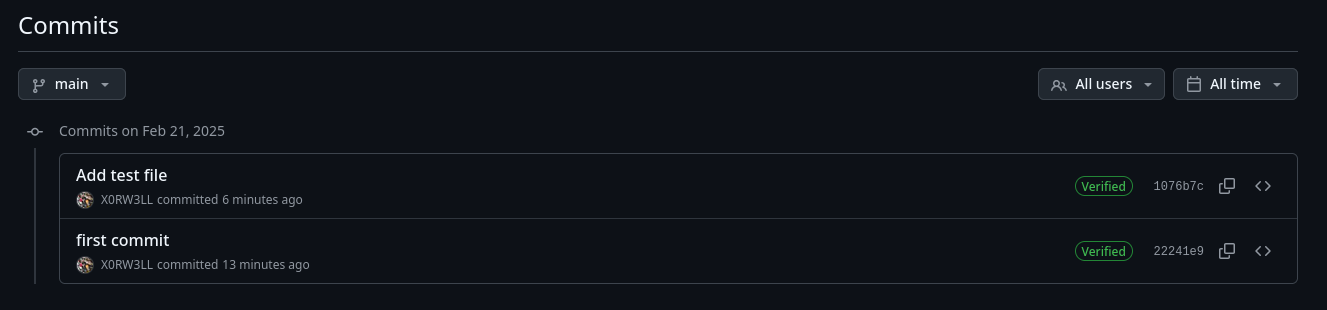
Closing thoughts
Learning Git will make your life so much easier. If you're beginning to learn Git, create a private repository and practice all you can. To quickly pull up the man-pages for whichever git command, you can execute man git push, or man git-push, or git push --help
Git responsibly ;)
ACPI
So what the heck is that character soup ACPI?
ACPI stands for Advanced Configuration and Power Interface
Okay, but what is ACPI?
ACPI can first be understood as an architecture-independent power management and configuration framework that forms a subsystem within the host OS. This framework establishes a hardware register set to define power states (sleep, hibernate, wake, etc). The hardware register set can accommodate operations on dedicated hardware and general purpose hardware.1
Simpler...
To put it very simply, it's the subsystem that handles your computer's power management. If you've ever wondered how LEDs, fans, and other devices/controllers know when to turn on/off, return their status, and a host of other functions, that's ACPI for you. It lets you, well not you; the operating system, and you by association, more or less interface with the motherboard
Interface with the motherboard, you say?
Yes. This brings us to this much needed
Now that we got the formalities out of the way, let's dive in
Telltale signs of broken ACPI
Preface
You've just installed a Linux distro on bare metal. You just made it to the GRUB menu, or systemd-boot, or whatever bootloader of your choice, selected the kernel to boot, and were ready to rock and roll
Depending on your boot parameters, bootloader, plymouth, or logging preferences, you may or may not have noticed one or more along the lines of the following:
ACPI Warning: \_SB.PCI0.GPP0.PEGP._DSM: Argument #4 type mismatch - Found [Buffer], ACPI requires [Package] (20230628/nsarguments-61)
tpm_crb MSFT0101:00: [Firmware Bug]: ACPI region does not cover the entire command/response buffer. [mem 0xbd6bb000-0xbd6bbfff flags 0x200] vs bd6bb000 4000
tpm_crb MSFT0101:00: [Firmware Bug]: ACPI region does not cover the entire command/response buffer. [mem 0xbd6bf000-0xbd6bffff flags 0x200] vs bd6bf000 4000
ACPI Error: Divide by zero (20230628/utmath-478)
ACPI Error: Aborting method \_SB.ATKD.WMNB due to previous error (AE_AML_DIVIDE_BY_ZERO) (20230628/psparse-529)
The above output may or may not match your system's; different manufacturers do things differently. You may get similar output, no ACPI-related errors/warnings at all (lucky you, but that's probably never going to be the case; adhering to the specification may not always be 100% to the dot, unfortunately), different errors/warnings, or a different number of warnings/errors
In this section, we are going to explore how to conduct research, dump ACPI tables, disassembly, compiling modified/custom tables, and upgrading the new tables via initrd
How do I know my ACPI tables are broken?
Besides the example output above, you might notice unexpected behaviors on Linux as opposed to an otherwise smooth-running system on Windows. You might notice:
- Severly degraded battery life
- Always-on/loud laptop fans
- Overheating
- TPM issues
- LEDs not behaving as expected
- General hardware-related issues
- Explicit BIOS errors/firmware bugs/broken ACPI output in
dmesg
This is only a list of potential issues that might be [in]directly ACPI-related. There is not a silver bullet to all issues, however, as you will soon get to understand why. There might be some trivialities that the end-user might be able to address with time, patience, effort, and experience, and there may be issues whose solutions may never see the light of day unless manufacterers step in. Unlike common, higher-level programming languages where function and variable names may hint or downright explicitly say what they do/mean, ASL (ACPI Source Language), however, is different. The ACPI specification dictates what the syntax must, should, must not, or should not be like. For instance, consider the following function name brightness_ctl_lvl: pretty self-explanatory, right? If we were to infer what the function did just by reading its name, we'd probably have a good guess that it would return the brightness control levels, or something along those lines. In ASL, however, that control method is called _BCL. ACPICA (ACPI Component Architecture) project's tools include a disassembler that can help annotate some of the device-specific methods, devices, and so on. The real limitation is obscure methods that only the manufacturer knows about; take P8XH, for instance...What in the fresh blue hell does it mean? Who knows. You're bound by:
- The manufacturer's obscurity
- Your imagination
- Your ability to unpack acronyms within the right context
- Your ability to reverse-engineer
Some of those 4-character method names might be easier to identify than others, like NTFY; simply notify. Others? Maybe not so much. This is why we need to accept the fact that not everything will be easy, if at all possible, to address
What we will be doing here is essentially a case study with some of the things I was able to address on my system. You might come out of it learning absolutely nothing, inspired to do your own research, or fixing an issue that's always bothered you. Again I remind you: proceed at your own risk should you wish to chase it down that far
Beginning the hunt
What you'll need
- Advanced Configuration and Power Interface (ACPI) Specification Version 6.5 1
- Debian-based Linux distro; I am using the 64-bit Kali Linux Installer image 2
- Linux Kernel stable release (6.6.8 at the time of writing) 3
- ASUS TUF FX505DU
- Time
- Patience
- Lots and lots of reading
- Experience with compilation
Installing dependency requirements for ACPI stuff
$ sudo apt install acpica-tools cpio acpi
So, where do I begin?
The first place to start looking is the kernel ring buffer, aka dmesg. Ideally, we want to go through the output line by line to get a sense of the functional flow. It can be daunting at first, but the more you dig into it (i.e. going through the kernel source code and docs for reference), the easier and quicker it is to read and figure out
There are multiple ways to go about this: we can either look for specific levels, or use grep. We are going to use both, and that's because we might miss the bigger picture if we only look at scoped specifics
To start, we'll only look for two message levels; warning and error messages
$ dmesg -tl warn,err
ACPI BIOS Error (bug): Could not resolve symbol [\_SB.PCI0.GPP0.SWUS], AE_NOT_FOUND (20230331/dswload2-162)
ACPI Error: AE_NOT_FOUND, During name lookup/catalog (20230331/psobject-220)
ACPI BIOS Error (bug): Could not resolve symbol [\_SB.PCI0.GPP0.SWUS.SWDS], AE_NOT_FOUND (20230331/dswload2-162)
ACPI Error: AE_NOT_FOUND, During name lookup/catalog (20230331/psobject-220)
ACPI Warning: \_TZ.THRM._PSL: Return Package type mismatch at index 0 - found Integer, expected Reference (20230331/nspredef-260)
tpm_crb MSFT0101:00: [Firmware Bug]: ACPI region does not cover the entire command/response buffer. [mem 0xbd6bb000-0xbd6bbfff flags 0x200] vs bd6bb000 4000
tpm_crb MSFT0101:00: [Firmware Bug]: ACPI region does not cover the entire command/response buffer. [mem 0xbd6bf000-0xbd6bffff flags 0x200] vs bd6bf000 4000
ACPI Warning: \_SB.PCI0.GPP0.PEGP._DSM: Argument #4 type mismatch - Found [Buffer], ACPI requires [Package] (20230331/nsarguments-61)
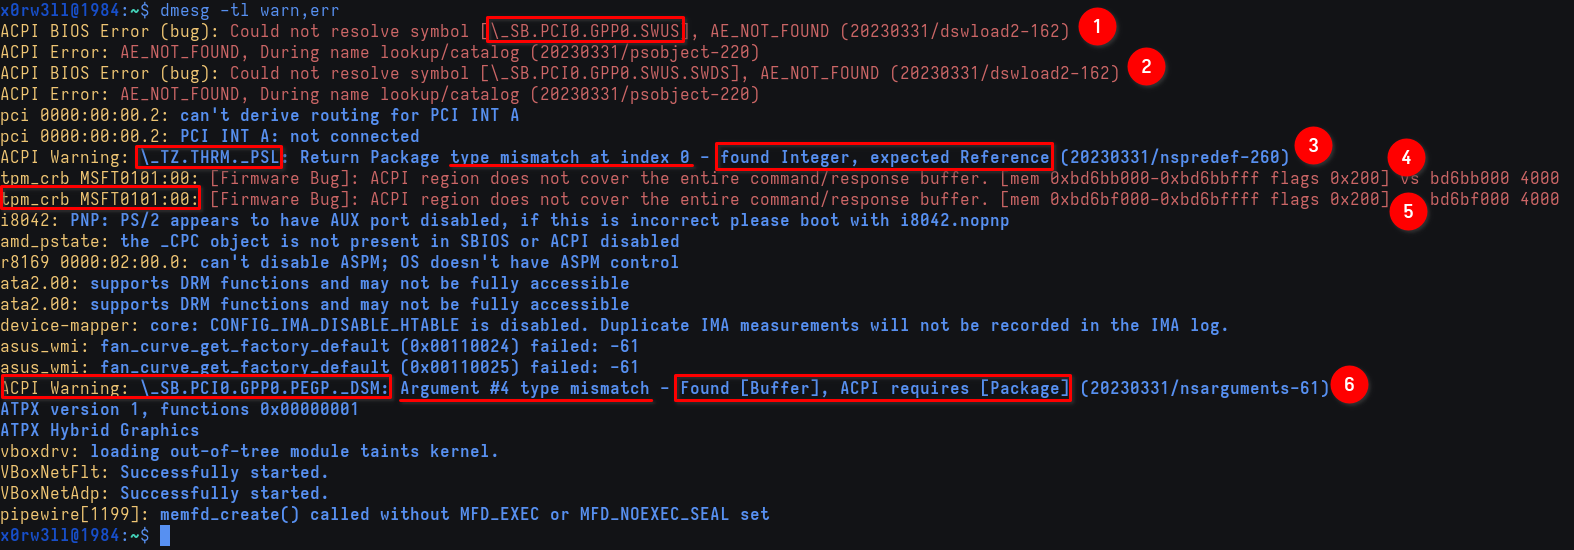
As we can see, we've already got ourselves a handful of potential issues. One thing to keep in mind about ACPI is that, for the end-user, there usually isn't much they can do without really digging into it. Nothing super drastic is going to happen with broken ACPI; the kernel does a lot of heavy-lifting under the hood to accommodate for old/broken BIOS. In theory, the laptop still runs fine. It might not be the greatest thing ever, but it's fully functional. Now, this output has been annoying me since 2019, and it's about time I did something about it
Let's try to unpack what we've got so far:
Could not resolve symbol [\_SB.PCI0.GPP0.SWUS], AE_NOT_FOUND: a symbol was not found in any of the ACPI tables, specifically theSWUSDevice object in this instance\_TZ.THRM._PSL: Return Package type mismatch at index 0 - found Integer, expected Reference: control method was expected to return aReferenceobject, but instead returned anIntegerACPI region does not cover the entire command/response buffer. [mem 0xbd6bb000-0xbd6bbfff flags 0x200] vs bd6bb000 4000: this error is TPM-related, and it means that the command/response buffer is bigger than what the ACPI region covers (ACPI covers 0x1000 (4095 bytes) as opposed to the expected 0x4000 (16384 bytes))\_SB.PCI0.GPP0.PEGP._DSM: Argument #4 type mismatch - Found [Buffer], ACPI requires [Package]: similar to the type mismatch warning above, except this time, thePEGPDevice-Specific Method expected aPackageobject for argv4, whereas aBufferobject was passed instead
In the next section, we are going to get down to business; we are going to dump ACPI tables, disassemble them, and go through the ASL code
We might also glance over ACPI Specification Version 5.0
Personal preference; choice of distro is all yours
Analyzing ACPI tables
Dumping, extracting, and disassembling ACPI tables
First things first: we need to identify the compiler version. This is going to ensure more successful [dis]assembly. We are mostly interested in DSDT and SSDT, so we'll be looking specifically for those
$ dmesg -t | egrep 'ACPI: (DSDT|SSDT)'
ACPI: DSDT 0x00000000BD6F2218 013DD0 (v02 _ASUS_ Notebook 01072009 INTL 20120913)
ACPI: SSDT 0x00000000BD7062C8 005419 (v02 AMD    AmdTable 00000002 MSFT 02000002)
ACPI: SSDT 0x00000000BD718F00 00119C (v01 AMD    AMD CPU  00000001 AMD  00000001)
ACPI: SSDT 0x00000000BD71A8E0 000C33 (v01 AMD    AmdTable 00000001 INTL 20120913)
ACPI: SSDT 0x00000000BD71B518 0010AC (v01 AMD    AmdTable 00000001 INTL 20120913)
ACPI: SSDT 0x00000000BD71C5C8 001A15 (v01 AMD    CPMD3CLD 00000001 INTL 20120913)
ACPI: SSDT 0x00000000BD71DFE0 0002AA (v01 AMD    AmdTable 00000001 INTL 20120913)
ACPI: SSDT 0x00000000BD71E290 001C69 (v01 AMD    AmdTable 00000001 INTL 20120913)
The compiler version is the last field in the output following the Compiler Name (e.g. AMD, INTL, MSFT). In our case, the compiler version is 201209131 (yes, that is the date 2012-09-13), and this is important because we are going to build2 that specific version to disassemble and compile the tables. Considering the fact that this was compiled in 2012, we may need to use an older container to successfully build that release. I used an Ubuntu Xenial container using systemd-nspawn with the build dependencies installed. Note that we won't be installing tools; we'll build and use them in-place as we don't want any conflicts after having installed the latest release of acpica-tools from the package repos
Assuming we've already downloaded the source tarball and built it, let's begin by dumping ACPI using the system-wide install of ACPICA, extracting the binary tables , then disassembling them using the 2012 release we built. Switching between the container and host system is implied, as well as moving files between both. For instance, I built ACPICA release 2012 in the container, and copied the release binaries (only really interested in iasl; make iasl) back to my host so I don't have to keep switching between the two. The following assumes the current working directory to be ~/stock_acpi/ on the host, where the compiled binaries had been copied
# Copy iasl from the container into the current working directory
$ sudo cp /var/lib/machines/compiler/root/acpica-unix-20120913/generate/unix/bin64/iasl .
# Dump ACPI to the output file acpidump
$ sudo acpidump > acpidump
# Extract DSDT/SSDT
$ acpixtract acpidump

Intel ACPI Component Architecture
ACPI Binary Table Extraction Utility version 20230628
Copyright (c) 2000 - 2023 Intel Corporation

  DSDT -   81360 bytes written (0x00013DD0) - dsdt.dat
  SSDT -    4268 bytes written (0x000010AC) - ssdt1.dat
  SSDT -    4508 bytes written (0x0000119C) - ssdt2.dat
  SSDT -    7273 bytes written (0x00001C69) - ssdt3.dat
  SSDT -    6677 bytes written (0x00001A15) - ssdt4.dat
  SSDT -    3123 bytes written (0x00000C33) - ssdt5.dat
  SSDT -   21529 bytes written (0x00005419) - ssdt6.dat
  SSDT -     682 bytes written (0x000002AA) - ssdt7.dat
We will break here for a quick interjection:
I’d just like to interject for a moment. What you’re refering to as Linux, is in fact, GNU/Linux, or as I’ve recently taken to calling it, GNU plus Linux.
ACPI tables can have external references. Much like how you can modularize your code to be split over multiple files, ACPI tables can be like this too. For successful disassembly, we need to instruct the disassembler to include other tables for external symbol resolution
# Prepare SSDT file names to be passed as args to iasl -e <tables> -d dsdt.dat
$ ls | grep ssdt | tr '\n' ',' && echo
ssdt1.dat,ssdt2.dat,ssdt3.dat,ssdt4.dat,ssdt5.dat,ssdt6.dat,ssdt7.dat,
# Disassemble DSDT, including external symbols found in SSDT
$ ./iasl -e ssdt1.dat,ssdt2.dat,ssdt3.dat,ssdt4.dat,ssdt5.dat,ssdt6.dat,ssdt7.dat -d dsdt.dat
......
Parsing completed
Disassembly completed
ASL Output:    dsdt.dsl - 651790 bytes
# Disassemble SSDT[1-7], including external symbols found in SSDT[1-7]
$ for ssdt in $(ls | grep ssdt); do ./iasl -e ssdt1.dat,ssdt2.dat,ssdt3.dat,ssdt4.dat,ssdt5.dat,ssdt6.dat,ssdt7.dat -d $ssdt; done
......
Parsing completed
Disassembly completed
ASL Output:    ssdt7.dsl - 5219 bytes
$ ls | grep dsl
dsdt.dsl
ssdt1.dsl
ssdt2.dsl
ssdt3.dsl
ssdt4.dsl
ssdt5.dsl
ssdt6.dsl
ssdt7.dsl
Et voilà! We have successfully disassembled DSDT/SSDT. We can finally move on to the real deal
Inspecting DSDT
In this section, we will be focusing primarily on the PSL control method. At this point, we have two options:
- Manual inspection: Inspecting ASL code using an editor, and looking for specific methods using
grep - Assisted inspection: Using
acpiexecto load tables, dump all their methods at once, and even debugging them
1. Manual inspection
Recall the warning from earlier?
ACPI Warning: \_TZ.THRM._PSL: Return Package type mismatch at index 0 - found Integer, expected Reference (20230331/nspredef-260)
Remember how we also mentioned that filtering the kernel ring buffer based on message level may end up hiding important context? Let's have a second look at the above warning in the context of event chronology. We are preserving timestamps here as they provide important context as well
$ dmesg | grep -i acpi
[1.308440] ACPI Warning: \_TZ.THRM._PSL: Return Package type mismatch at index 0 - found Integer, expected Reference (20230331/nspredef-260)
[1.308450] ACPI: \_TZ_.THRM: Invalid passive threshold
[1.332434] ACPI: thermal: Thermal Zone [THRM] (73 C)
Previously, that second line was not included because we'd chosen to show only warnings and errors, whereas that message level is info. Moreover, noticing the timestamps, we can tell that shortly after the warning was emitted, the thermal zone THRM complained about an invalid passive threshold. What does that mean?
This is where the ACPI specification3 is a must-have. For the sake of brevity, I will summarize the concept. Thermal control in ACPI boils down to 3 policies: active, passive, and critical. Active cooling is achieved by turning on the fan device(s) to actively cool the system. Passive cooling is achieved by clock throttling. The upside to passive cooling is little-to-no noise (fan device(s) should spin at the minimum RPM they support, or turn off altogether), and less power consumption (i.e. power saving). The downside, however, is the performance impact that's a result of throttling. Finally, and most importantly, the critical policy. As the name suggests, this policy activates when the thermal zone reaches the critical temperature trip point, immediately shutting down the system to avoid hardware damage. This policy we will avoid messing with at all costs because, if not handled properly, we can literally fry the device beyond repair
Now that we got the concepts out of the way, let's focus on passive cooling, specifically the \_TZ.THRM._PSL control method; the Thermal Zone THRM's Passive List. This thermal object is what evaluates to a list of processor objects to be used for passive cooling4. We'll start by grepping for _PSL in dsdt.dsl, or searching for it using the editor of choice
$ grep -n _PSL dsdt.dsl
16164:            Method (_PSL, 0, NotSerialized)  // _PSL: Passive List
We can see that iASL has already very graciously annotated the object for us. Let's open the file at the line number returned and take a look at the method in question
$ vim dsdt.dsl +16164
Lo and behold! We've got ourselves a *checks notes* useless stub method. Well, it's not exactly "useless", per se, since _PSV is also defined5
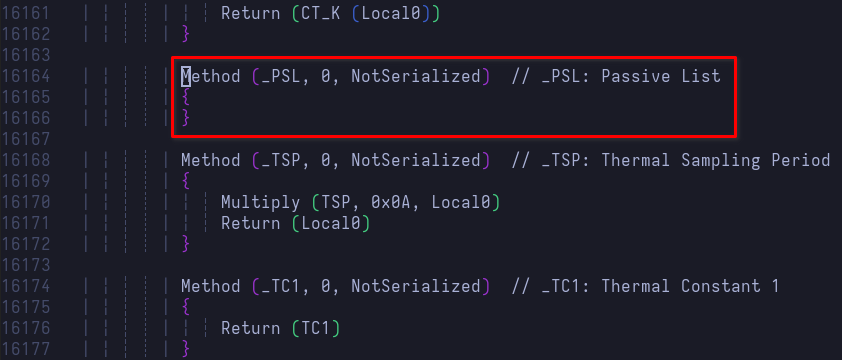
Looking back at the warning, it makes sense now. Stub method would return "nothing" or UnknownObj. What we need to figure out now is how we can get this method to evaluate to a package containing references to all processor objects to be used for passive cooling. We are going to do this in the next subchapter
2. Assisted inspection
We'll take this brief detour to check out what acpiexec can offer. First off, acpiexec works with compiled AML (ACPI Machine Language) tables, so let's go ahead and compile DSDT using the latest release of iasl, followed by loading the compiled AML table into acpiexec
# Compile DSDT
$ iasl dsdt.dsl
......
ASL Input:     dsdt.dsl -  651790 bytes   8601 keywords      0 source lines
AML Output:    dsdt.aml -   81446 bytes   6414 opcodes    2187 named objects

Compilation successful. 0 Errors, 73 Warnings, 391 Remarks, 129 Optimizations, 3 Constants Folded
# Load DSDT into acpiexec, disabling execution of STA/INI methods during init
$ acpiexec -di dsdt.aml
......
ACPI: Enabled 1 GPEs in block 00 to 7F
- find _PSL
    \_TZ.THRM._PSL Method       0x55e15e8614d0 001 Args 0 Len 0000 Aml 0x55e15e7c85f2
- disassemble \_TZ.THRM._PSL
{
- quit
What happened there? What is with the {? Well, thing about acpiexec is that it will not show you the full code driving a control method, so you won't be seeing Method (...) for starters. Additionally, if the control method really is just a stub, there will be nothing to show. Where the program really shines, however, is for quick debugging and finding methods on the fly. This can be useful if you want to test certain changes before upgrading the tables and rebooting the system. From this point on, however, we will mostly rely on manual inspection since we can get the full picture better that way
Addressing _PSL
Let's pull up the _PSL control method for a quick refresher
Method (_PSL, 0, NotSerialized)  // _PSL: Passive List
{
}
O' Processor, where art thou?
According to the specification1, we need to get _PSL to return a package of references to processor objects. This evidently implies that we need to find the processor objects to begin with
How can we do that? Simple: by reading the spec! Except, you'll quickly find that there are no references to any Processor operators in the language reference. Why is that?
If we take a look at Appendix C: Deprecated Content2, we'll find that declaring processor objects has been deprecated in favor of the Device operator. Additionally, remember how the compiler version was 20120913? This bit was important in identifying the ACPI specification version used, version 5.0 in our case. If we download the spec PDF, surely enough, the Processor operator is there
Additionally, and again according to the spec
If _PSL is defined then:
- If a linear performance control register is defined (via either P_BLK or the _PTC, _TSS, _TPC objects) for a processor defined in _PSL or for a processor device in the zone as indicated by _TZM then the _TC1, _TC2, and objects must exist. A_TFP or _TSP object must also be defined if the device requires polling.
- If a linear performance control register is not defined (via either P_BLK or the _PTC, _TSS, _TPC objects) for a processor defined in _PSL or for a processor device in the zone as indicated by _TZM then the processor must support processor performance states (in other words, the processor’s processor object must include _PCT, _PSS, and _PPC).
Right now, the task is locating said processor objects and making sure they fit either of the requirements outlined above. According to whichever spec version is used, we can consider a list of possible names to search for. For brevity, however, we already have a hint, or an idea, that processor objects were declared in the \_PR scope. Scope is an ASL operator, so we can begin our search by looking for Scope (_PR)
$ grep -n 'Scope (_PR)' dsdt.dsl
3046:    Scope (_PR)
$ vim dsdt.dsl +3046
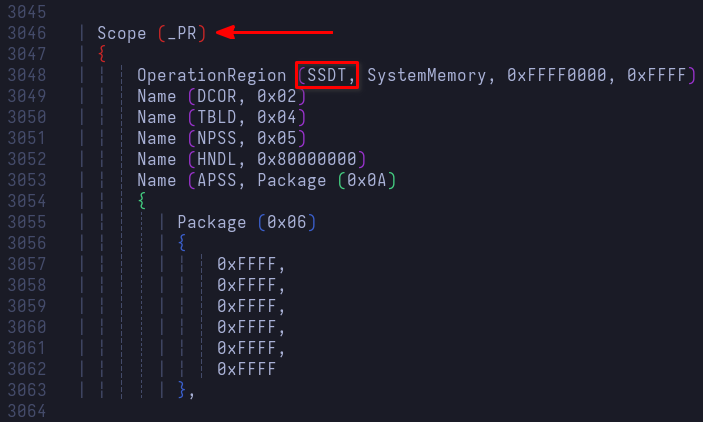
We can see that this named scope operates on a secondary SSDT, which means we can find processor-related named objects (performance, states, capabilities, dependencies, etc.) in one of the SSDTs we'd already disassembled. Furthermore, scrolling down the \_PR scope, we'll find the notation used to be P[0-9A-F]{3}. On other hardware, it might be CPU[0-9] instead
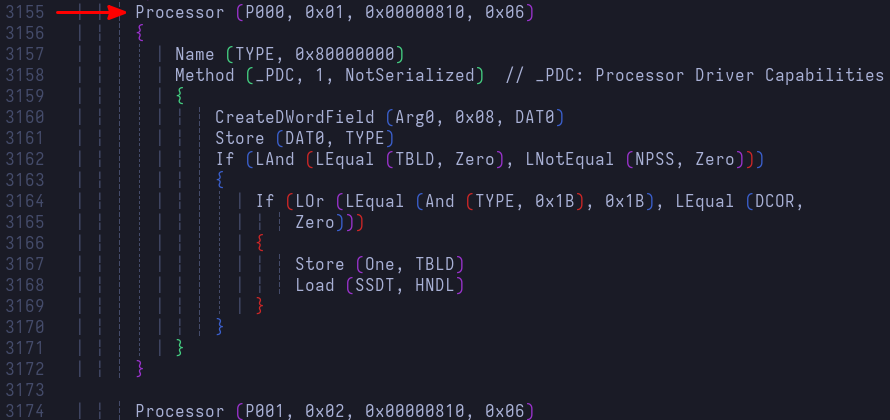
Now that we know where to look, let's grep away
$ egrep -n 'P[0-9A-F]{3}' ssdt*.dsl
ssdt2.dsl:22:    External (\_PR_.P000, DeviceObj)
ssdt2.dsl:23:    External (\_PR_.P001, DeviceObj)
ssdt2.dsl:24:    External (\_PR_.P002, DeviceObj)
ssdt2.dsl:25:    External (\_PR_.P003, DeviceObj)
ssdt2.dsl:26:    External (\_PR_.P004, DeviceObj)
ssdt2.dsl:27:    External (\_PR_.P005, DeviceObj)
ssdt2.dsl:28:    External (\_PR_.P006, DeviceObj)
ssdt2.dsl:29:    External (\_PR_.P007, DeviceObj)
There we have it! This is an AMD Ryzen 7 3750H processor, and so it makes sense we're getting 8 processor objects shown in the second SSDT
Let's make sure the thermal zone interface requirements are satisfied; each processor object referenced MUST support performance states, namely Performance Control, Performance Supported States, and Performance Present Capabilities
Note: AMD Ryzen 7 3750H only meets the latter requirement mentioned at the beginning of this section, and that's why we're looking for those objects specifically
$ egrep '_P(CT|SS|PC)' ssdt2.dsl
ssdt2.dsl:        Name (_PCT, Package (0x02)  // _PCT: Performance Control
ssdt2.dsl:        Name (_PSS, Package (0x03)  // _PSS: Performance Supported States
ssdt2.dsl:        Method (_PPC, 0, NotSerialized)  // _PPC: Performance Present Capabilites
ssdt2.dsl:        Name (_PCT, Package (0x02)  // _PCT: Performance Control
ssdt2.dsl:        Name (_PSS, Package (0x03)  // _PSS: Performance Supported States
ssdt2.dsl:        Method (_PPC, 0, NotSerialized)  // _PPC: Performance Present Capabilites
ssdt2.dsl:        Name (_PCT, Package (0x02)  // _PCT: Performance Control
ssdt2.dsl:        Name (_PSS, Package (0x03)  // _PSS: Performance Supported States
ssdt2.dsl:        Method (_PPC, 0, NotSerialized)  // _PPC: Performance Present Capabilites
ssdt2.dsl:        Name (_PCT, Package (0x02)  // _PCT: Performance Control
ssdt2.dsl:        Name (_PSS, Package (0x03)  // _PSS: Performance Supported States
ssdt2.dsl:        Method (_PPC, 0, NotSerialized)  // _PPC: Performance Present Capabilites
ssdt2.dsl:        Name (_PCT, Package (0x02)  // _PCT: Performance Control
ssdt2.dsl:        Name (_PSS, Package (0x03)  // _PSS: Performance Supported States
ssdt2.dsl:        Method (_PPC, 0, NotSerialized)  // _PPC: Performance Present Capabilites
ssdt2.dsl:        Name (_PCT, Package (0x02)  // _PCT: Performance Control
ssdt2.dsl:        Name (_PSS, Package (0x03)  // _PSS: Performance Supported States
ssdt2.dsl:        Method (_PPC, 0, NotSerialized)  // _PPC: Performance Present Capabilites
ssdt2.dsl:        Name (_PCT, Package (0x02)  // _PCT: Performance Control
ssdt2.dsl:        Name (_PSS, Package (0x03)  // _PSS: Performance Supported States
ssdt2.dsl:        Method (_PPC, 0, NotSerialized)  // _PPC: Performance Present Capabilites
ssdt2.dsl:        Name (_PCT, Package (0x02)  // _PCT: Performance Control
ssdt2.dsl:        Name (_PSS, Package (0x03)  // _PSS: Performance Supported States
ssdt2.dsl:        Method (_PPC, 0, NotSerialized)  // _PPC: Performance Present Capabilites
With that knowledge in mind, let's put it to good use
To Method, or not to Method, that is the question
We need to pause for a second. In the original table, _PSL is defined as a control method, and I'd been referring to it as such for consistency. However, we need to understand that control method declaration entails a set of things. Where a list of references to processor objects is concerned, do we need an entire control method along with its 8 automatically available local variables? Or do we simply need a named object that evaluates to the required list and be done with it?
We do not need any arguments for _PSL, so a named object sounds like it makes better sense. Moreover, in the Thermal Zone Examples3, the Name operator was indeed used, so this is what we'll be going with
Tracking changes
At this point, it's probably a good idea to consider initializing a local git repo for the stock_acpi directory so it's easier to track changes
# Assuming we're already in ~/stock_acpi
$ git init .
# Since we haven't modified anything yet, track and commit all files
$ git add -A
$ git commit -m 'Added stock ACPI'
Whenever we make any changes from this point on, we will provide meaningful commit messages that are easier to look for later. A good commit message convention to follow would probably look like <SIGNATURE>: \_SCOPE.OBJ.OBJ: <short description>. For example:
DSDT: \_TZ.THRM._PSL: Declared thermal zone THRM's passive list
SSDT2: \_PR.P000: Added missing C-State dependencies
More details can be added to the commit message's body to provide context and explanations. Let's go ahead and create our first commit with real work
Defining _PSL
We are going to define _PSL as a named object using the processor objects previously found in SSDT
# dsdt.dsl

- Method (_PSL, 0, NotSerialized)  // _PSL: Passive List
- {
- }
+ Name (_PSL, Package (0x08)  // _PSL: Passive List
+ {
+     \_PR.P000,
+     \_PR.P001,
+     \_PR.P002,
+     \_PR.P003,
+     \_PR.P004,
+     \_PR.P005,
+     \_PR.P006,
+     \_PR.P007
+ })
Now that we've made a change to the table, we should also bump the DefinitionBlock's OEMRevision; that's the last argument. This is useful for tracking which tables are upgraded, and what the revision is. We could also incorporate this OEMRevision in the commit message so it's easier to track changes across revisions
- DefinitionBlock ("dsdt.aml", "DSDT", 2, "_ASUS_", "Notebook", 0x01072009)
+ DefinitionBlock ("dsdt.aml", "DSDT", 2, "_ASUS_", "Notebook", 0x01072010)
Next, compile the custom table, and commit the changes
$ iasl dsdt.dsl
$ git add dsdt.dsl dsdt.aml
$ git commit
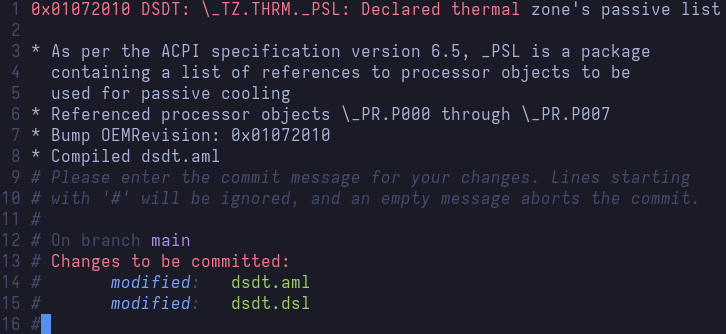
Upgrading DSDT via initrd
Now that we've ensured successful compilation and committed our changes, it's time to put it to the test. We will be using the kernel documentation4 as a guide to upgrade ACPI tables
The explanation to the following steps is outlined in great detail in the docs (link in footnotes)
$ mkdir -p kernel/firmware/acpi
$ cp dsdt.aml kernel/firmware/acpi
For this next step, however, we will be doing things a bit differently
# Create uncompressed cpio archive
$ find kernel | cpio -H newc --create > acpi.cpio
# Copy the new archive to EFI
$ sudo cp acpi.cpio /boot/efi/EFI/acpi/
Since I am using systemd-boot, I will pass the initrd /EFI/acpi/acpi.cpio boot param in my image's conf file found at /boot/efi/loader/entries/<entry-token>-$(uname -r).conf
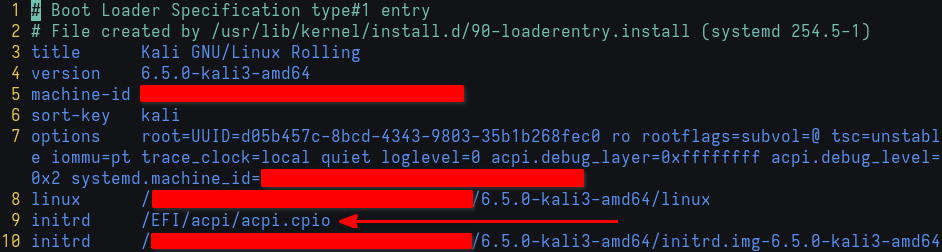
Remember how we installed the acpi package earlier? We are now going to take note of its output, along with the dmesg output pertinent to _PSL. We have already seen the latter's warning messages, so let's now focus on what we can see with acpi
# Be verbose
$ acpi -V
Battery 0: Charging, 90%, 00:19:38 until charged
Battery 0: design capacity 4050 mAh, last full capacity 2083 mAh = 51%
Adapter 0: on-line
Thermal 0: ok, 60.0 degrees C
Thermal 0: trip point 0 switches to mode critical at temperature 103.0 degrees C
Cooling 0: Processor 0 of 10
Cooling 1: Processor 0 of 10
Cooling 2: Processor 0 of 10
Cooling 3: Processor 0 of 10
Cooling 4: Processor 0 of 10
Cooling 5: Processor 0 of 10
Cooling 6: Processor 0 of 10
Cooling 7: Processor 0 of 10
Right now, there is only 1 trip point defined, and that is the critical trip point. Let's now reboot the system and see if we've had any luck
Verifying the changes
First things first: we'll look for the kernel buffer ring's messages levels that are above warning to make sure we haven't messed up. We can do this by issuing dmesg -tl warn+
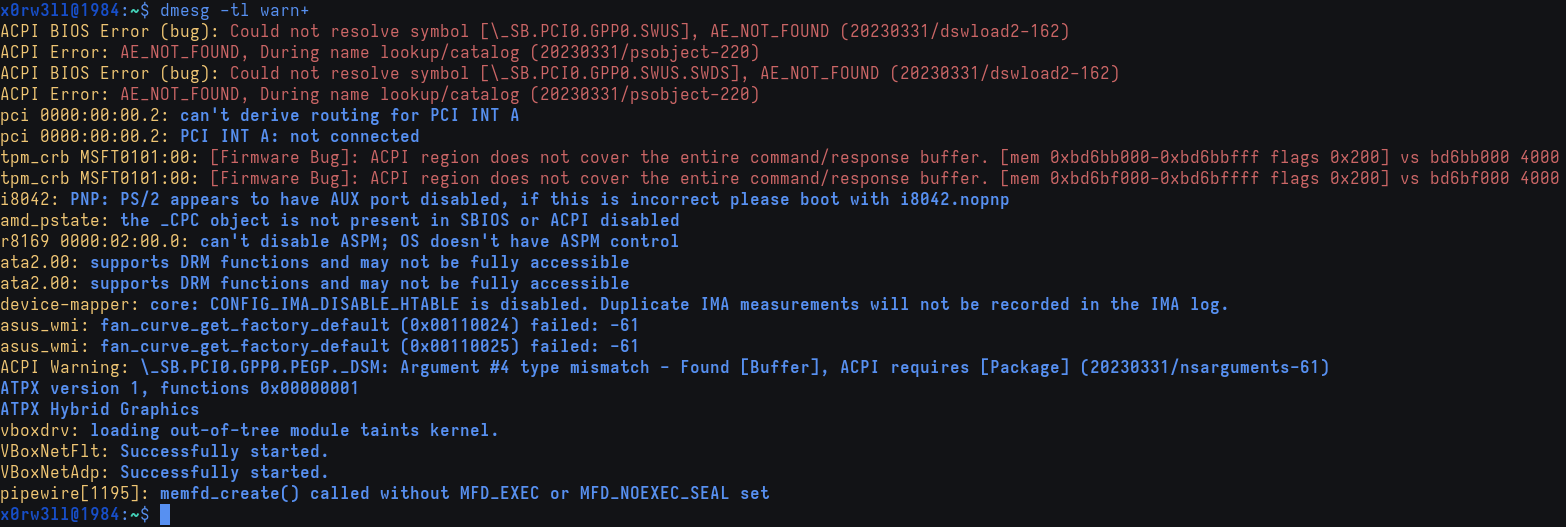
Looks promising! We can no longer see the ACPI warning complaining about _PSL returning an integer as opposed to a reference. Additionally, if we dmesg | grep -i acpi, the thermal zone's Invalid passive threshold informational message seems to have disappeared as well!
Let's triple-check what acpi -V has to say
$ acpi -V
Battery 0: Charging, 94%, 00:13:09 until charged
Battery 0: design capacity 4050 mAh, last full capacity 2083 mAh = 51%
Adapter 0: on-line
Thermal 0: ok, 50.0 degrees C
Thermal 0: trip point 0 switches to mode critical at temperature 103.0 degrees C
Thermal 0: trip point 1 switches to mode passive at temperature 96.0 degrees C
Cooling 0: Processor 0 of 10
Cooling 1: Processor 0 of 10
Cooling 2: Processor 0 of 10
Cooling 3: Processor 0 of 10
Cooling 4: Processor 0 of 10
Cooling 5: Processor 0 of 10
Cooling 6: Processor 0 of 10
Cooling 7: Processor 0 of 10
And just like that! We can now see another thermal trip point that was previously not there, and it is indeed the passive cooling trip point!
Now, I don't like the fact that it's set to 96 degrees Celsius; that only means that active cooling will be preferred until thermals are at 96 degress. I'd much rather run a fairly silent system, so this is what we'll be looking at next
Addressing _PSV
If you haven't already compiled a custom kernel of your choosing, now is the time to do so. Reason being that we need to build a kernel with ACPI_DEBUG* support so we can view debug output in dmesg. I cannot stress this enough, but it's going to be better if you clone the repo as opposed to downloading the tarball archive; git grep is going to be a lot faster an easier than grep when it's needed
As mentioned previously, this writeup assumes prior experience, so I'll skip the full kernel build walkthrough, but opt to only addressing the important bits instead
Building a custom kernel for ACPI debugging
The most important bit we need is to enable ACPI_DEBUG* in the kernel configuration. make menuconfig, followed by searching for ACPI_DEBUG, should take us right where we need to be. We are going to enable ACPI_DEBUG, ACPI_DEBUGGER, and ACPI_DEBUGGER_USER.
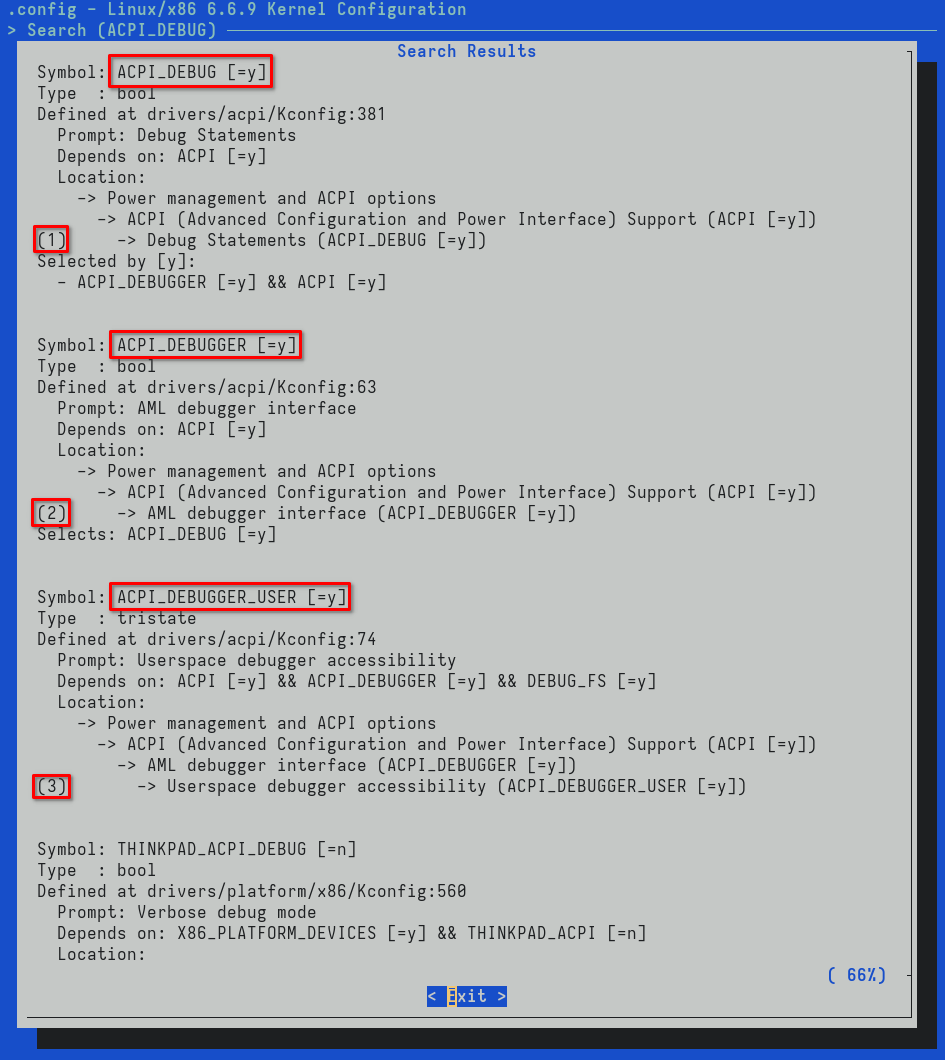
Additionally, we are going to enable two more options
- Allow upgrading ACPI tables via initrd (if not already enabled)
- Allow ACPI methods to be inserted/replaced at run time
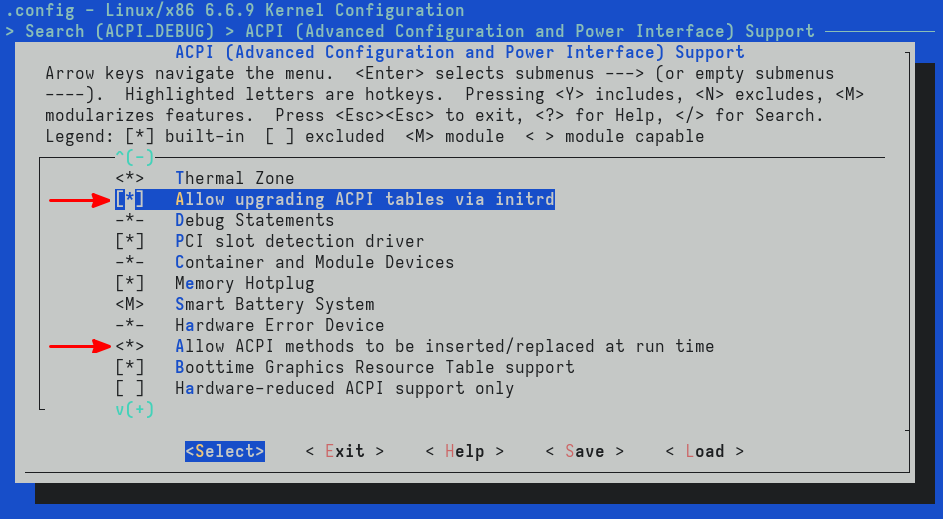
We are only interested in bindeb-pkgs so we can save a little time building the kernel. To ensure successfull bootup, don't forget to install the headers package as well
# Current working directory is assumed to be /path/to/kernel/repo/root/
# Build only the binary deb packages using all processors
$ make -j$(nproc) bindeb-pkg
# Install the new kernel and headers (replace file names with actual pkg names)
$ sudo apt install ../linux-image-x.y.z.deb ../linux-headers-x.y.z.deb
Finally, add the initrd /EFI/acpi/acpi.cpio param to the new kernel entry, as well as the following boot params: acpi.debug_layer=0xffffffff acpi.debug_level=0x2, and reboot into the newly compiled kernel. Here is what my configuration looks like
# Boot Loader Specification type#1 entry
# File created by /usr/lib/kernel/install.d/90-loaderentry.install (systemd 254.5-1)
title      Kali GNU/Linux Rolling
version    6.6.8-nvop-ssdt+
machine-id REDACTED
sort-key   kali
options    root=UUID=d05b457c-8bcd-4343-9803-35b1b268fec0 ro rootflags=subvol=@ tsc=unstabl
e iommu=pt trace_clock=local quiet loglevel=0 acpi.debug_layer=0xffffffff acpi.debug_level=
0x2 systemd.machine_id=REDACTED
linux      /REDACTED/6.6.8-nvop-ssdt+/linux
initrd     /EFI/acpi/acpi.cpio
initrd     /REDACTED/6.6.8-nvop-ssdt+/initrd.img-6.6.8-nvop-ssdt+
Finding passive temperature in DSDT
We already know that the passive temperature is 96 degrees Celcius, but we want to double-check that, and see if there's anything we can do about it. Naturally, we'll grep -n _PSV dsdt.dsl and jump straight into the method declaration
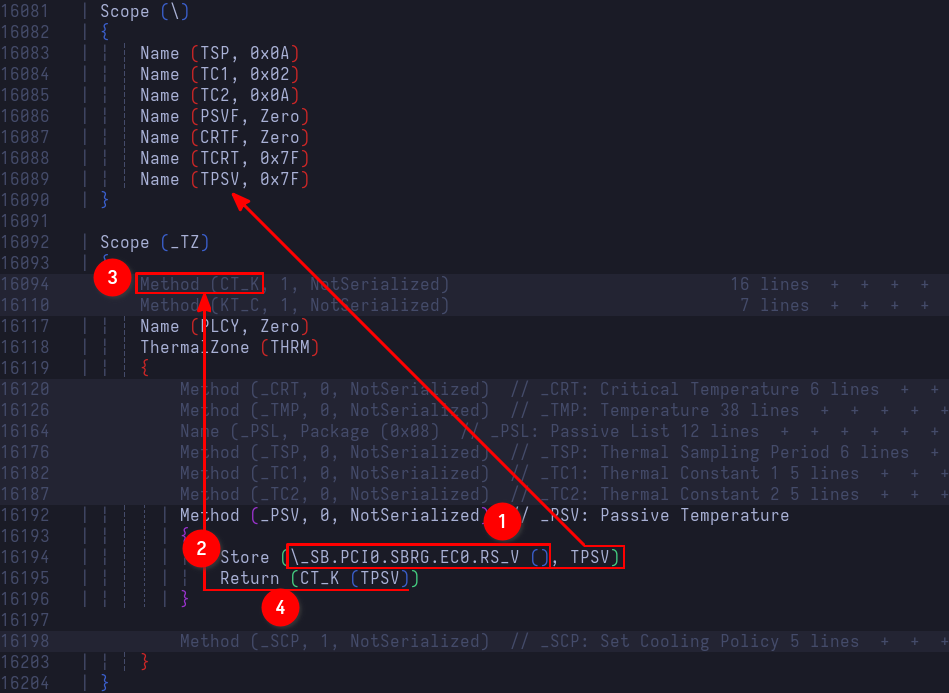
The method begins by (1) executing another control method, namely RS_V, that belongs to Embedded Controller1 0 (EC0), (2) stores its return value in the named object TPSV (initialized to 0x7F), and (4) returns the temperature (in Kelvin * 10) after having passed it (in Celsius) as an argument to the CT_K control method (Celsius To Kelvin). Do note that the actual temperature will be in tenth of degrees Kelvin, so for instance, if the returned value from _PSV is 3692, the actual temperature will be 369.2 degrees Kelvin, which is precisely 96.05 degress Celsius
Let's go ahead and insert a debug statement to verify the passive temperature. There are two ways to do this
- Using the
Storeoperator - Assigning the value to the
Debugobject directly
We'll use both for demonstration purposes
Method (_PSV, 0, NotSerialized)  // _PSV: Passive Temperature
{
    Store (\_SB.PCI0.SBRG.EC0.RS_V (), TPSV)
    Store ("\_TZ.THRM._PSV: CT_K (TPSV): following debug output in Kelvin * 10", Debug)
    Debug = CT_K (TPSV) // Return value from \_SB.PCI0.SBRG.EC0.RS_V () is stored in TPSV
    Debug = "\_TZ.THRM._PSV: TPSV: following debug output in Celsius"
    Debug = TPSV
    Return (CT_K (TPSV))
}
From this point on, we're assuming bumping the OEMRevision, compiling the modified table, copying it into the kernel/firmware/acpi directory, creating the cpio archive, overwriting the previous one in /boot/efi/EFI/acpi/acpi.cpio, and committing changes. After that's done and the system's been rebooted, we'll check for warning-level messages since that's where debug output ends up. We can grep for specific filters as well to filter out unwanted messages, but only after we've made sure no new errors/warnings showed up
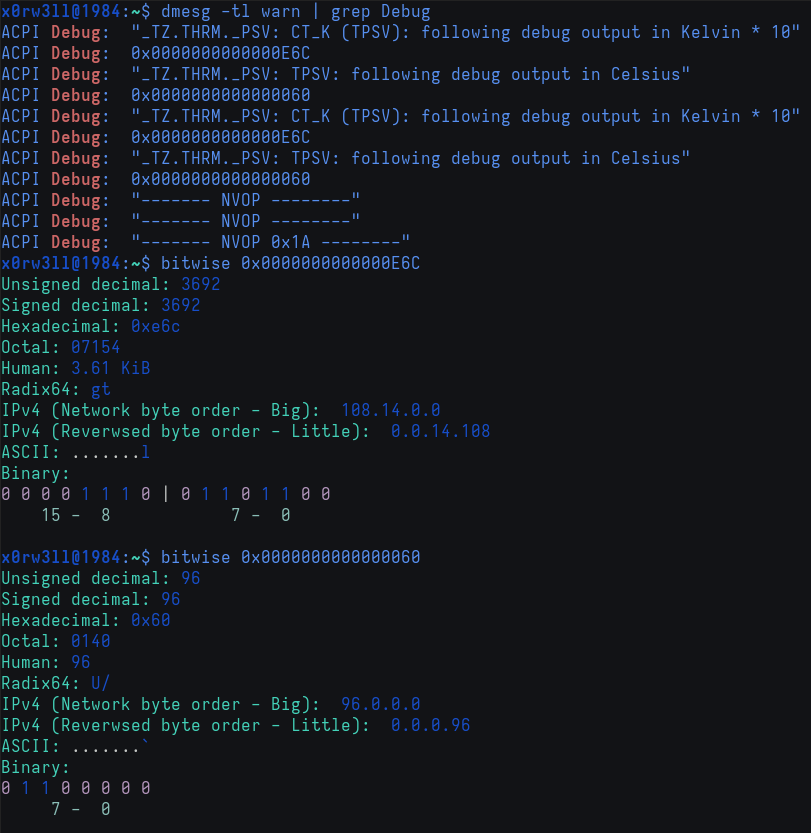
The output verifies what we've previously seen using acpi -V. That is, 3692/10 degrees Kelvin, or 96 degrees Celsius. We needed to see the output coming straight from _PSV for two reasons
- Practicing inserting debug statements
- Understanding that we are to return the passive temperature in Kelvin, multiplied by 10
I use bitwise for quick type conversions, and there's a Vim plugin for it too which can be handy at times. You can install it via sudo apt install bitwise
Let's refer back to the specification's cooling preferences2 for a second
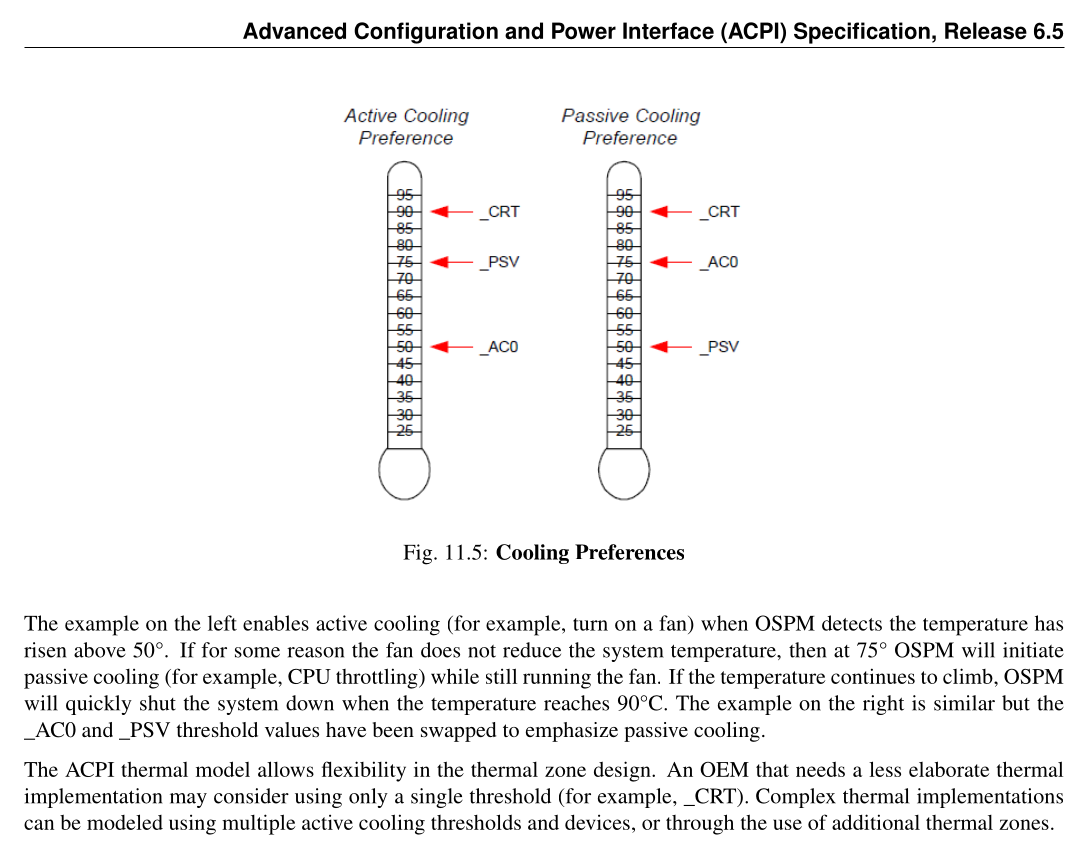
When the active cooling (_AC0) temperature trip point is set lower than the passive cooling (_PSV) temperature trip point, active cooling is preferred. That means passive cooling will only be triggered when the temperature exceeds the passive trip point. In our case, the passive temperature is set to 96 degrees Celsius, meaning the fans will always be running, and throttling will only kick in when the temperature exceeds the aforementioned trip point. We want to flip the table here and give preference to passive cooling so the fans can calm the heck down when they're not needed. We also want to try and save up on power consumption. Having always-on fan devices, and processors that are power-hungry, definitely does not help us achieve that goal. The solution is pretty simple at this point: return a lower temperature (50C vs 96C) in tenths of degrees Kelvin. I chose to lower mine down to 50.8753 degrees Celsius, or roughly 3240/10 degrees Kelvin
Judging by my own usage, idle/low-power temperatures are at about 40-or-so degrees Celsius, and I don't want my system to run on moderately warm components for too long. I could go for 60 degrees Celsius instead, but I'd rather preserve the components' longevity on the long run than save up on power consumption for the shorter run. Without further ado, let's implement the new change
$ git diff
diff --git a/dsdt.dsl b/dsdt.dsl
index ac6af92..d31e097 100644
--- a/dsdt.dsl
+++ b/dsdt.dsl
@@ -17,7 +17,7 @@
  *     Compiler Version 0x20120913 (538052883)
  */

-DefinitionBlock ("dsdt.aml", "DSDT", 2, "_ASUS_", "Notebook", 0x01072011)
+DefinitionBlock ("dsdt.aml", "DSDT", 2, "_ASUS_", "Notebook", 0x01072012)
 {
     External (\_SB_.ALIB, MethodObj)    // 2 Arguments
     External (\_SB_.PCI0.GPP0.PEGP)
@@ -16191,12 +16191,16 @@ DefinitionBlock ("dsdt.aml", "DSDT", 2, "_ASUS_", "Notebook", 0x01072011)

             Method (_PSV, 0, NotSerialized)  // _PSV: Passive Temperature
             {
-                Store (\_SB.PCI0.SBRG.EC0.RS_V (), TPSV)
-                Store ("\_TZ.THRM._PSV: CT_K (TPSV): following debug output in Kelvin * 10", Debug)
-                Debug = CT_K (TPSV)
-                Debug = "\_TZ.THRM._PSV: TPSV: following debug output in Celsius"
-                Debug = TPSV
-                Return (CT_K (TPSV))
+                /*  Comment out original values
+                *   We don't need another control method execution
+                *   We can definitely do away with all the unnecessary
+                *   work involved, including the mutex
+                */
+
+                // Store (\_SB.PCI0.SBRG.EC0.RS_V (), TPSV)
+                // Return (CT_K (TPSV))
+
+                Return (0xCA8) // Hex for 3240 (tenths of Kelvin) => 50.85C
             }

             Method (_SCP, 1, NotSerialized)  // _SCP: Set Cooling Policy
After rebooting the system, we can finally see that we've successfully overridden the return value from _PSV. Now, did we do this correctly? Technically, yes, but also...It's not exactly that simple. For us to do things 100% correctly and properly, we need in-depth knowledge of hardware, ACPI, and experience with systems programming. However, we are not interested in becoming OEMs ourselves—we just want to address whatever issues we can address with what little knowledge and experience we have without causing any additional issues. That logic is obviously not sound as we should always strive to do everything correctly, but let's face it: this is already close enough to our goal, and I'll take it. As far as I'm concerned, and for once, I can't actually hear the fans at all on Linux! Up until this point, regardless of power consumption, my laptop's fans were always on. Doing this, however, gave me the chance to work with a completely silent laptop. There are some caveats that I did not mention: for instance, you'll really experience a "fanless" device when no external displays are involved. When you connect an HDMI cable to an external monitor, there's always more power consumption involved, but I've yet to dive into ACPI in greater detail if I want to look further into this. Maybe I'll revisit it again at a later point in the future when I've had the chance to acquire more knowledge and experience. For now, however, I am very happy with the results so far
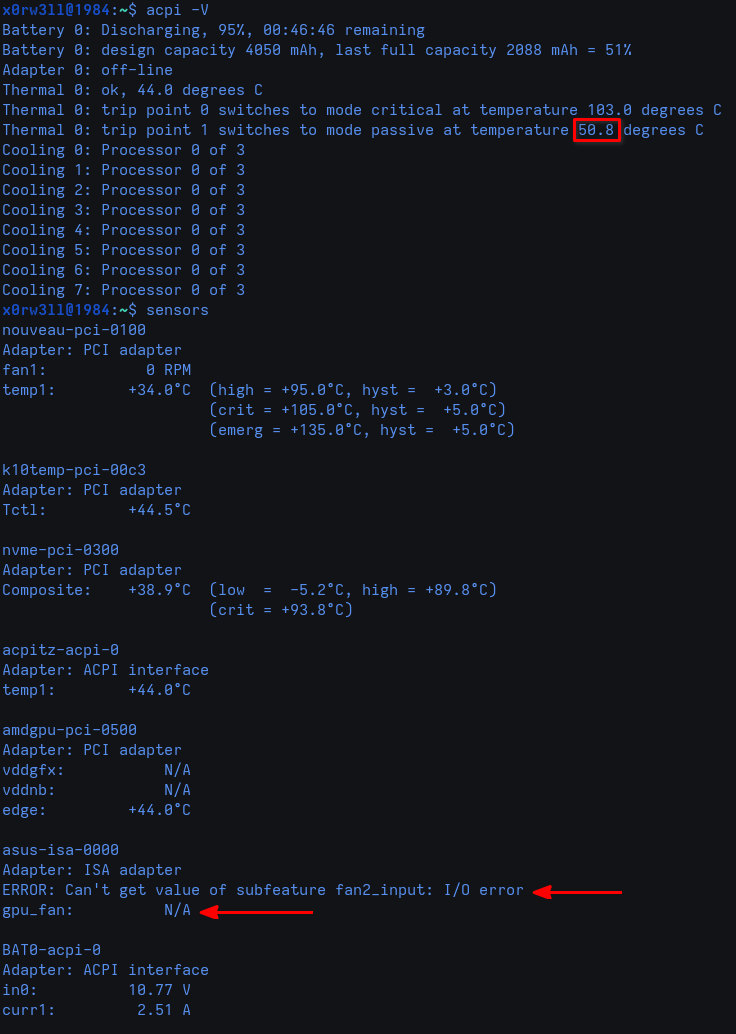
Reflection
So far, we've been able to address not one, but two ACPI-related warnings. I've largely left out some explanations/gotchas, and I did so on purpose for the following reasons:
- Remember: this is not a guide, but a writeup on how I addressed some issues related to my hardware, which may very well be different from yours
- I can't claim to be an expert on any of this, so I'd rather not deliver wrong information based on my own limited knowledge/interpretation
- You'll come across a wealth of accurate information by following the linked documentaion/specification
When I started this journey, I had to go through the process of finding information, hunting for resources, lots of trial and error, and many a sleepless night. Ultimately, however, it was really worth it
My main goal with this project is to get anyone interested in doing their own research. If this helps in any way, I'll be very glad. If I get criticised to the bone for it, I'll also be very glad because that means I'll not only learn what I did or understood wrong, but also more people can learn from my mistakes. See, we're not perfect, and that's okay. What matters is how we respond to criticism in a manner that's both healthy and productive
Moving forward, we now have a couple of issues still dangling, one of which involves making a certain change to the nouveau_acpi driver in the kernel source code. I don't do C myself, but I've had to learn just enough C for me to able to go forward with addressing the aforementioned issue. Ideally, however, we don't want half-baked solutions; we want solid, verifiable solutions. I am still learning though, and there's a lot of value for me in doing things this way I am, so the tradeoff is justifiable for me. We'll stop by TPM first, however, before we can get to nouveau
Let's go ahead and continue on to addressing TPM
Addressing TPM
Once again, here's a quick refresher on the TPM-related error
tpm_crb MSFT0101:00: [Firmware Bug]: ACPI region does not cover the entire command/response buffer. [mem 0xbd6bb000-0xbd6bbfff flags 0x200] vs bd6bb000 4000
tpm_crb MSFT0101:00: [Firmware Bug]: ACPI region does not cover the entire command/response buffer. [mem 0xbd6bf000-0xbd6bffff flags 0x200] vs bd6bf000 4000
Right off the bat, we can already get a hint as to why this error came up; there seems to be 1 byte missing (0xbd6bbfff-0xbd6bb000 = 4095 vs 0xbd6bf000-0xbd6bb000 = 4096)
Quickest way to find the source file for the driver is to use git grep in the kernel's repo. You could either git grep 'region does not cover', or git grep tpm_crb. You'll find that the file exists at drivers/char/tpm/tpm_crb.c. Let's take a look at the function responsible for displaying this error
/*
 * Work around broken BIOSs that return inconsistent values from the ACPI
 * region vs the registers. Trust the ACPI region. Such broken systems
 * probably cannot send large TPM commands since the buffer will be truncated.
 */
static u64 crb_fixup_cmd_size(struct device *dev, struct resource *io_res,
			      u64 start, u64 size)
{
	if (io_res->start > start || io_res->end < start)
		return size;

	if (start + size - 1 <= io_res->end)
		return size;

	dev_err(dev,
		FW_BUG "ACPI region does not cover the entire command/response buffer. %pr vs %llx %llx\n",
		io_res, start, size);

	return io_res->end - start + 1;
}
Let's first talk about what any of this means. crb stands for command response buffer. We interact with the Trusted Platform Module using a medium, if you will, and that is the character device at /dev/tpmX (or /dev/tpmrmX for TPM 2.0). We send command buffers, and TPM sends back response buffers. The above function checks the IO resources of the TPM device, i.e. start/base address in memory versus limit/end address. Devices declared in ACPI are supplied system resources; be they memory address ranges, I/O ports, interrupts, and/or DMA channels
As we'll soon see, this specific TPM device is allocated two 32-bit memory descriptors, describing fixed ranges of memory addresses; one for the command buffer, and another for the response buffer. Each memory descriptor has a Write status, base address, range length (i.e. total number of bytes decoded in the memory range), and optionally a name for the descriptor1
As mentioned earlier, we could just comment out dev_err(...) and call it a day, but we would probably never know how or why ACPI came into play, or understand what actually happened under the hood. Let's find out! We'll do so by grepping DSDT for either TPM or MSFT0101 as per the output shown earlier
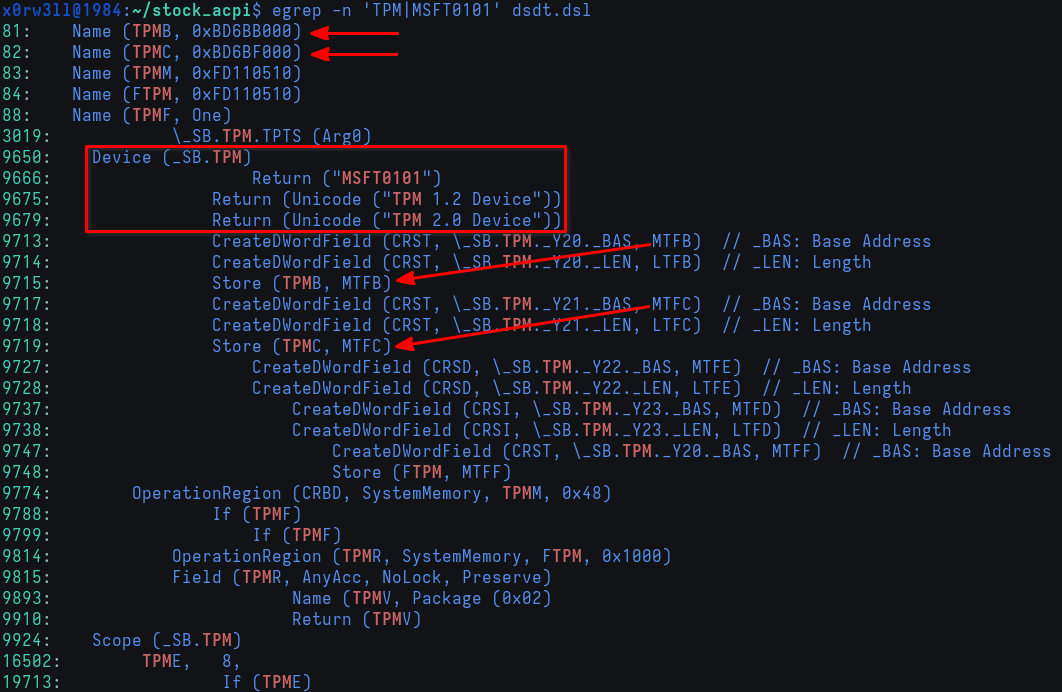
As we can see, TPM is a device that's evidently declared in DSDT, and we can already see the memory addresses referenced in the error. What we need to figure out now is making sense of the error in the context of ACPI now that we know where to look
Let's take a closer look at the bits most relevant to our research. I will move a few lines around so it's easier to read, and I'll also provide some additional /* comments */ besides the compiler-provided // annotations
Name (TPMB, 0xBD6BB000)                                        /* Some memory address for something (more on that later) */
Name (TPMC, 0xBD6BF000)                                        /* Some memory address for another thing (more on that later) */
Name (AMDT, One)                                               /* AMD TPM, probably */
Device (_SB.TPM)                                               /* Device declaration */
{
    Name (CRST, ResourceTemplate ()                            /* Current Resource Settings Template, or related to the T in AMDT */
    {
        Memory32Fixed (ReadOnly,                               /* Write status */
            0x00000000,                                        // Address Base
            0x00001000,                                        // Address Length
            _Y20)                                              /* DescriptorName */
        Memory32Fixed (ReadOnly,                               /* Write status */
            0xFED70000,                                        // Address Base
            0x00001000,                                        // Address Length
            _Y21)                                              /* DescriptorName */
    })
    Method (_CRS, 0, Serialized)                               // _CRS: Current Resource Settings
    {
        If (LEqual (AMDT, One))
        {
            CreateDWordField (CRST, \_SB.TPM._Y20._BAS, MTFB)  // _BAS: Base Address
            CreateDWordField (CRST, \_SB.TPM._Y20._LEN, LTFB)  // _LEN: Length
            Store (TPMB, MTFB)                                 /* Store 0xBD6BB000 into MTFB; the DWordField describing the base address */
            Store (0x1000, LTFB)                               /* Store 0x1000 into LFTB; the DWordField describing the address range length */
            CreateDWordField (CRST, \_SB.TPM._Y21._BAS, MTFC)  // _BAS: Base Address
            CreateDWordField (CRST, \_SB.TPM._Y21._LEN, LTFC)  // _LEN: Length
            Store (TPMC, MTFC)                                 /* Store 0xBD6BF000 into MTFC; the DWordField describing the base address */
            Store (0x1000, LTFC)                               /* Store 0x1000 into LFTC; the DWordField describing the address range length */
            Return (CRST)                                      /* Return the resource template describing the memory region allocated for the TPM device */
        }
    }
}
Let's break down what's happening. First off, 2 named objects, essentially variables, are declared; each holding its respective memory address to be used later. AMDT can be considered a boolean true in this case
Next, the TPM device is declared, containing a variety of objects. What's most relevant to us at this time is the resource template CRST that returns the memory descriptors, along with the associated _CRS (Current Resource Settings) object
The device is supplied two memory descriptors, each defining the memory region within which the device will occupy and operate. Initially, the descriptor named _Y20 describes a fixed 32-bit ReadOnly memory range beginning at 0x00000000 up to 0x00001000. This buffer's base address, as well as its length, will later be modified by TPMB, and LFTB, respectively. Similarly, _Y21 describes 0xFED70000 through 0xFED71000, later modified by MFTC, and LFTC, respectively
In the following subchapter AML Debug, we will explore this further using the help of acpiexec and the ACPI specification
AML Debug
Referencing the ACPI specification
As for the _CRS object, the code inside it executes at runtime. So, really, the initial memory description of the device is short lived, relatively speaking. To really understand what's happening in this control method, we're gonna find it useful to bring back an old friend; acpiexec. Before we do that, however, let's put the theory in perspective, using the ACPI spec as a reference
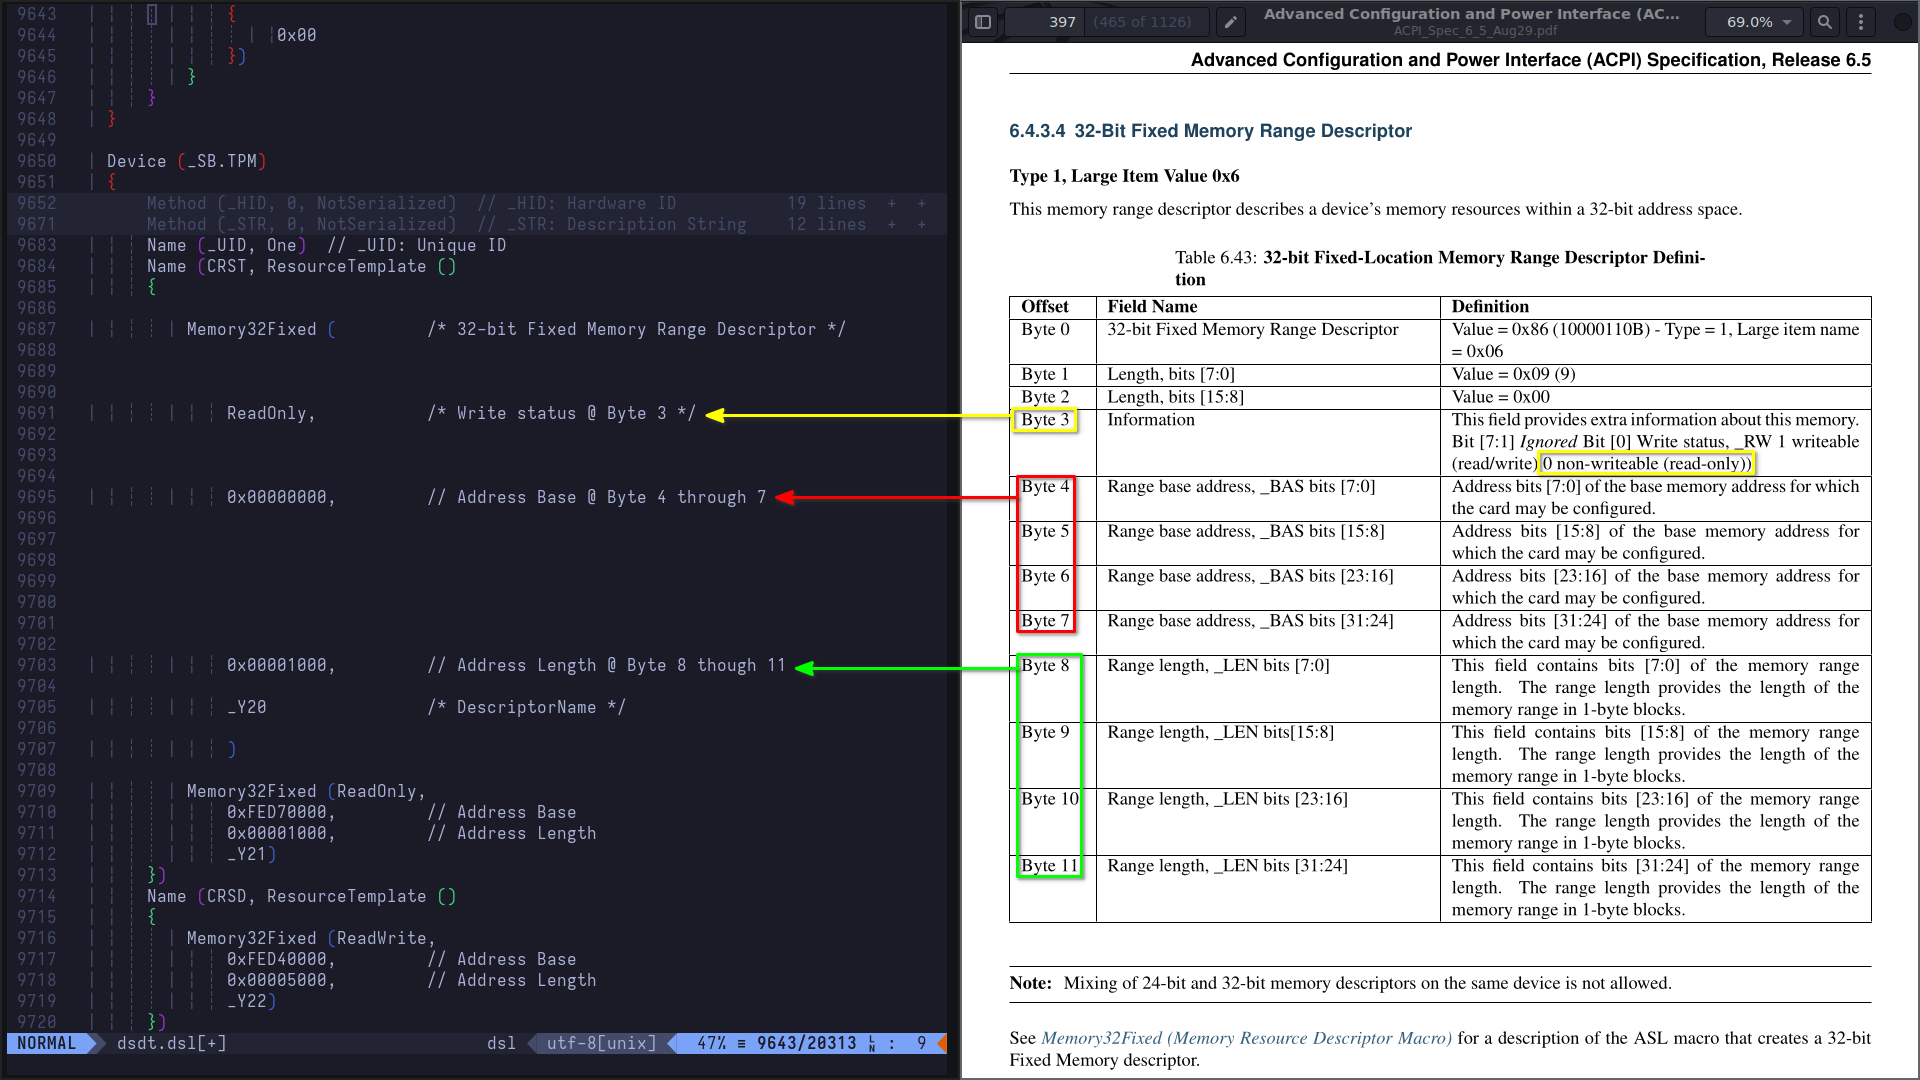
As per the screenshot, Memory32Fixed is buffer, or a byte stream, consisting of 12 bytes that describe the device's memory resources within the 32-bit address space1
Strap in, for this is gonna get real serious real quick! We're gonna go above and beyond with this one, and it's going to involve surgery a whole lot of debugging; fun!
Debugging AML with acpiexec
At this point, we should already have the compiled AML DSDT. We'll dive right in. Since we already know the namespace, device, and method, we can start debugging right away. Alternatively, we can execute - find TPM, or - find _CRS. The downside to the latter is that it will find all objects that have Current Resource Settings. Spoiler alert: they're definitely more than 5. To debug, we can execute - de \_SB.TPM._CRS (shorthand/truncated commands are supported down to a single character, but I prefer using 2 or sometimes 3 for disambiguity. Commands are also case-insensitive). Here's a list of commands and aliases we can commonly use for quick debugging:
debug=>dorde(single-step a control method)dump=>du(display ACPI objects or memory)<Enter>(single-step next AML opcode (over calls)evaluateorexecute=>eorex(evaluate object or control method)
We'll start by loading the compiled dsdt.aml table using $ acpiexec -di dsdt.aml, followed by debugging the _CRS object by executing % d \_SB.TPM._CRS. Next, we'll single-step AML opcodes by hitting <Enter>, and occasionally dump ResultObj using % du <Address> where <Address> is the object's address (e.g. 0x560769fed140). In the following screenshot, we are doing just that; debugging the control method, single-stepping one AML opcode, and dumping the result buffer which is the 32-bit fixed memory range descriptor
Note: $ refers to the low-privilege user's default shell; % refers to the AML debugger
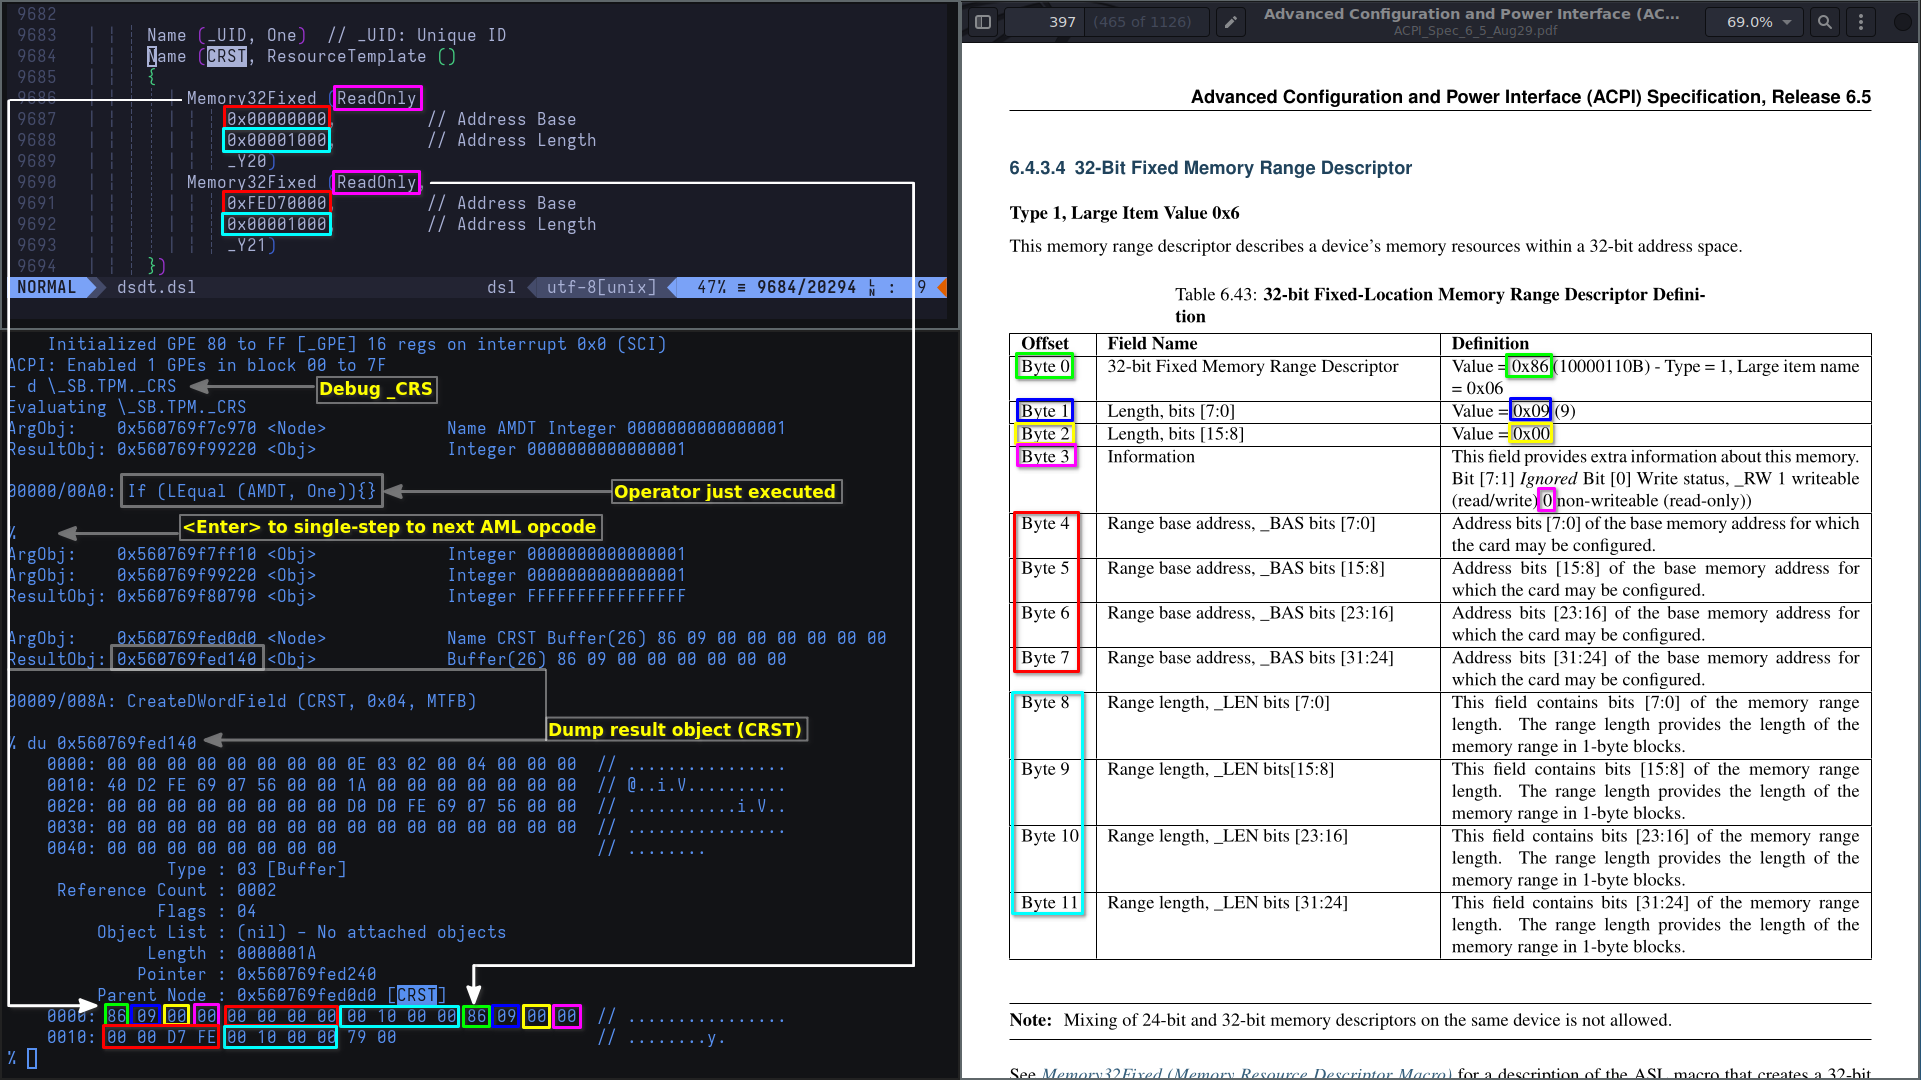
We can clearly see the memory descriptor's initial value, with all the bytes described in the specification. Let's try to visualize it
# Initial resource settings for the TPM device

+-------+-------+-------+-------+-------+-------+-------+-------+-------+-------+--------+--------+
| 86    | 09    | 00    | 00    | 00    | 00    | 00    | 00    | 00    | 10    | 00     | 00     |
| ^^~~~ | ^^~~~ | ^^~~~ | ^^~~~ | ^^~~~ | ^^~~~ | ^^~~~ | ^^~~~ | ^^~~~ | ^^~~~ | ^^~~~~ | ^^~~~~ |--> _Y20 Descriptor
| Byte0 | Byte1 | Byte2 | Byte3 | Byte4 | Byte5 | Byte6 | Byte7 | Byte8 | Byte9 | Byte10 | Byte11 |
+-------+-------+-------+-------+-------+-------+-------+-------+-------+-------+--------+--------+
  \---+   \---+   \---+   \---+   \---+   \---+   \---+   \---+   \---+   \---+   \----+   \----+
      |       |       |       |       |       |       |       |       |       |        |        +----> Byte11: Range length, _LEN bits [31:24] -----------+
      |       |       |       |       |       |       |       |       |       |        +-------------> Byte10: Range length, _LEN bits [23:16] -----------+
      |       |       |       |       |       |       |       |       |       +----------------------> Byte9:  Range length, _LEN bits [15:8] ------------+
      |       |       |       |       |       |       |       |       +------------------------------> Byte8:  Range length, _LEN bits [7:0] -------------+
      |       |       |       |       |       |       |       +--------------------------------------> Byte7:  Range base address, _BAS bits [31:24] --+  |
      |       |       |       |       |       |       +----------------------------------------------> Byte6:  Range base address, _BAS bits [23:16] --+  |
      |       |       |       |       |       +------------------------------------------------------> Byte5:  Range base address, _BAS bits [15:8] ---+  |
      |       |       |       |       +--------------------------------------------------------------> Byte4:  Range base address, _BAS bits [7:0] ----+  |
      |       |       |       +----------------------------------------------------------------------> Byte3:  Information                             |  |
      |       |       +------------------------------------------------------------------------------> Byte2:  Length, bits [15:8]                     |  |
      |       +--------------------------------------------------------------------------------------> Byte1:  Length, bits [7:0]                      |  |
      +----------------------------------------------------------------------------------------------> Byte0:  32-bit Fixed Memory Range Descriptor    |  |
                                                                                                                                                       |  |
                                  |........0x00000000.........|<---------------------------------------------------------------------------------------+  |
                                                                                                                                                          |
                                                                  |.........0x00001000..........|<--------------------------------------------------------+


+-------+-------+-------+-------+-------+-------+-------+-------+-------+-------+--------+--------+
| 86    | 09    | 00    | 00    | 00    | 00    | D7    | FE    | 00    | 10    | 00     | 00     |
| ^^~~~ | ^^~~~ | ^^~~~ | ^^~~~ | ^^~~~ | ^^~~~ | ^^~~~ | ^^~~~ | ^^~~~ | ^^~~~ | ^^~~~~ | ^^~~~~ |--> _Y21 Descriptor
| Byte0 | Byte1 | Byte2 | Byte3 | Byte4 | Byte5 | Byte6 | Byte7 | Byte8 | Byte9 | Byte10 | Byte11 |
+-------+-------+-------+-------+-------+-------+-------+-------+-------+-------+--------+--------+
  \---+   \---+   \---+   \---+   \---+   \---+   \---+   \---+   \---+   \---+   \----+   \----+
      |       |       |       |       |       |       |       |       |       |        |        +----> Byte11: Range length, _LEN bits [31:24] -----------+
      |       |       |       |       |       |       |       |       |       |        +-------------> Byte10: Range length, _LEN bits [23:16] -----------+
      |       |       |       |       |       |       |       |       |       +----------------------> Byte9:  Range length, _LEN bits [15:8] ------------+
      |       |       |       |       |       |       |       |       +------------------------------> Byte8:  Range length, _LEN bits [7:0] -------------+
      |       |       |       |       |       |       |       +--------------------------------------> Byte7:  Range base address, _BAS bits [31:24] --+  |
      |       |       |       |       |       |       +----------------------------------------------> Byte6:  Range base address, _BAS bits [23:16] --+  |
      |       |       |       |       |       +------------------------------------------------------> Byte5:  Range base address, _BAS bits [15:8] ---+  |
      |       |       |       |       +--------------------------------------------------------------> Byte4:  Range base address, _BAS bits [7:0] ----+  |
      |       |       |       +----------------------------------------------------------------------> Byte3:  Information                             |  |
      |       |       +------------------------------------------------------------------------------> Byte2:  Length, bits [15:8]                     |  |
      |       +--------------------------------------------------------------------------------------> Byte1:  Length, bits [7:0]                      |  |
      +----------------------------------------------------------------------------------------------> Byte0:  32-bit Fixed Memory Range Descriptor    |  |
                                                                                                                                                       |  |
                                  |........0xFED70000.........|<---------------------------------------------------------------------------------------+  |
                                                                                                                                                          |
                                                                  |.........0x00001000..........|<--------------------------------------------------------+

                                                                                                   +------------------------------------------------------+
                                                                                                   | 86 09 00 00 00 00 00 00 00 10 00 00: _Y20 Descriptor |
                                                                                                   | 86 09 00 00 00 00 D7 FE 00 10 00 00: _Y21 Descriptor |
                                                                                                   | 79 00                              : End Tag         |
                                                                                                   +------------------------------------------------------+
Note: End Tag is a small resource data type. It consists of two bytes; 0x79 at Byte 0, and a checksum at Byte 1 covering all resource data after the serial identifier. The latter is automatically generated by the compiler and produces a zero sum2
So what does any of this mean? And why do we need not one, but two memory range descriptors? What are TPMB and TPMC? Soon, we'll find out that those two will be the base addresses for the command and response buffers, respectively. Let's see that in action by allowing the control method to run to completion by executing % g or % go
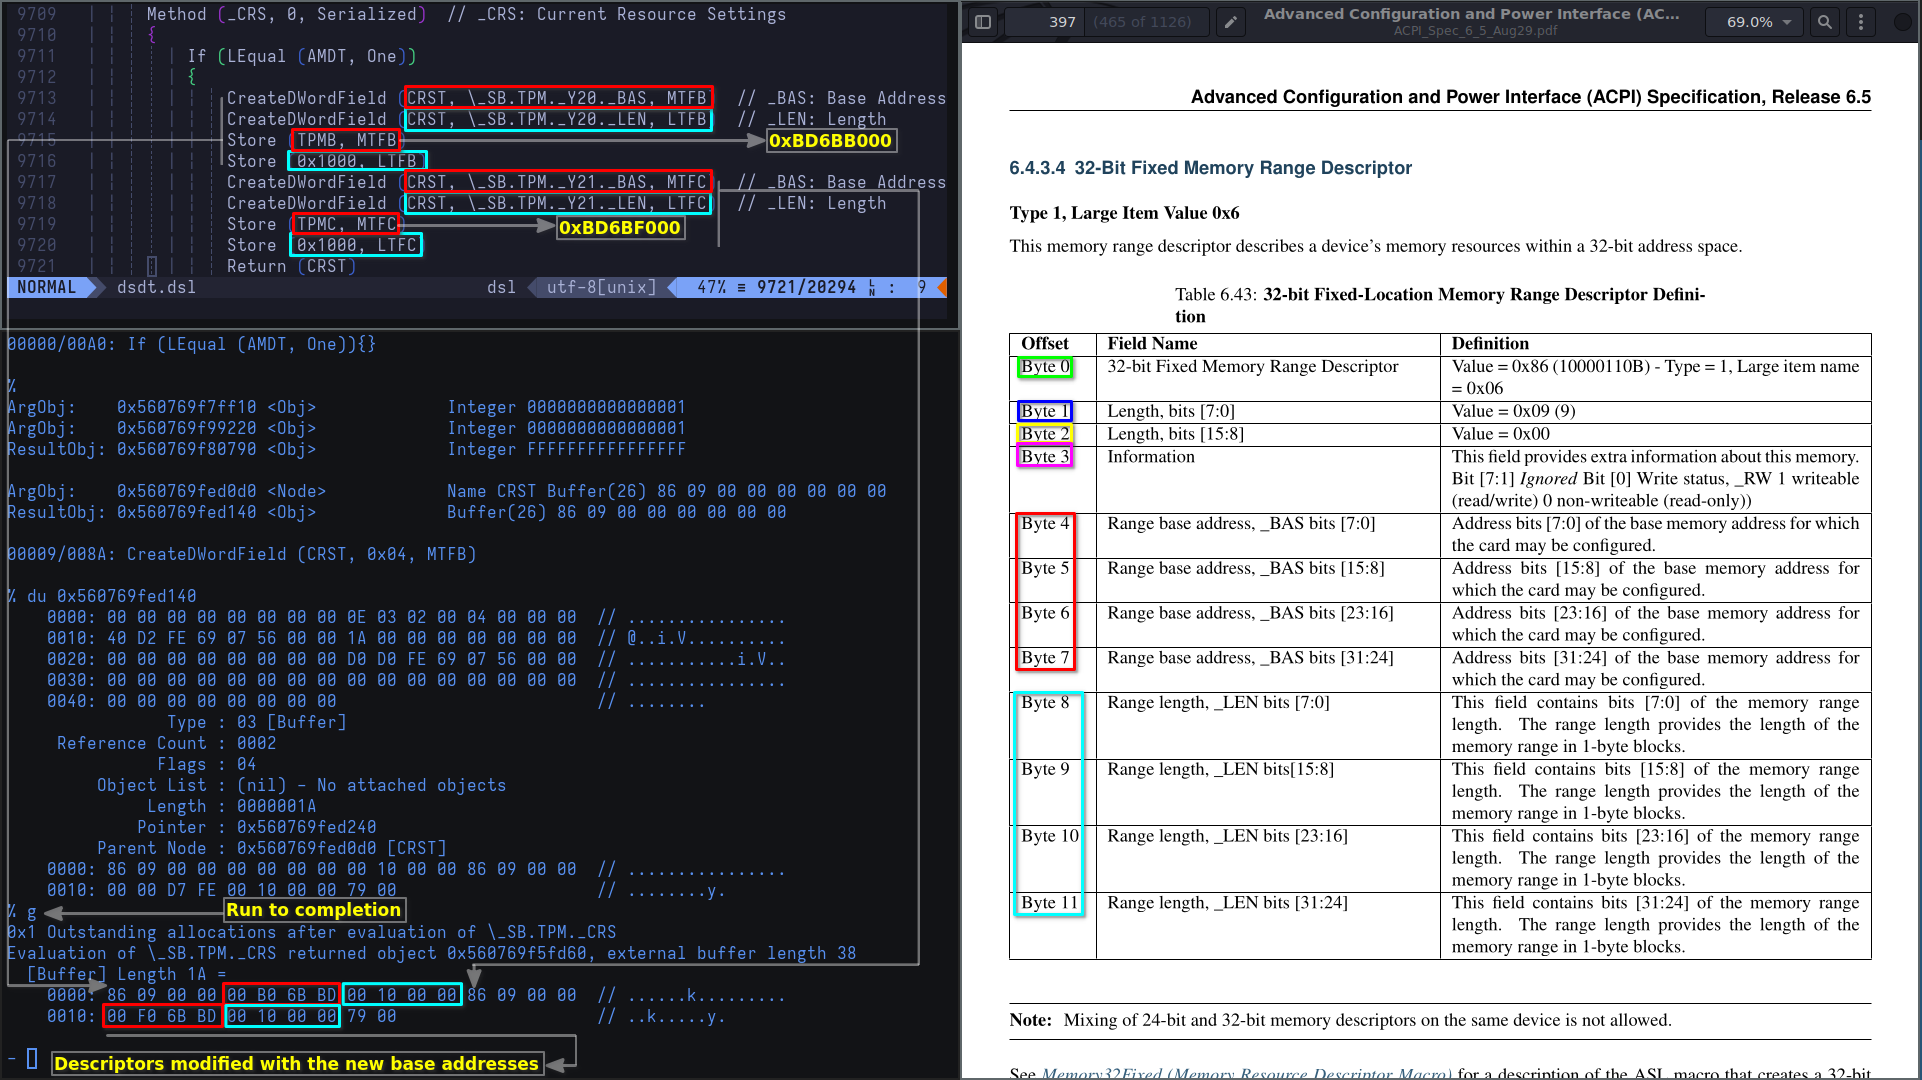
I've chosen to skip over single-stepping for brevity, but you should get the point by now. To sum it up, here's how the resource settings change over each step
+----------------------+-----------------------------------------+-----------------------------------------+---------+----------------------------------+
|        OPERATOR      |              COMMAND BUFFER             |             RESPONSE BUFFER             | END TAG |           DESCRIPTION            |
+----------------------+-----------------------------------------+-----------------------------------------+---------+----------------------------------+
| Memory32Fixed (_Y20) |  86 09 00 00  00 00 00 00  00 10 00 00  |  86 09 00 00  00 00 D7 FE  00 10 00 00  |  79 00  |  // _Y20: initial allocation     |
| Memory32Fixed (_Y21) |  86 09 00 00  00 00 00 00  00 10 00 00  |  86 09 00 00  00 00 D7 FE  00 10 00 00  |  79 00  |  // _Y21: initial allocation     |
| Store (TPMB,   MTFB) |  86 09 00 00 [00 B0 6B BD] 00 10 00 00  |  86 09 00 00  00 00 D7 FE  00 10 00 00  |  79 00  |  // Command  buffer _BAS changed |
| Store (0x1000, LTFB) |  86 09 00 00  00 B0 6B BD [00 10 00 00] |  86 09 00 00  00 00 D7 FE  00 10 00 00  |  79 00  |  // Command  buffer _LEN changed |
| Store (TPMC,   MTFC) |  86 09 00 00  00 B0 6B BD  00 10 00 00  |  86 09 00 00 [00 F0 6B BD] 00 10 00 00  |  79 00  |  // Response buffer _BAS changed |
| Store (0x1000, LTFC) |  86 09 00 00  00 B0 6B BD  00 10 00 00  |  86 09 00 00  00 F0 6B BD [00 10 00 00] |  79 00  |  // Response buffer _LEN changed |
+----------------------+-----------------------------------------+-----------------------------------------+---------+----------------------------------+
Here's what we know so far:
- Two firmware bugs
- One byte missing from the command response buffer
- Each buffer is allocated 0x1000 (4095 bytes) in its respective ACPI region
We'll take a closer look at the driver's source code in the next subchapter, ultimately landing us into debugging the kernel dynamically so we have:
- reference, context, and understanding before the fact (i.e. before debugging)
- knowledge of what exactly we'll be looking for
Source code analysis
Let's analyze the source code for the tpm_crb driver to get a better understanding of the flow. Immediately following the crb_fixup_cmd_size function shown earlier is the crb_map_io function, which, as the name implies, maps the IO resources for the command response buffer. I will only include snippets that are immediately relevant to what we're researching. This is not the complete function declaration
/*
 * drivers/char/tpm/tpm_crb.c
 * Annotated functions are there for later cross-referencing
 */

static int crb_map_io(struct acpi_device *device, struct crb_priv *priv, // ------> crb_map_io() {
		      struct acpi_table_tpm2 *buf)
{
	struct list_head acpi_resource_list;
	struct resource iores_array[TPM_CRB_MAX_RESOURCES + 1] = { {0} };
	void __iomem *iobase_array[TPM_CRB_MAX_RESOURCES] = {NULL};
	struct device *dev = &device->dev;
	struct resource *iores;
	void __iomem **iobase_ptr;
	int i;
	u32 pa_high, pa_low;
	u64 cmd_pa;
	u32 cmd_size;
	__le64 __rsp_pa;
	u64 rsp_pa;
	u32 rsp_size;
    int ret;

    ret = __crb_cmd_ready(dev, priv);                                    // ------> __crb_cmd_ready();
    if (ret)
      goto out_relinquish_locality;

    pa_high = ioread32(&priv->regs_t->ctrl_cmd_pa_high);
    pa_low  = ioread32(&priv->regs_t->ctrl_cmd_pa_low);
    cmd_pa = ((u64)pa_high << 32) | pa_low;
    cmd_size = ioread32(&priv->regs_t->ctrl_cmd_size);

    iores = NULL;
    iobase_ptr = NULL;
    for (i = 0; iores_array[i].end; ++i) {
    }

    if (iores)
      cmd_size = crb_fixup_cmd_size(dev, iores, cmd_pa, cmd_size);       // ------> _dev_err() {

    dev_dbg(dev, "cmd_hi = %X cmd_low = %X cmd_size %X\n",               // ------> dev_printk_emit() {
      pa_high, pa_low, cmd_size);

    priv->cmd = crb_map_res(dev, iores, iobase_ptr, cmd_pa, cmd_size);   // ------> crb_map_res() {
    if (IS_ERR(priv->cmd)) {
      ret = PTR_ERR(priv->cmd);
      goto out;
    }

	memcpy_fromio(&__rsp_pa, &priv->regs_t->ctrl_rsp_pa, 8);             // ------> memcpy_fromio();
	rsp_pa = le64_to_cpu(__rsp_pa);
	rsp_size = ioread32(&priv->regs_t->ctrl_rsp_size);

	iores = NULL;
	iobase_ptr = NULL;
	for (i = 0; resource_type(iores_array + i) == IORESOURCE_MEM; ++i) {
		if (rsp_pa >= iores_array[i].start &&
		    rsp_pa <= iores_array[i].end) {
			iores = iores_array + i;
			iobase_ptr = iobase_array + i;
			break;
		}
	}

	if (iores)
		rsp_size = crb_fixup_cmd_size(dev, iores, rsp_pa, rsp_size);     // ------> _dev_err() {

	if (cmd_pa != rsp_pa) {
		priv->rsp = crb_map_res(dev, iores, iobase_ptr,                  // ------> crb_map_res() {
					rsp_pa, rsp_size);
		ret = PTR_ERR_OR_ZERO(priv->rsp);
		goto out;
	}
}
At a very high level, only zooming into functions immediately preceding the calls to crb_fixup_cmd_size, the following takes place:
- Request tpm crb device to enter ready state
- Validate IO resources (command). If not NULL, fix up the command size (first call to
_dev_err()) - Emit device debug
prinktstatement (command) - Map command buffer resources
- Copy memory area from IO (response)
- Validate IO resources (response). If not NULL, fix up the response size (second call to
_dev_err()) - Map response buffer resources
The basic idea here is that 1) the ACPI region should cover the entire command response buffer as reported by the registers, and 2) command and response buffer sizes must be identical
We now have a good enough reference that will help us trace these functions, or rather crb_map_io() specifically, during bootup. Question is: how do you debug something to which you don't have access? That's where the beauty of dynamic debugging comes into play. We'll instruct ftrace to trace kernel-space functions (remember: TPM gets initialized very early on), filtering that one function we're after, and save a snapshot of the output to the filesystem once it's ready. That's what we'll be doing next!
Dynamic Debug
Requirements
Kernel build
For this part, we'll be performing dynamic debugging, which requires the kernel to be built with the following kernel config items1
CONFIG_DYNAMIC_DEBUG=y        # build catalog, enables CORE
CONFIG_DYNAMIC_DEBUG_CORE=y   # enable mechanics only, skip catalog
Kernel boot parameters
In the dynamic debug documentation referenced above, we can find all the information pertinent to setting up filters. Let's first start by searching the available function filters to find out whether or not we can debug the function we're interested. Every prompt shown from hereon out is assumed to be running as root
$ grep crb_map_io /sys/kernel/tracing/available_filter_functions
crb_map_io
Great! Looks like we can indeed debug that function. Let's go ahead and prepare the kernel parameters for dynamic debugging at boot-time
dyndbg="file tpm_crb.c +p" trace_buf_size=1M ftrace=function_graph ftrace_graph_filter=crb_map_io ftrace_boot_snapshot
Those parameters can be passed into your bootloader's configs; be it GRUB's /etc/default/grub (don't forget to update-grub after making changes to the file), or systemd-boot's /boot/efi/loader/entries/<machine-id>-$(uname -r).conf
I chose the function_graph tracer specifically because it's easier to follow from a strictly visual standpoint. ftrace_graph_filter=crb_map_io will only trace that one function in the tpm_crb.c file; this is extremely important so the tracer does not hook into every function that's executing (might severely degrade performance and/or cause lockups). ftrace_boot_snapshot will allow the tracer to hand over the call graph to the filesystem, which we will be using a text editor to view its contents at /sys/kernel/tracing/snapshot. Finally, the +p flag following the file match-spec enables the pr_debug() callsite. We are using it to see debug messages that would be otherwise hidden as per the kernel's default parameters
Post-reboot Analysis
After having committed our changes to the kernel command-line parameters and rebooted the system, it's time to analyze the function call graph. In Vim's command mode, we'll be executing the following: :set cc=25, and :hi ColorColumn guibg=DarkRed. This is simply to overlay a color column at the 25th column exactly; this is the level at which any function executing within crb_map_io is displayed in the call graph
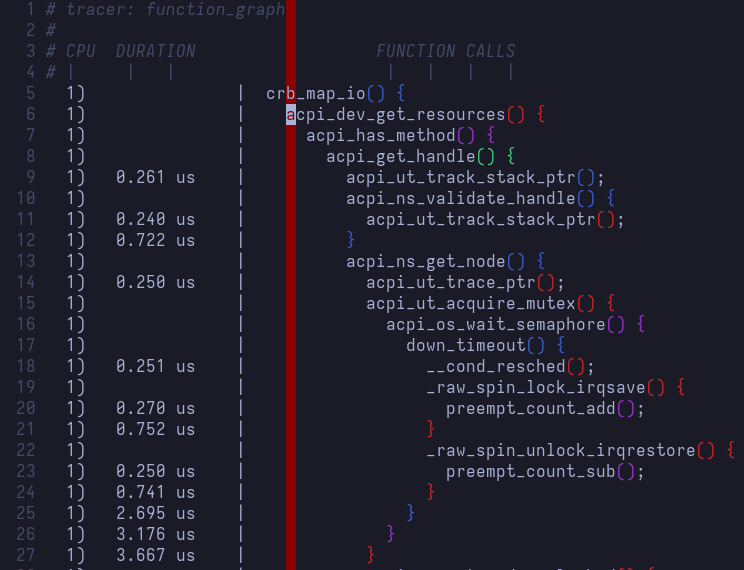
Now, this is an almost-10k-lines-long file, so we'll only be covering relevance as usual. As a reminder, we are looking for functions in the following order
1. crb_map_io()
2. __crb_cmd_ready()
3. _dev_err()
4. dev_printk_emit()
5. crb_map_res()
6. memcpy_fromio()
7. _dev_err()
8. crb_map_res()
I chose to split the same file multiple times in Vim so it's easier to follow. Normally, we'd be scrolling through/searching for the functions of interest. I also darkened the ColorColumn so it doesn't impact readability
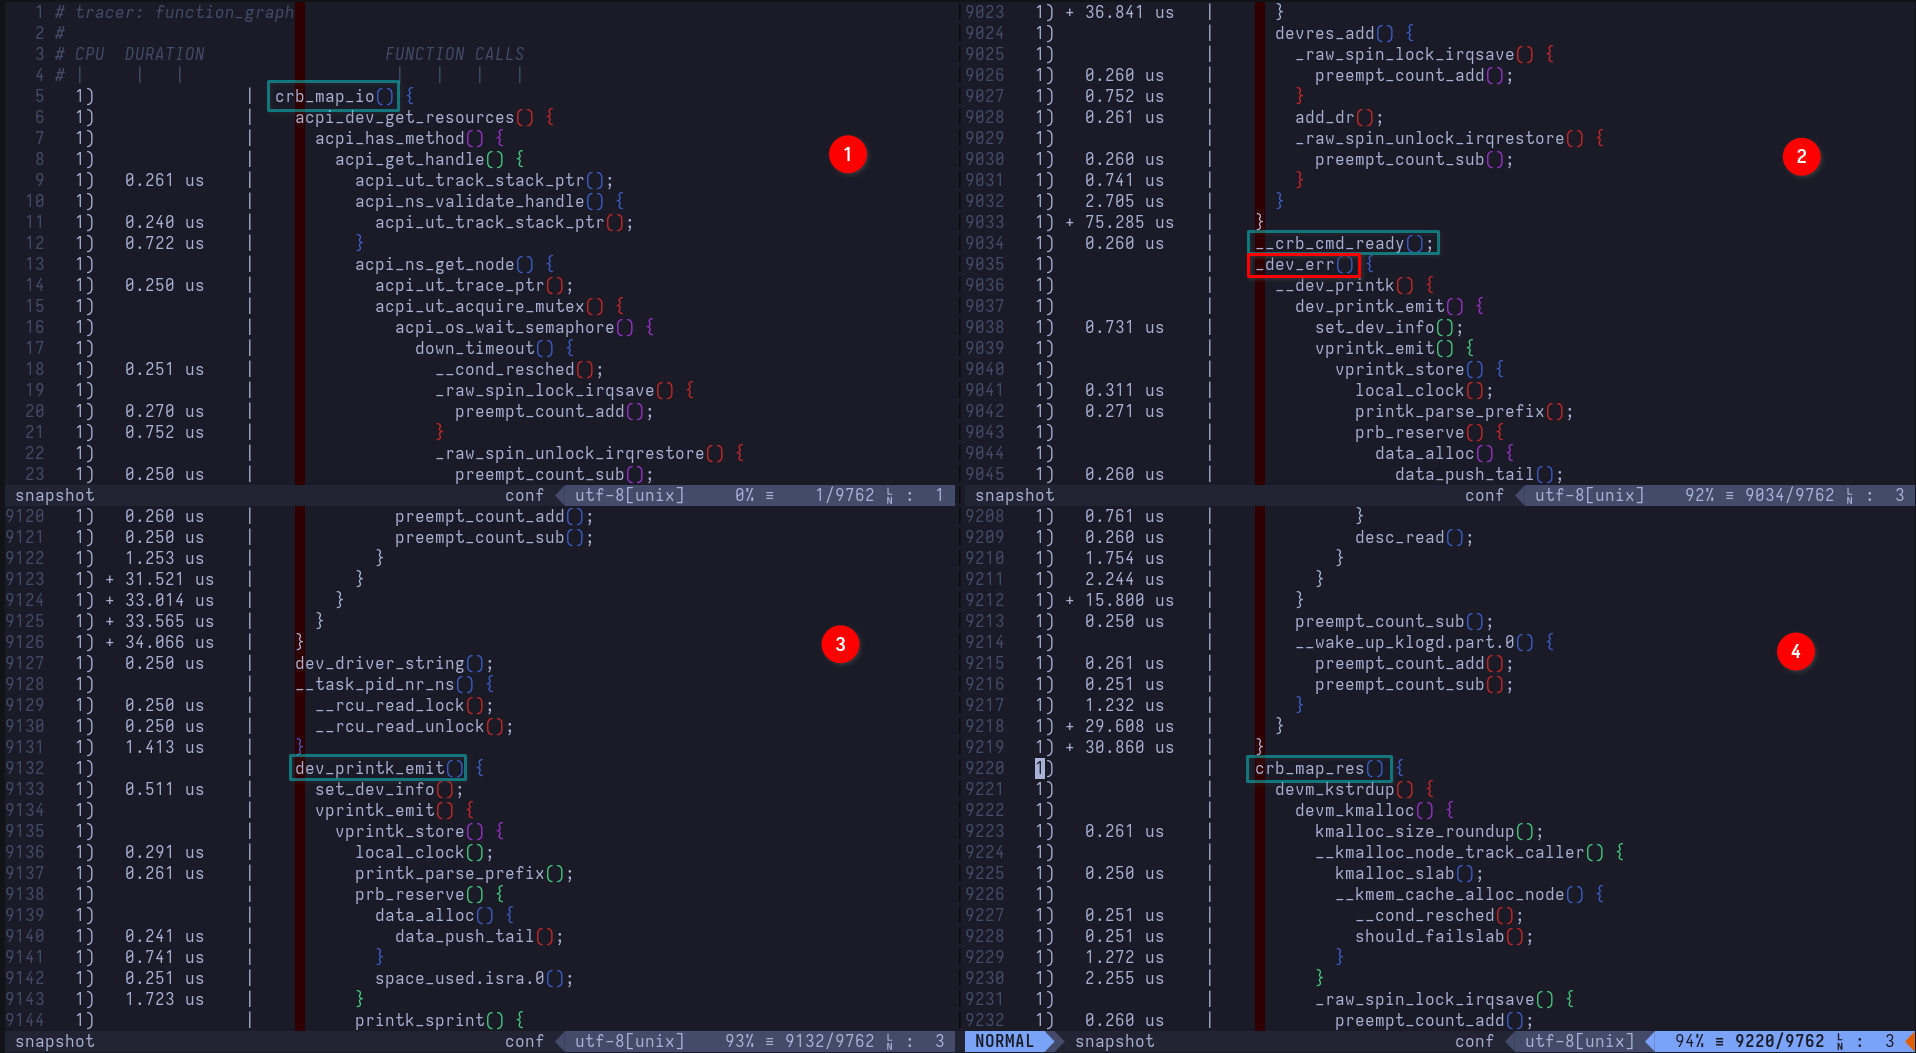
Let's unpack:
crb_map_io()begins execution. This is the function we're tracing
2.1__crb_cmd_ready()executes, requesting tpm crb device to enter ready state
2.2_dev_err()executes (it's really a wrapper for printing device error-level messages), calling__dev_printk(), which ultimately ends up printing[Firmware Bug]: ACPI region does not cover the entire command/response buffer. [mem 0xbd6bb000-0xbd6bbfff flags 0x200] vs bd6bb000 4000to the kernel ring buffer. Remember, this is the called by the first call tocrb_fixup_cmd_size()which handles fixing up the command sizedev_printk_emit()executes, printing thedev_dbgmessagetpm_crb MSFT0101:00: cmd_hi = 0 cmd_low = BD6BB000 cmd_size 1000to the kernel ring buffercrb_map_res()executes, mapping the command response buffer's resources
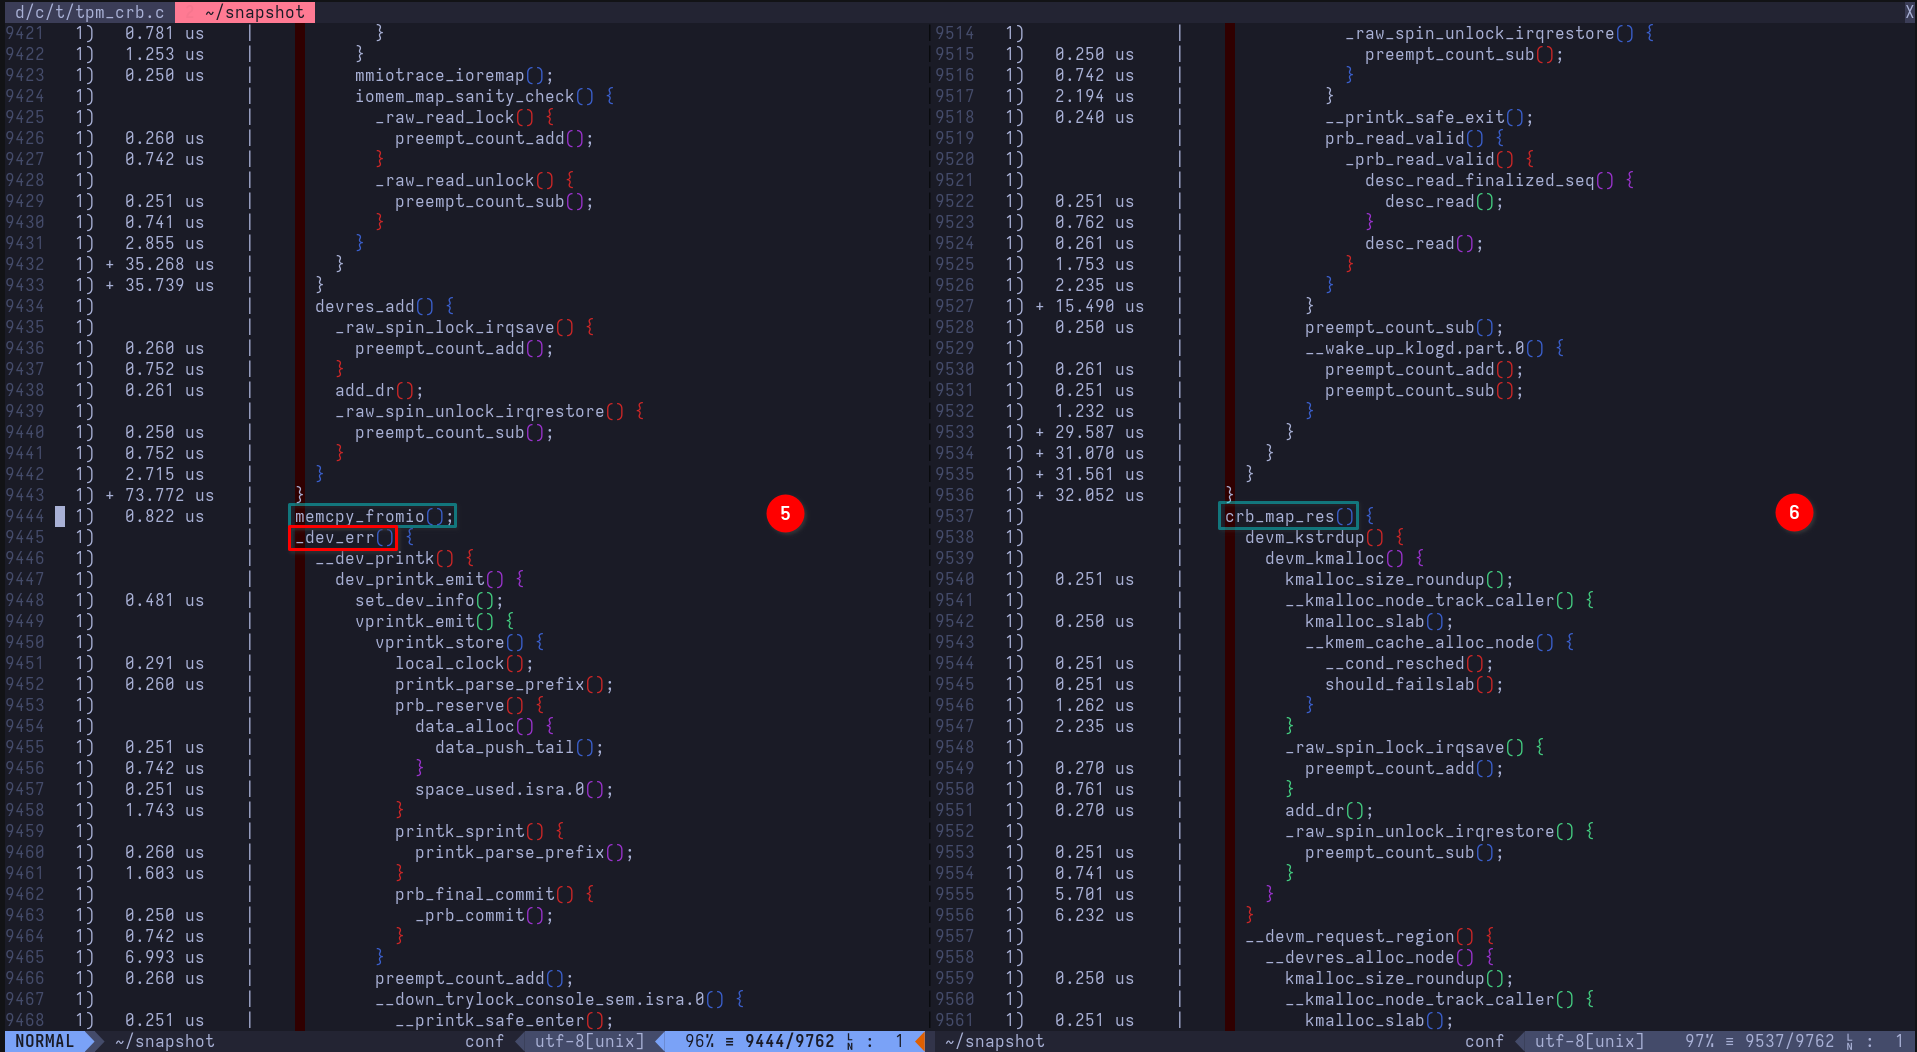
5.1memcpy_fromio()executes, copying memory area from IO for the response buffer
5.2_dev_err()executes, calling__dev_printk(), which ultimately ends up printing[Firmware Bug]: ACPI region does not cover the entire command/response buffer. [mem 0xbd6bf000-0xbd6bffff flags 0x200] vs bd6bf000 4000to the kernel ring buffer. Remember, this is the called by the second call tocrb_fixup_cmd_size()which handles fixing up the response sizecrb_map_res()executes, mapping the command response buffer's resources
Now, putting it all together, we have perspective
tpm_crb MSFT0101:00: [Firmware Bug]: ACPI region does not cover the entire command/response buffer. [mem 0xbd6bb000-0xbd6bbfff flags 0x200] vs bd6bb000 4000

tpm_crb MSFT0101:00: cmd_hi = 0 cmd_low = BD6BB000 cmd_size 1000

tpm_crb MSFT0101:00: [Firmware Bug]: ACPI region does not cover the entire command/response buffer. [mem 0xbd6bf000-0xbd6bffff flags 0x200] vs bd6bf000 4000
It all makes sense now! Command size is 1000 (remember: Store (0x1000, LTFB)) as declared/modified by ACPI, versus what the register reports back; 4000. Now, if you think the fix should be simple enough, you're on the right track. Instead of allocating 0x1000 (4.00 KiB) for the command and response buffers, we should really allocate 0x4000 (16.00 KiB). Let's go ahead and modify that in DSDT's _SB.TPM._CRS (or _SB.TPM.CRST and remove runtime modifications executed in _SB.TPM._CRS)
The Fix
Method (_CRS, 0, Serialized)  // _CRS: Current Resource Settings
{
    If (LEqual (AMDT, One))
    {
        CreateDWordField (CRST, \_SB.TPM._Y20._BAS, MTFB)  // _BAS: Base Address
        CreateDWordField (CRST, \_SB.TPM._Y20._LEN, LTFB)  // _LEN: Length
        Store (TPMB, MTFB)
-       Store (0x1000, LTFB)
+       Store (0x4000, LTFB)    /* Fix up command size */
        CreateDWordField (CRST, \_SB.TPM._Y21._BAS, MTFC)  // _BAS: Base Address
        CreateDWordField (CRST, \_SB.TPM._Y21._LEN, LTFC)  // _LEN: Length
        Store (TPMC, MTFC)
-       Store (0x1000, LTFC)
+       Store (0x4000, LTFC)    /* Fix up response size */
        Return (CRST)
    }
Bump the OEMRevision, compile the newly modified table, copy the compiled table into kernel/firmware/acpi, create the cpio archive, copy it over to /boot/efi/EFI/acpi/acpi.cpio, and reboot. With dynamic debugging still enabled, we can verify whether or not our fix actually worked. Grepping the kernel ring buffer for the firmware bug will not return anything. Grepping for cmd_size, however, will now show tpm_crb MSFT0101:00: cmd_hi = 0 cmd_low = BD6BB000 cmd_size 4000! Looking at the new /sys/kernel/tracing/snapshot will reveal that _dev_err() calls were never made (_dev_err() is the byproduct of calling crb_fixup_cmd_size() to print the error-level message)
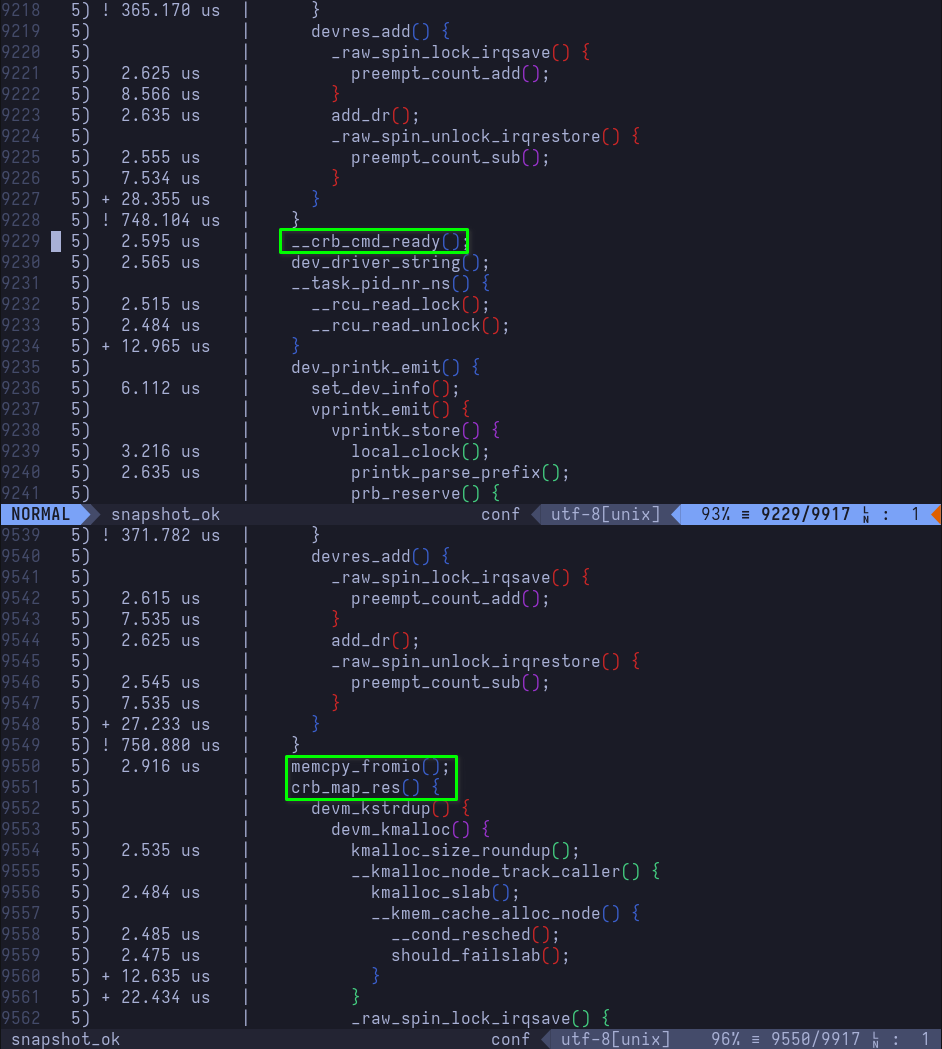

This concludes addressing TPM! We've not only managed to address an issue at a lower level, but we've also learned a bit of debugging along the way
Addressing Nouveau
Welcome to the final leg of this tour: addressing a non-issue. No, really; this part has absolutely no effect other than simply getting rid of a warning message. However, there's a bit of learning involved, and a chance to patch a kernel driver, which is the entire point of this research
Quick refresher, as usual
ACPI Warning: \_SB.PCI0.GPP0.PEGP._DSM: Argument #4 type mismatch - Found [Buffer], ACPI requires [Package] (20230628/nsarguments-61)
This warning message on its own probably doesn't mean much or make any sense right off the bat, save for the fact that there's an issue with the PEGP Device-Specific Method. Now that we have ACPI_DEBUG* kernel configs in place, we also get some much needed context, and it's the following output
ACPI Debug:  "------- NVOP --------"
ACPI Debug:  "------- NVOP --------"
ACPI Debug:  "------- NVOP 0x1A --------"
Again, both outputs might not make sense when viewed individually. Put together, however, and we have a bit more specificity and pointers as to what might be happening. Let's find out whether or not they're related by grepping *.dsl for either PEGP, NVOP, GPP0, or all of them
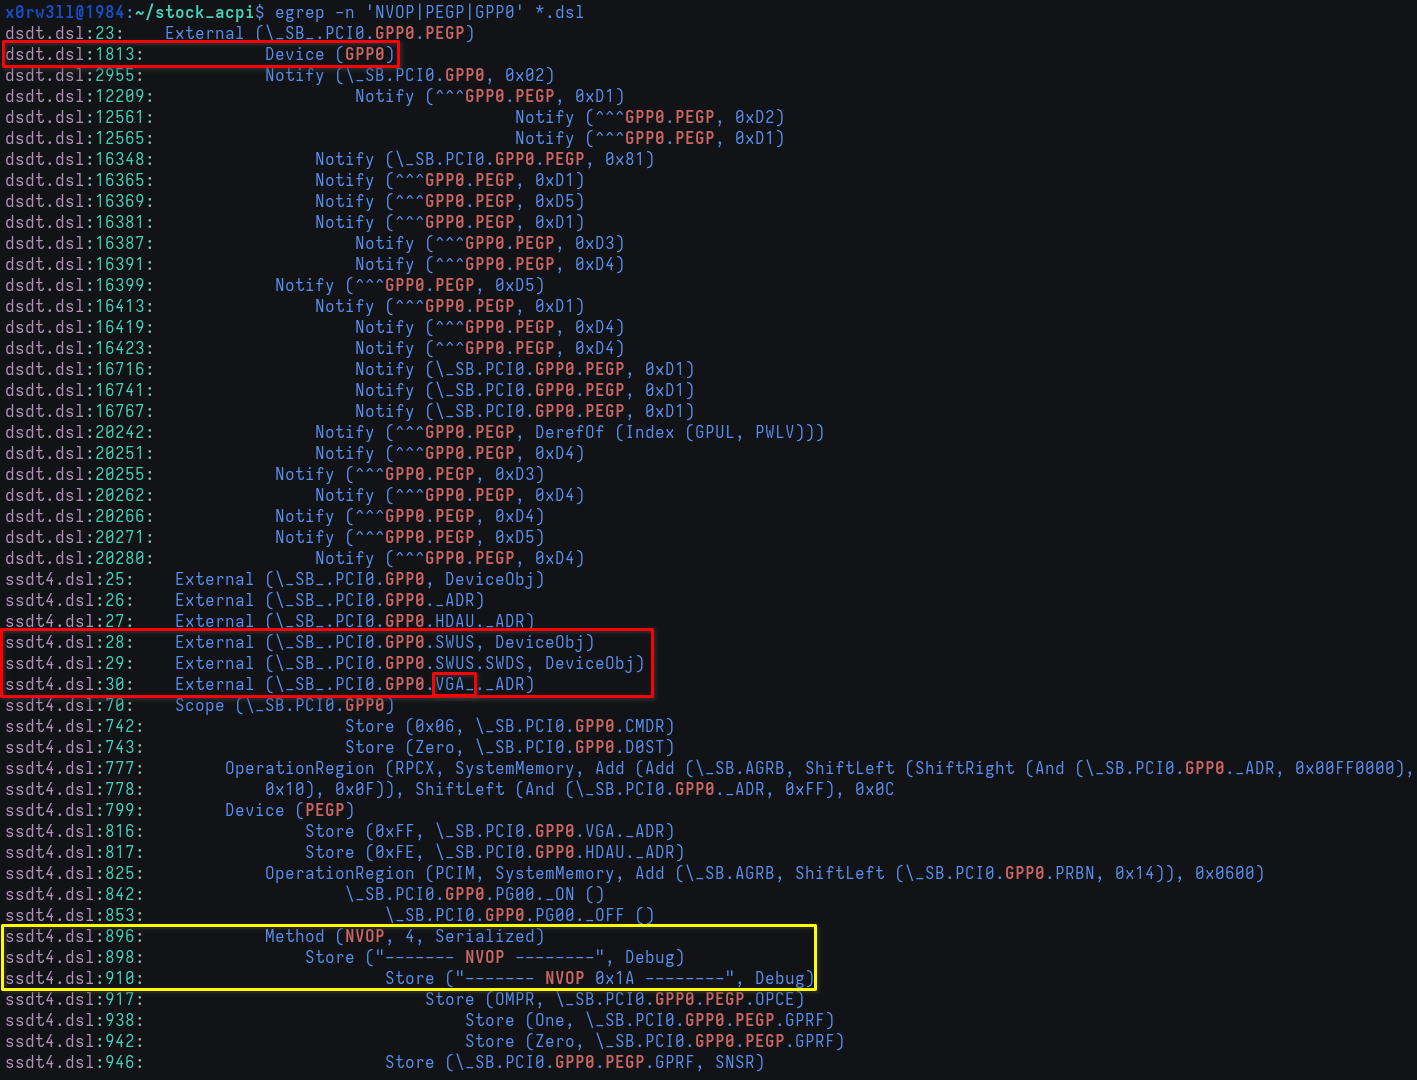
If we scroll down just a bit more, we'll have additional context
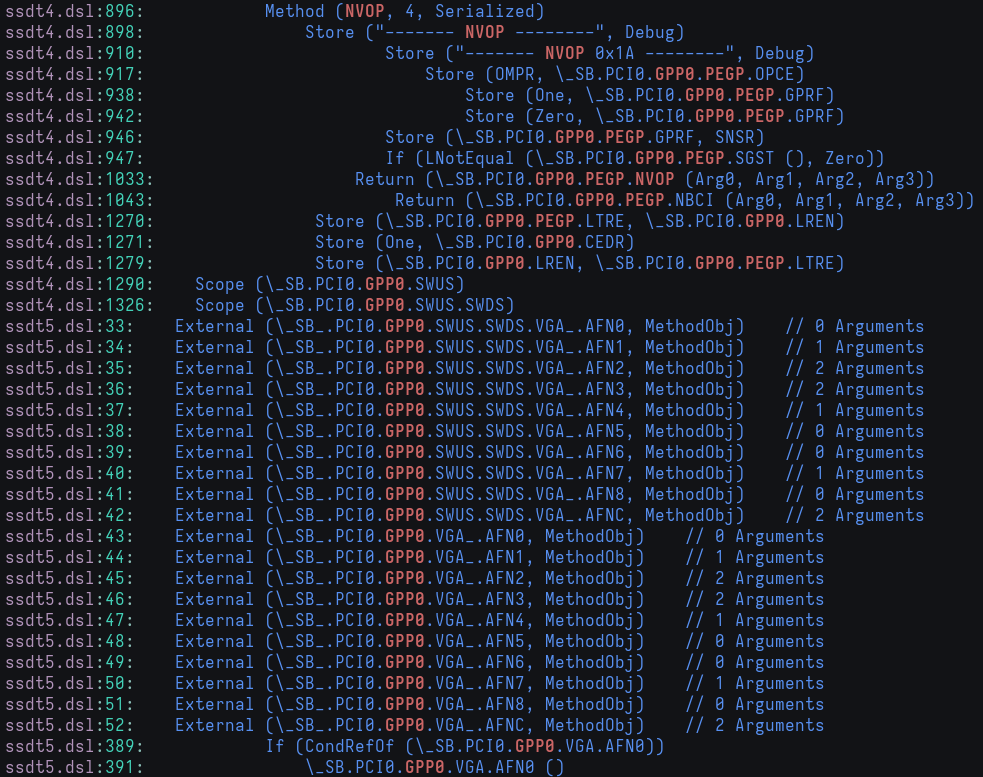
ssdt4.dsl:1033: Return (\_SB.PCI0.GPP0.PEGP.NVOP (Arg0, Arg1, Arg2, Arg3))
Now we know that the we need to look into the 4th SSDT for the PEGP Device declaration, along with its two control methods of most relevance to us; _DSM and NVOP. Additionally, the GPP0 device seems to have VGA-related control methods, so that means that it's responsible for handling VGA controller, of which this laptop has two; NVIDIA and AMD. If we were to guess that it might have anything to do with NVIDIA, we'd be correct in guessing that. By default, Linux will use the Nouveau driver to handle NVIDIA cards, and this is exactly where we'll start our search.
As usual, git grep nouveau will show us everything we need. GPU driver source files are found in drivers/gpu/drm/{nouveau,amd}, so let's go ahead and see what's inside the nouveau directory
$ ls drivers/gpu/drm/nouveau/
dispnv04             nouveau_bo.o         nouveau_gem.o       nouveau_ttm.h
dispnv50             nouveau_chan.c       nouveau_hwmon.c     nouveau_ttm.o
include              nouveau_chan.h       nouveau_hwmon.h     nouveau_usif.c
Kbuild               nouveau_chan.o       nouveau_hwmon.o     nouveau_usif.h
Kconfig              nouveau_connector.c  nouveau_ioc32.c     nouveau_usif.o
modules.order        nouveau_connector.h  nouveau_ioc32.o     nouveau_uvmm.c
nouveau_abi16.c      nouveau_connector.o  nouveau_ioctl.h     nouveau_uvmm.h
nouveau_abi16.h      nouveau_crtc.h       nouveau.ko          nouveau_uvmm.o
nouveau_abi16.o      nouveau_debugfs.c    nouveau_led.c       nouveau_vga.c
nouveau_acpi.c       nouveau_debugfs.h    nouveau_led.h       nouveau_vga.h
nouveau_acpi.h       nouveau_debugfs.o    nouveau_led.o       nouveau_vga.o
nouveau_acpi.o       nouveau_display.c    nouveau_mem.c       nouveau_vmm.c
nouveau_backlight.c  nouveau_display.h    nouveau_mem.h       nouveau_vmm.h
nouveau_backlight.o  nouveau_display.o    nouveau_mem.o       nouveau_vmm.o
...
There are many files, but their names are usually descriptive enough. We already know that something's happening on the ACPI side of things that has to do with VGA; the NVIDIA card specifically. It makes sense that we start by looking at nouveau_acpi.c
This specific issue is going to be addressed in two parts; one for ACPI, and one for the kernel driver. Both have to be done in order for it to be successfully addressed, so we'll split it accordingly, starting with the kernel driver
Part 1: Driver
To start things off, we'll keep the debug output in mind because it's a crucial pointer for figuring out what's happening
ACPI Warning: \_SB.PCI0.GPP0.PEGP._DSM: Argument #4 type mismatch - Found [Buffer], ACPI requires [Package] (20230628/nsarguments-61)
ACPI Debug:  "------- NVOP --------"
ACPI Debug:  "------- NVOP --------"
ACPI Debug:  "------- NVOP 0x1A --------"
It looks like the NVOP control method gets called twice, with the second call showing additional debug output with the argument 0x1A. Why is this significant? We'll see as soon as we look at the drivers/gpu/drm/nouveau/nouveau_acpi.c file
// SPDX-License-Identifier: MIT
#include <linux/pci.h>
#include <linux/acpi.h>
#include <linux/slab.h>
#include <linux/mxm-wmi.h>
#include <linux/vga_switcheroo.h>
#include <drm/drm_edid.h>
#include <acpi/video.h>

#include "nouveau_drv.h"
#include "nouveau_acpi.h"

#define NOUVEAU_DSM_LED 0x02
#define NOUVEAU_DSM_LED_STATE 0x00
#define NOUVEAU_DSM_LED_OFF 0x10
#define NOUVEAU_DSM_LED_STAMINA 0x11
#define NOUVEAU_DSM_LED_SPEED 0x12

#define NOUVEAU_DSM_POWER 0x03
#define NOUVEAU_DSM_POWER_STATE 0x00
#define NOUVEAU_DSM_POWER_SPEED 0x01
#define NOUVEAU_DSM_POWER_STAMINA 0x02

#define NOUVEAU_DSM_OPTIMUS_CAPS 0x1A
#define NOUVEAU_DSM_OPTIMUS_FLAGS 0x1B
Sure enough, there are DSM-related definitions, and then there's #define NOUVEAU_DSM_OPTIMUS_CAPS 0x1A
NOUVEAU...DSM...OPTIMUS...0x1A
NouVeau...OPtimus...0x1A
NVOP 0x1A! Sounds very promising, no? Let's go ahead and search for instances of the previously defined constant in the file. First hit we get looks like the following
/* Must be called for Optimus models before the card can be turned off */
void nouveau_switcheroo_optimus_dsm(void)
{
	u32 result = 0;
	if (!nouveau_dsm_priv.optimus_detected || nouveau_dsm_priv.optimus_skip_dsm)
		return;

	if (nouveau_dsm_priv.optimus_flags_detected)
		nouveau_optimus_dsm(nouveau_dsm_priv.dhandle, NOUVEAU_DSM_OPTIMUS_FLAGS,
				    0x3, &result);

	nouveau_optimus_dsm(nouveau_dsm_priv.dhandle, NOUVEAU_DSM_OPTIMUS_CAPS,
		NOUVEAU_DSM_OPTIMUS_SET_POWERDOWN, &result);

}
Something I haven't mentioned earlier is that if you read the entire kernel ring buffer (dmesg), line by line, you'll find references to switcheroo which can definitely add more context to your search when hunting for things in the kernel. For example, consider the following output
$ dmesg -t | grep 'DSM'
VGA switcheroo: detected Optimus DSM method \_SB_.PCI0.GPP0.PEGP handle
nouveau: detected PR support, will not use DSM
We already have a good head start in that we know those are related, and it's something to do with the kernel driver sending an unexpected data type (Buffer) to the PEGP Device-Specific Method. Additionally, the reason I mentioned it being a non-issue is that _DSM is not even used since a Power Resource was detected. For context, switcheroo, as the name implies, handles switching graphics. With all that being said, let's navigate to the nouveau_optimus_dsm function
static int nouveau_optimus_dsm(acpi_handle handle, int func, int arg, uint32_t *result)
{
	int i;
	union acpi_object *obj;
	char args_buff[4];
	union acpi_object argv4 = {
		.buffer.type = ACPI_TYPE_BUFFER,
		.buffer.length = 4,
		.buffer.pointer = args_buff
	};

	/* ACPI is little endian, AABBCCDD becomes {DD,CC,BB,AA} */
	for (i = 0; i < 4; i++)
		args_buff[i] = (arg >> i * 8) & 0xFF;

	*result = 0;
	obj = acpi_evaluate_dsm_typed(handle, &nouveau_op_dsm_muid, 0x00000100,
				      func, &argv4, ACPI_TYPE_BUFFER);
	if (!obj) {
		acpi_handle_info(handle, "failed to evaluate _DSM\n");
		return AE_ERROR;
	} else {
		if (obj->buffer.length == 4) {
			*result |= obj->buffer.pointer[0];
			*result |= (obj->buffer.pointer[1] << 8);
			*result |= (obj->buffer.pointer[2] << 16);
			*result |= (obj->buffer.pointer[3] << 24);
		}
		ACPI_FREE(obj);
	}

	return 0;
}
We can see that argv4 is indeed an ACPI_TYPE_BUFFER object, which is passed to the Device-Specific Method via the call to acpi_evaluate_dsm_typed. The returned object is a buffer whose pointers are bitshifted and bitwise OR-assigned. Here's the thing: when you're sending data to/from ACPI, data types should match. That is, if you send a buffer object, you're expecting to receive a buffer object. If we recall the warning message, we did indeed send a buffer object, but the Device-Specific Method, specifically for argument #4, the expected data type was supposed to be a package object. The problem is, however, that the returned data type is a buffer object, and the object the method expects to receive should be a package object
So, how do we address this? It's simple, really; change the data type we're sending, right? Not so much...For us to understand how our data is being sent, we must look at how acpi_evaluate_dsm_typed works. If you already have experience compiling the kernel, then you probably know how indespinsable tags are. If you don't know what that is, ctags -R 2>/dev/null at the root of the Linux repo will generate those tags for you. This is how we can jump back and forth between function declarations. With that in mind, and whilst browsing the file using Vim, we can position the cursor on the function, and press Ctrl+] to jump to its declaration (which may or may not be in the same file). In this case, acpi_evaluate_dsm_typed is defined in the acpi_bus.h header file
acpi_evaluate_dsm_typed(acpi_handle handle, const guid_t *guid, u64 rev,
			u64 func, union acpi_object *argv4,
			acpi_object_type type)
{
	union acpi_object *obj;

	obj = acpi_evaluate_dsm(handle, guid, rev, func, argv4);
	if (obj && obj->type != type) {
		ACPI_FREE(obj);
		obj = NULL;
	}

	return obj;
}
Judging by the name, and what the function does, it calls the acpi_evaluate_dsm function with argv4 passed as an argument, storing the result in obj. Immediately after, it checks whether 1) an object was returned, and 2) if its type does not match the type we sent in the initial call, in which case it would free the object and return NULL. So we know we can't use this function because we'll be sending a package and receiving a buffer in exchange, thereby nullifying the returned object (if any). In our case, we already know what to expect out of this exchange, and we mean for it to be processed that way. This function gave us a very good pointer, and that is using the acpi_evaluate_dsm function instead since it doesn't perform any type checking
The tricky bit here is figuring out how we can send a packaged buffer object. That is, a package object, containing a buffer object. Quickest way to draw inspiration is to git grep ACPI_TYPE_PACKAGE, and go after various function declarations in hopes of finding one that has more or less the same scenario. This process can be a bit time-consuming, and so for brevity's sake, I will leave it to you as an exercise
The solution is relatively simple once you get things in the right order. I struggled with this bit myself because of my extremely limited knowledge of C, which was when I had to read a bit more at least to understand basic concepts. Let me walk you through the steps needed:
- Keep the buffer
objas-is; we're still sending that - Declare a new package object, containing one element pointing to the buffer object
- Use
acpi_evaluate_dsminstead ofacpi_evaluate_dsm_typed, with argument #4 pointing to the newly declared package object as opposed to theargv4buffer object
Let's see the modified code. I will use diff formatting here just so the changes are easier to identify
static int nouveau_optimus_dsm(acpi_handle handle, int func, int arg, uint32_t *result)
{
	int i;
	union acpi_object *obj;
	char args_buff[4];
	union acpi_object argv4 = {
		.buffer.type = ACPI_TYPE_BUFFER,
		.buffer.length = 4,
		.buffer.pointer = args_buff
	};
+   union acpi_object pkg = {
+      .package.type = ACPI_TYPE_PACKAGE,
+      .package.count = 1,
+      .package.elements = &argv4
+   };

	/* ACPI is little endian, AABBCCDD becomes {DD,CC,BB,AA} */
	for (i = 0; i < 4; i++)
		args_buff[i] = (arg >> i * 8) & 0xFF;

	*result = 0;
+   obj = acpi_evaluate_dsm(handle, &nouveau_op_dsm_muid, 0x00000100,
+		func, &pkg);

	if (!obj) {
		acpi_handle_info(handle, "failed to evaluate _DSM\n");
		return AE_ERROR;
	} else {
		if (obj->buffer.length == 4) {
			*result |= obj->buffer.pointer[0];
			*result |= (obj->buffer.pointer[1] << 8);
			*result |= (obj->buffer.pointer[2] << 16);
			*result |= (obj->buffer.pointer[3] << 24);
		}
		ACPI_FREE(obj);
	}

	return 0;
}
That's it, really. At this point, we can commit the changes changes and recompile the entire kernel, or simply compile and install only the nouveau module. We are not done yet, however; we MUST modify the ACPI table to inform it of the new changes. More on that in the next part, so let's get on with it
Part 2: ACPI
We'll kick this part off by looking at \_SB.PCI0.GPP0.PEGP._DSM and subsequently \_SB.PCI0.GPP0.PEGP.NVOP side by side
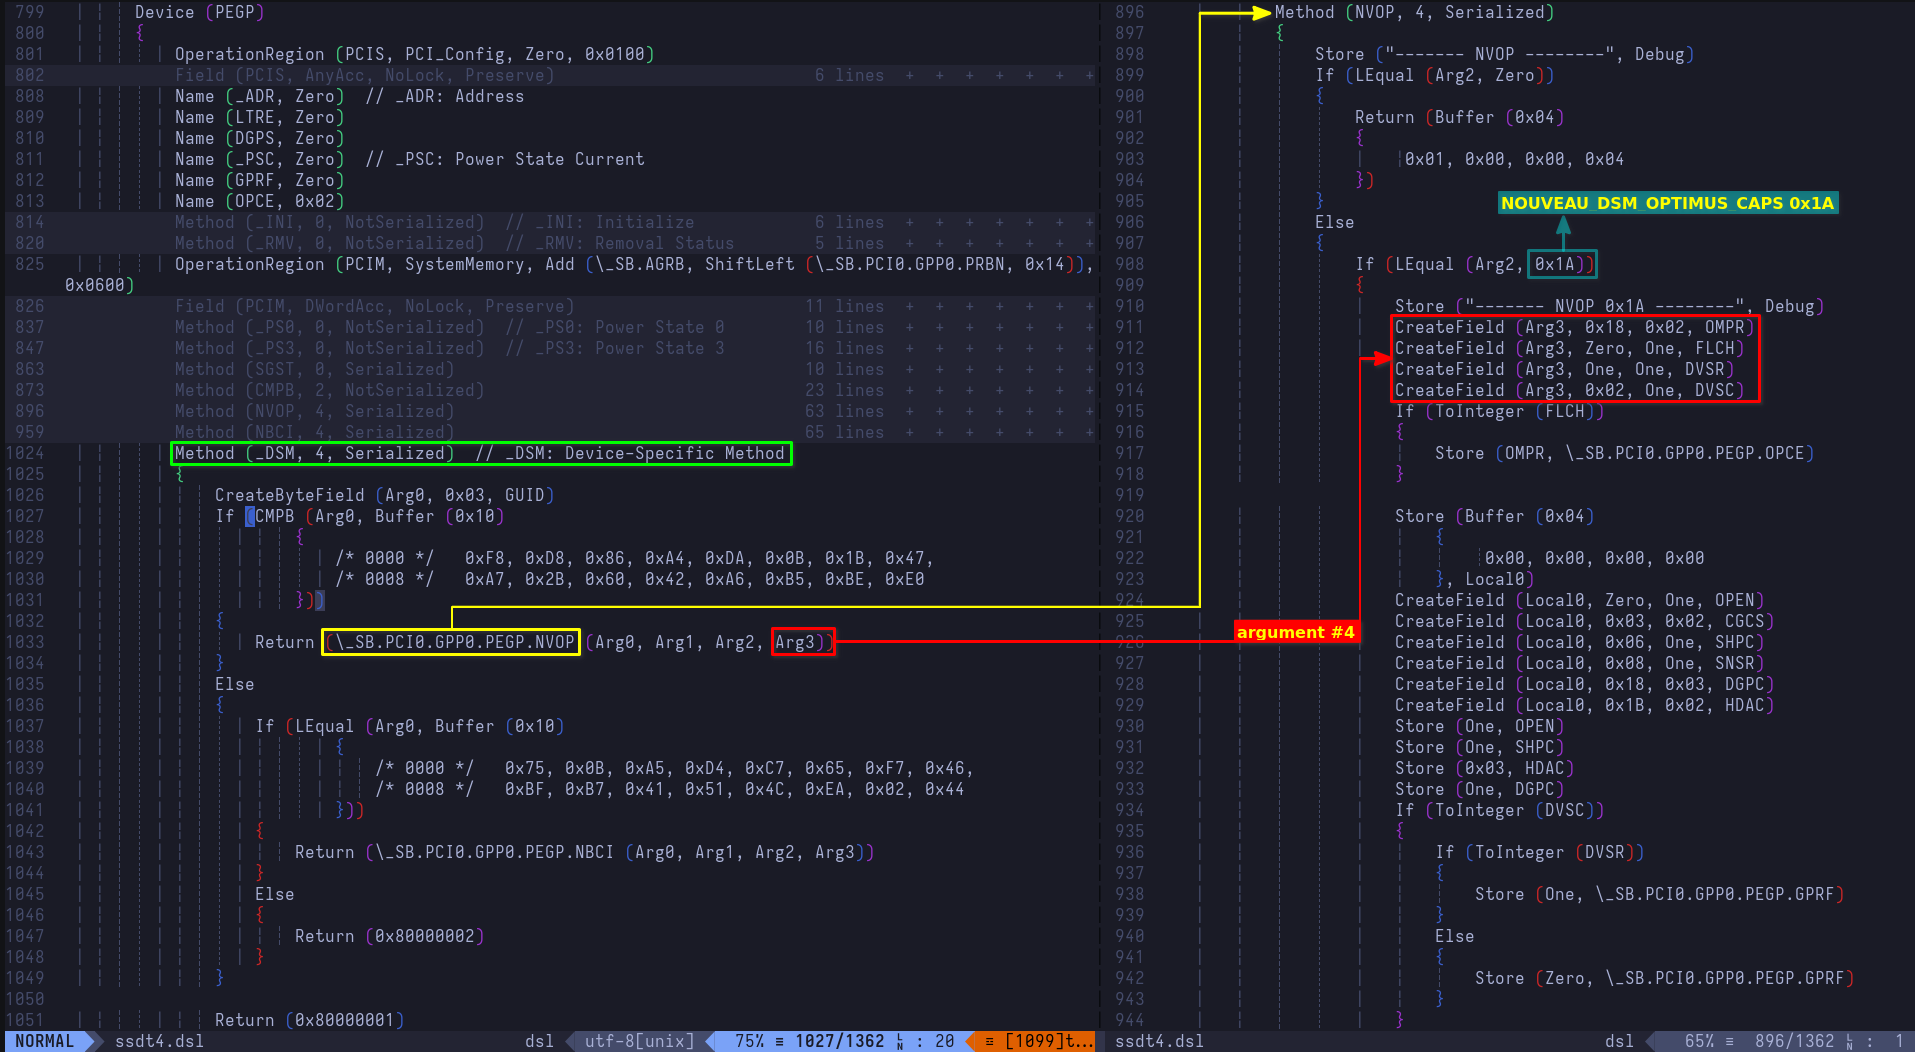
The Device-Specific Method compares buffers (CMPB (Arg0, Buffer ...)), and calls NVOP with 4 arguments, returning the buffer it returns upon successful execution back to the caller (nouveau_optimus_dsm). Remember, ACPI complained with a warning, not an error, meaning that it probably still processed the input buffer even when it was expecting a package. This is important to keep in mind because the way NVOP is currently set up handles buffer objects just fine
/* Also remember that Arg3 is argument #4 beginning at index 0 */

CreateField (Arg3, 0x18, 0x02, OMPR)
CreateField (Arg3, Zero, One, FLCH)
CreateField (Arg3, One, One, DVSR)
CreateField (Arg3, 0x02, One, DVSC)
So if we're sending a package containing one element that's a buffer object, we need to dereference that object reference1. The idea is very simple, and you already know the concept. Consider a list x containing ['A', 'B', 'C']. If we want to dereference the first item of the list, we can do that by using its index; x[0] = 'A'. This is exactly what we'll be doing here, so let's see the diff in action
- CreateField (Arg3, 0x18, 0x02, OMPR)
- CreateField (Arg3, Zero, One, FLCH)
- CreateField (Arg3, One, One, DVSR)
- CreateField (Arg3, 0x02, One, DVSC)

+ CreateField (DerefOf (Arg3 [Zero]), 0x18, 0x02, OMPR)
+ CreateField (DerefOf (Arg3 [Zero]), Zero, One, FLCH)
+ CreateField (DerefOf (Arg3 [Zero]), One, One, DVSR)
+ CreateField (DerefOf (Arg3 [Zero]), 0x02, One, DVSC)
Fairly straightforward if you ask me! Without this change, an error would get thrown because then there would be a wildly different data types (package vs buffer). After compiling the table, creating the cpio archive, and all that fun stuff, we no longer get the type mismatch warning! Additionally, this fix makes it so that we're compliant to the spec where ACPI's concerned

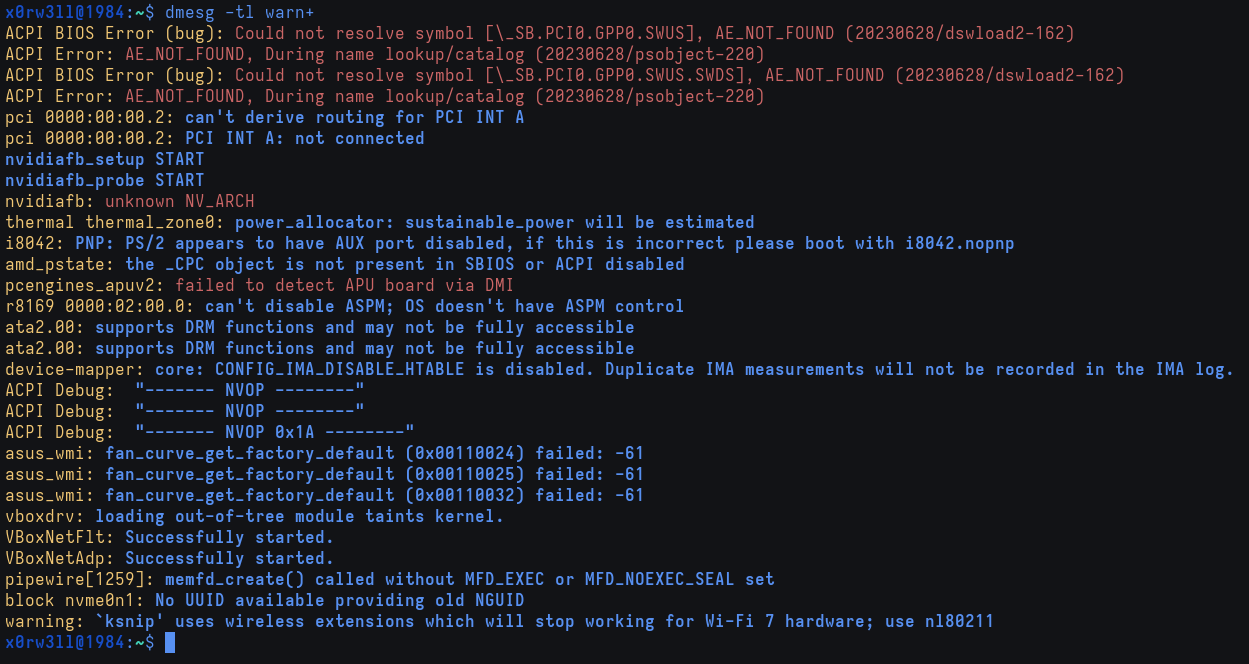
Success! This concludes addressing nouveau both on the ACPI and kernel driver sides. I hope you enjoyed it as much as I did, and learned a thing or two while you're at it. This has been an extremely valuable experience for me in that I learned so much in so little time by consulting various resources, trying out things, and correlating findings. I do hope that this inspires more research into lower-level components/subsystems that are usually ripe for research!
OSCP
In this chapter, I will be going through my general experience with OSCP. Expect nothing technical; this is more of a storytime type of entry, focusing on the personal aspect. If you want to learn more about the technicalities, there's PEN-200, exam guide, and FAQs for that
This is only meant to be a light read, and I'm pretty much known for talking a lot. Divines watch over you as you read through my ramblings and try to make sense thereof
Additionally, this is my personal reflection on my own journey, so YMMV. This is not a guide, or an instruction manual; it is simply thoughts streamed out from my brain, through a keyboard, wired into a laptop, encoded into binary data, travelling hundreds or thousands of miles in huge underwater cables, to be delivered to your computer, decoded all the way back to human-readable form so you can read it and go, "get a load of this guy". Enjoy, or don't; completely up to you!
OSCP
How it started
[Record scratch] How did I get here? Well, remember how I asked you to grab your cup of coffee/tea? Now's probably a good time to do that as we are about to unpack an entire lifetime in a few or so lines of text. Don't worry though; here's a TL;DR that bypasses storytime
The early days
I remember the first time a PC ever made it into our home. Pretty exciting time, I must say! You've finally plugged everything in, got the 'Computers 101' briefing, and before you know it, you're listening to the sweet, sweet jingle that plays during the Windows installer. Life's good
Next thing you know, you're staring at a copy of Sub7. "What the heck is that?", you ask. Soon enough, you realize what you're looking at is a potentially dangerous piece of software that can be absolutely abused and misused by anyone in possession thereof. For me, personally, I believe this is where it all started
As I mentioned earlier, I'm a very curious individual by nature, and tech is a treasure trove for the keen-eyed. There are just way too many possibilities right at the tips of your fingers at an affordable cost. If you ask me, I'd much rather look into space as well because it is the ultimate treasure trove of curiosities, but..Well, that never came to pass, so here we are
If you, too, remember the early days of Windows, you surely recall that wallpaper titled "Inside Your PC", or something along those lines. It was like a picture of a motherboard or some such, and I loved it! "How did they come up with this stuff?", I'd ask often myself. To manufacture something so small that's capable of producing all these possibilities...That's just wow. I knew what I had to do; I set out to chase this dream growing up, trying to learn all I can about it, until it was time to decide what I wanted to do "when I grow up"; I chose Dentistry. Pretty anti-climactic, amirite?
Don't get me wrong, this was a 100% autonomous decision on my part, and it was a split against studying Computer Science. They say that it's no use crying over spilt milk, and you know what...They're absolutely correct. Everything that ever happens does so for a reason. That reason might manifest or make sense instantly, some time later, or simply never at all. I believe every decision I've ever made in my entire life has either directly or indirectly led me to where I am now, and I don't regret a thing. Actually, that's not entirely true. I do regret wasting time when I shouldn't have, but hey...Better late than never, right? So once again, here we are
Boredom, Butterflies, and Buffer Overflows
I get bored very easily. I am always looking for something to do; anything. It's around 2006-2008, the internet's full of new things; MySpace, Facebook, all these websites, forums, videogames...It's awesome! "What if, instead of going through every platform to do one thing, we had everything in one place in the form of a 1st-person game-like..thing? Basic idea was having this "virtual reality" platform where you get to roam around as a "player", and visit whichever place you want on the internet. Little did I know back then that this would later become the "Metaverse". I knew, roughly, what I wanted to do, but I didn't have the strength know-how to do it. I wanted to code, and that's all I ever wanted at that time. Out of boredom sometime way later, I'd try to learn C#. Microsoft had some wonderful courses back then, so I tried to learn using those. First time around, I'd finish up to 80% of the course, only to ditch it for a good few months. I'd try again, and manage to go through even less content. And again, until I just gave up
Fast-forward some time, I hear about this language everyone's talking about; Python. Python this, Python that...What's with all the fuss?
Oh, a relatively simple, yet powerful language that anyone can learn, you say? Where do I sign?
I started learning Python on and off sometime around 2014-2015. That was a key moment in laying some groundwork for what would follow. Fast-forward some more, and it's 2018-2019. I am in China, teaching EFL (English as a Foreign Language) to youngsters. Remember, dear reader; I did say this was going to be a collection of mostly disorganized information; no backsies now. So, I teach English in a country whose language I know of as much as the next toddler does; not much I can do in terms of, well, things to do. You can almost imagine how utterly bored I'd get. Thankfully, however, I had access to unrestricted high-speed internet. I'd go on to spend my time trying to learn more about Python, so I took another course. When I was done with the course, I obviously still got bored because neither did I put it to practice, nor had a real use case for it. Suddenly, I remember seeing ads (not in China) for a certain training company, offering courses that teach "Kali Linux". I remember getting tired of them pushing their ads all the time to the point I'd think "OMG shut up about Kali Linux already!"
I caved in. I started learning about Kali Linux. It was then that I started questioning everything I'd been doing online. Growing up, I'd always believed in the "inherent goodness of people". Boy, oh boy, have I been so naive.
You really think someone would go on the internet and lie?
Why, yes. They lie, lie, and then lie some more. As it turns out, that prince who promised you infinite riches was really just someone looking to make a quick buck off your personal information. The US Treasury does not hand out freebies. Everything's made up, and the points don't matter.
"Hold on a minute...It's all just a facade and everyone's evil?", I hear you ask. No, it's not all doom and gloom. Just like there are some whose sole purpose of existence is to make life hell for everyone else, there are also those who put up a good fight for what's right. I don't know about you, but I'm here for a good time, not for a long time. I'd rather leave a good mark that actually helps anyone than lead a purposeless life for a quick buck that disappears before it's even conceived. That being said, let's fast-forward some more
It's 2020, and I'd just come back from a quick trip to Japan. Pissed I couldn't finish what I started in China, royally pissed I couldn't start what I wanted to start in Japan as an outcome of the former not happening. I'm sitting there, looking for what to do next with my life, when I remember I'd done that course on Kali Linux. The internet's dark and full of terrors, and it could use all the help it could get, so I decided to go back full-circle. I started looking at different training providers, and roughly made a plan of action
I'm going to get X, Y, Z, then OSCP certified. I went for X certified, studied for Y, completely ditched Z, then decided to have a crack at PEN-200/OSCP
Late 2021, and I'm not entirely happy with Y. That's when I decided to stop wasting what little time I had and go with OffSec. I finally made the purchase, and started right away
Enter PEN-200
I've finally made it here. I have this PDF, and it contains all the information I'd need to pass the exam. I also have a tight 3-month window to finish everything, so no time to waste. Generally speaking, I don't like to ask that many questions, or any at all for that matter if possible. I decided to go it alone for the most part, even though I knew there was an amazing support network on OffSec's Discord server. In doing so, I forced myself to go out there looking for answers. Whenever I got stuck on anything, there was always a search engine to the rescue, and so many bad hot takes out there. I knew there and then that not only would I have to find the answers I seek, but also filter the resources I'd stumble upon based on quality
In teaching, there are two ways to deliver a piece of information: you either lead the person to finding answers (which are already out there) on their own, or you spoon-feed it to them. OffSec does the former, and in my humble opinion, I believe it's an extremely effective method of content/concept delivery. If you're given all the information at once on a silver platter, there's a very high chance you'll either forget about it, or take it as-is without ever questioning why or how it came to pass. This is what I loved about OffSec's methodology; the effort you exert trying to understand how things work really pays off if understanding is what you're after. If you're after the certificate and gg, by all means; go ahead and memorize the entire content front-to-back, but good luck ever being good at what you do. Anyone can read a walkthrough on performing SQLi attacks, but how many actually understand what's happening under the hood?
Picture this: you're an OSCP who landed a decent job somewhere reputable, and on your first task, you launched a kernel exploit on a production system without reading the little disclaimer that goes a little something along the lines of
Let's think about the consequences for a moment. Time is money, and bringing a client's prod down, however momentarily or long that might be, is definitely not going to fly without consequences. For starters, you'll make a whole lot of people angry. I don't know whether you like being yelled at, or get a professional hit where it hurts, but hey...It's up to you at this point. Do you want to be a glorified keyboard smasher, mindlessly trying everything until something sticks? Or do you want to be good at what you do?
This is where PEN-200 shines. You are supposed to have a pretty good idea about what you're doing so you don't risk damaging your client's assets, your own company's reputation, and your own self-esteem in the process. The course pushes you in that direction should you get the point behind why it's delivered the way it is
I started out copying and pasting things mindlessly, and that has definitely not done me any good. The more mistakes I made, the more I realized how much of my approach and thinking I needed to change. It was thanks to this course that I managed to change my ways, and it's been amazing ever since
OSCP
How it went
I failed 3 times before I passed the certification exam on the fourth attempt. I say so with pride because had it not been for these failures, I would have probably not changed my ways
I was pretty confident the first time around, and even managed to fall 10 points short of the passing score. Second time around, I fell 20 points short, and similarly for the third attempt. It was then when I took a little detour which, in hindsight, was somewhat ahead of its time. I started looking into Windows Internals, and this bit was useful in engaging my brain to ask questions. I found myself constantly jumping back and forth between different resources, adding more to what little I knew with every iteration
Come March 15 2023, and the course gets revamped in more ways than meets the eye. I especially loved the capstone exercises; the fact that the previously taught concepts are consolidated into a set of exercises that often encourage external research really goes to show just how much thought has been put into their making. In my opinion, it was the right balance between putting knowledge to application, and putting understanding to the test. It's when you're outside of your comfort zone that you begin to think of creative ways to get yourself out of an otherwise sticky situation, or in this case, into a system your heart so desires to break
For the next 6 months, I'd redo the entire course. A stupid mistake I'd made in all my previous attempts was completely doing away with Active Directory. Don't be like me; you just cannot escape one of the most prevalent domains in the industry and count on your comfort zone to save the day. Even if you manage to own all standalone targets on the exam, you will still need intimate knowledge of AD for your actual job. I paid the price for that mistake threefold, but also gained a whole lot of knowledge in the process, so it ultimately balanced out for me. You, however, should do the smart thing from the get-go
I paid more attention to AD that 4th time around, and it absolutely saved the day when it did
P.S anyone who tells you the exam was not covered in the course materials has no idea what they're talking about. I've done 4 different iterations of the exam, and I can tell you it is 100% covered in PEN-200. I never needed to undertake additional training from any of the available providers to pass the exam; I needed to stay true to myself, and actually address my shortcoming, rather than blame it on the training itself
As for the exam experience, everything that could go wrong did indeed go wrong. I lost 4 hours of my exam time due to unforseen circumstances. I didn't spend the time panicking, working on documentation, or what have you. I simply went over to my friend's, and decided to take my mind off all the stresses. There was nothing else I could do, and I knew worrying wouldn't help if not make things even worse for me. In doing so, I came back home with fresh ideas, and a different approach to attacking the targets
It all worked out, and I've earned the certification I've been after this whole time. Remember: failure's not the end, but the beginning to a deeper level of understanding
OSCP
Lessons learned
- Time management: don't leave documentation to the very last moment
- Do not skip Active Directory
- Like most things in life, it is important to know when to let go
- Eat properly
- Sleep properly
- Take breaks whenever you need them
- Don't beat yourself up about failure; it's there to reality-check and teach you a thing or two
- Don't shy away from asking good questions, but also don't skip the research part
- Leave no stone unturned, and don't skip the obvious
- Take your ego out for a long walk, and leave it on the way back home
- Understand that learning takes time, and things are going to click when you've understood them enough
Contacts
You can find me on any of the following channels: